Create a publishing page layout
This article explains what page layouts are and how they relate to publishing pages, master pages, and content types. This article also shows you how to create a page layout content type and a page layout, as well as how to use the browser to create a new publishing page that is based on your new page layout.
Important: In order for you to create a publishing page layout, your site must be located on a server running Microsoft Office SharePoint Server 2007, and publishing must be turned on in the top-level site of the site collection. Also, to create content types, you must have authoring permissions for that top-level site. If you find that you are unable to create a page layout, contact your server administrator.
In this article
What is publishing?
Office SharePoint Server 2007 makes it easy for users to upload documents to document libraries and add tabular information to lists. However, when you want to publish longer or more unstructured information in a Web page format, and you want the content owners to be able to produce the pages themselves, you can use publishing pages to enable browser-based page editing by authorized contributors. For example, in a team that manages a news Web site, it is easier for reporters to submit articles if they can enter them via their Web browsers. At the same time, this arrangement can be useful in standardizing the information that each writer submits.
Each publishing page is associated with a page layout. The page layout controls the look and feel of the publishing pages that are created from it. It also defines the fields where contributors can enter various types of article content, such as article titles, graphics, quotations, and unstructured text.
Publishing pages use the publishing feature in Office SharePoint Server 2007. Publishing automates the workflow process, making it easy to use the browser to create new pages that are based on a page layout. When the page is created and edited, the content owner submits it for review. When the reviewer approves the article and publishes it, the page becomes visible to other users on the site.

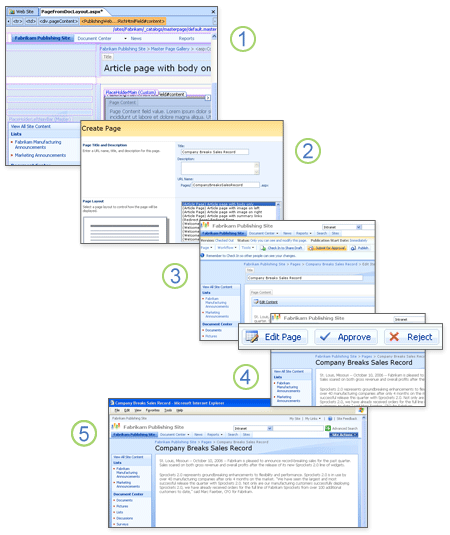
1. A Web developer creates and customizes the page layout in Office SharePoint Designer 2007.
2. A content owner creates a new page based upon one of the available page layouts (in the browser).
3. The content owner completes the page in the browser, and then submits it for approval.
4. An authorized approver edits and then approves or rejects the article.
5. Upon approval, the article is published.
To specify what content belongs in any one page layout, you can create your own content type. A content type identifies the fields on the page where page authors enter content. By using a content type, you can choose which page fields and content fields are available in a page layout and therefore which fields are available on publishing pages that are created from that page layout for content owners to enter content in. Page fields define what content should appear on a page, what metadata is associated with the page, and which type of control each field should appear as (such as a single line of text, a hyperlink, or a picture). Content fields define the content on the page that is to be supplied by the contributor. Data entered in content fields is stored in SharePoint list items in the Pages document library. When a visitor views the publishing page, content is pulled from the list and displayed in the field controls.
Using publishing pages, you can automate the input of information and specify exactly how that information is displayed. Here are some of the key elements that make up publishing.
| Element and description | Where it is created or edited | Example |
| Publishing page This is a page that is created from a publishing page layout and stored in the Pages document library in the site or subsite. | Browser only | Reporter browses to the site and then clicks Publishing Page on the Create page. The reporter must choose a page layout to specify the look and organization of the page. |
| Publishing page layout This is a page template that controls how the page looks and exactly which elements (such as lists and libraries) should be present on the page. The publishing page layout can be attached to a master page that defines its layout and formatting. Page layouts and master pages are stored in the Master Page Gallery of the top-level site. | Browser or Office SharePoint Designer 2007 | The Web designer creates an attractive page layout that the reporters can choose when they create a new page based on a publishing page via the browser. This page layout can use graphics or notes and can specify which content types are used on pages that are created by using this page layout. |
| Master page This page defines the layout, fonts, and formatting for the pages that are attached to it. Master pages and page layouts are stored in the Master Page Gallery of the top-level site. | Office SharePoint Designer 2007 | The Web designer attaches a master page to the publishing page layout so that the layout uses the same fonts and formatting that the rest of the site does. |
| Content type This controls how content is entered and displayed. Publishing content types identify what fields are available on the publishing pages. Content types are defined in the top-level site and are stored there in the Content Types Gallery. | Browser only | The Web designer creates a content type named Articles that includes fields for the following content: the article title, the body text, an uploaded photo, a photo caption, a photographer name, a source name, and links to more information. |
Create a page layout content type
A content type defines how the contributor should enter each type of content, how that content is displayed, and how it is handled in a workflow environment. For example, in the earlier scenario where a team of reporters submits articles for review by an editor, you might want to require that a Contact name be submitted with every article, or to associate all of the articles with an existing workflow. You can even add new fields, such as a Source Name field, and specify whether to hide that field in all forms. You create content types in order to make sure that certain information is submitted with each article, that the article is associated with a workflow, that key fields are included, and more.
Content types are added to the top-level site. Thereafter, they are available to all of the subsites in that site collection. To create or edit content types, you must have authoring permissions on the top-level site. Following are the steps for creating a new content type:
-
In the browser, do one of the following:
-
From any team site, on the Site Actions menu, click Site Settings.
-
From any portal area, click Site Actions, point to Site Settings, and then click Modify All Site Settings.
-
-
On the Site Settings page, under Site Collection Administration, click Go to top level site settings.
Alternatively, you can browse directly to http://your_top_level_site/_layouts/settings.aspx, where your_top_level_site is the URL for your root site, such as fabrikamweb for the http://fabrikamweb site.
-
Under Galleries, click Site content types.
-
On the Site Content Type Gallery page, on the menu bar, click Create.
-
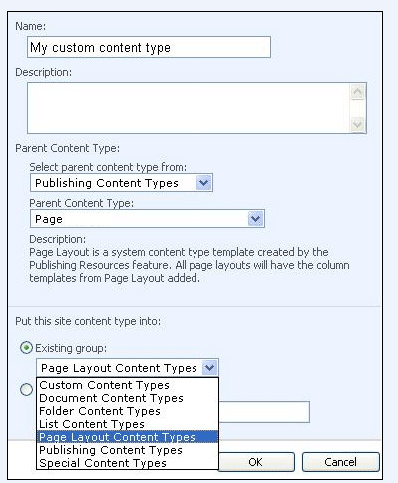
In the Name box, type the name for this content type.
This is the name that appears in the Content types list in step 6 in the following section, Create a page layout.
-
In the Description box, type a description for this content type.
-
In the Select parent content type from list, click Publishing Content Types.
-
In the Parent Content Type list, click Page.
-
Under Put this site content type into, click Existing group, and then click Page Layout Content Types in the list.

Note: To make your new content type available for page layouts that you create or customize in Office SharePoint Designer 2007, put the content type in the Page Layout Content Types group, where it will be easy to locate. The next section shows you how to use your new content type in Office SharePoint Designer 2007.
-
Click OK.
The Site Content Type page opens.
Use the options on the Site Content Type page, which are described as follows, to customize how the information is entered, displayed, or handled in a workflow environment.
Note: Make sure to set up a content type field for each field that you want to appear on the publishing page.
-
Settings Use these options to make overall changes to suit your needs. For example, click Workflow to associate a workflow with this content type.
-
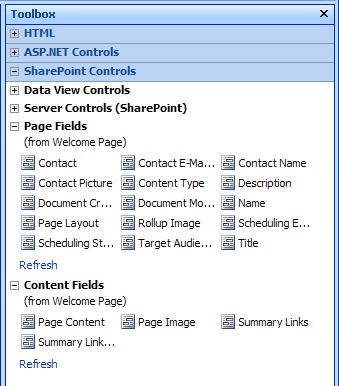
Columns Click the Name column, and then you can change the type of field (such as hyperlink, text box, or choice box) or status (such as required, optional, or hidden). The columns that you set up here become available as fields on your publishing page, so be sure to set up all that you need. The columns appear in the Toolbox task pane in Office SharePoint Designer 2007 when you edit the page layout. When you open the page layout in Office SharePoint Designer 2007, you will notice that required fields appear on the page, fields that are inherited from the Page content type appear in the Page Fields sections of the Toolbox, and fields from the specific content type that you created appear in the Content Fields section of the Toolbox.

-
Add from existing site columns Use this option to add data fields from an existing list of available fields.
-
Add from new site column Use this option to add your own data fields (columns).
-
Column order Use this option to change the order in which items are presented to the users who submit information on the input form.
Create a page layout
Now that you have created a new content type, you can create a page layout from it. The fact that you first created a custom content type ensures that the pages that are created from this page layout have all of the columns that you specified available to them.
-
In Office SharePoint Designer 2007, open the Web site in which you want to create the page layout.
-
On the File menu, point to New, and then click SharePoint Content.
-
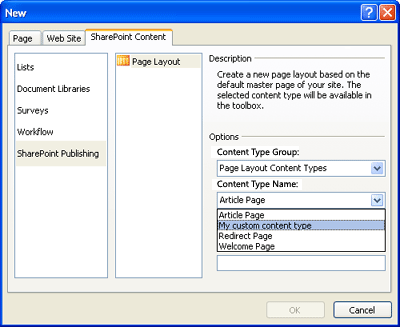
In the New dialog box, click SharePoint Publishing.
Note: If this option is not listed, it is probably because the site in which you are working does not have publishing turned on in Office SharePoint Server 2007. If you have authoring permissions on the top-level site, you can turn on publishing for the browser by pointing to Administration on the Office SharePoint Designer Site menu, and then clicking Administration Home. Under Site Administration, click Site features, and then click Activate next to the Office SharePoint Server Publishing option. After you perform these steps, return to Office SharePoint Designer 2007 and start over with step 1, but this time click Refresh on the View menu between step 1 and step 2.
-
Click Page Layout.
-
Under Options, in the Content Type Group list, click Page Layout Content Types.
-
In the Content Type Name list, click the content type that you want.

If you created a content type in the previous section, and if you put your content type in the Page Layout Content Types group, you should see that content type in this list. Learn how to create a content type in the previous section, Create a page layout content type.
-
In the URL Name box, type a name for this page layout.
This becomes the file name of the page layout. For example, if you type MyPageLayout in this box, the page layout file name will be MyPageLayout.aspx.
-
In the Title box, type a title for this page layout.
This becomes the page layout title that appears in the list of available page layouts when you create a new publishing page on the Create page in the browser. You want to give the page layout a title that is recognizable to users who create publishing pages that are based on this page layout.
-
Click OK.
The page layout opens in Design view. By default, it is attached to the default Master Page. To learn how to customize the page layout, see the article Customize a publishing page layout.
Note: Site page layouts in Office SharePoint Server 2007 use the publishing master page, which may be different from default.master.
The new page layout is created in the top-level site. You can verify that it was created by browsing to the Master Page Gallery at http://your_top_level_site/_catalogs/masterpage/Forms/AllItems.aspx where your_top_level_site is the name of the top-level site. Your new page layout should be listed on this page.
Create a publishing page from your new page layout
You can create a new publishing page that uses a specified page layout by following these steps:
-
In the browser, browse to any page in your site.
-
On the Site Actions menu, click View All Site Content.
Note: If this option is not listed, it is probably because the site in which you are working does not have publishing turned on in Office SharePoint Server 2007. If you have authoring permissions on the top-level site, you can turn on publishing for the browser by pointing to Administration on the Office SharePoint Designer Site menu, and then clicking Administration Home. Under Site Administration, click Site features, and then click Activate next to the Office SharePoint Server Publishing option.
-
On the menu bar, click Create.
-
Under Web Pages, click Publishing Page.
-
In the Title box, type a name for this page.
This is the title that appears in the title bar of the browser when you view the new page.
-
In the Description box, type a description for this page. (This step is optional.)
-
In the URL Name box, type a file name for the new page.
This becomes the file name of the page layout. For example, if you type MyPageLayout in this box, the page layout file name will be MyPageLayout.aspx.
-
In the Page Layout list, click the name of the page layout that you created in the previous section Create a page layout, and then click Create.
The new page is created. You can edit the page in the browser, or you can edit the page layout from which it was created. For more information, see the article Customize a publishing page layout.
Note: At this point, the page has been created, but it does not become visible on the site until it is published. If you do not have rights to publish the page, it is submitted for approval. Upon approval and publishing, the page becomes visible to all site visitors.
No comments:
Post a Comment