Change email account settings
You can change a variety of different settings for your email including:
-
Your password
-
Your profile picture
-
Your name and email address (for POP and IMAP accounts only)
Change your password with your email provider
If you forget your password, think your password may be compromised, or your password has expired, you'll need to first change your password with your email provider, for example Office 365, Outlook.com, Gmail, Yahoo, or Xfinity, and then update Outlook with the new password.
-
For other email providers, go to the provider's website, for example Gmail or Yahoo, and follow their instructions for changing your password.
Update your password in Outlook
Once you've changed your password with your email provider, you can update Outlook with your new password.
Office 365, Outlook.com, and Exchange accounts
Outlook will prompt you to update your password. When you see the Enter Password prompt, type your new password, and optionally, select the Remember Password checkbox.
Gmail, Yahoo, and other email accounts
-
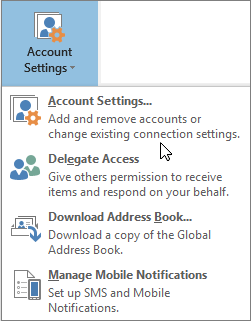
In Outlook, choose File > Account Settings > Account Settings.
-
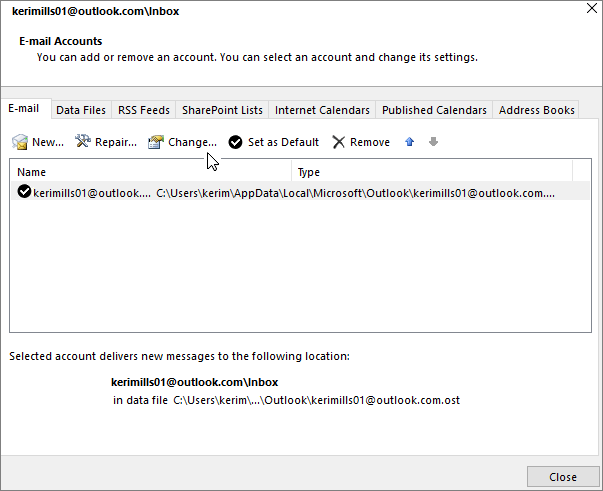
Select the email account you want to change, and then choose Change.
-
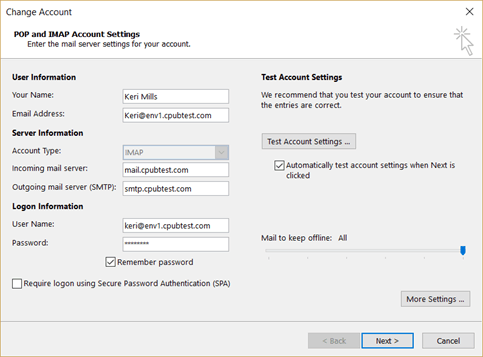
In the Change Account window, update your password.
-
Choose Close after Outlook tests your account settings, then Finish > Close to return to Outlook.
Change your photo
-
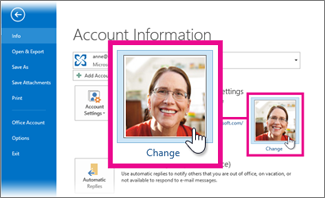
Click File, and then under your photo, click Change.
-
Click the Browse button, locate and select the photo you want to use, and then click Open.
If you're prompted to sign in to Outlook Web App, you'll see the Browse button after you sign in.
Tip: Outlook can use .jpg, .png, .gif, .bmp, or .tif photo file formats.
The new photo may take a few minutes to show up in contact cards.
Change other account settings
- What type of email account do you have?
- Exchange, Office 365, or Outlook.com
- Gmail, Yahoo, iCloud, or other email account
For Exchange, Outlook.com, and Office 365 accounts, you can only change a few specific settings. You can open additional mailboxes, turn on or turn off Cached Exchange Mode, control the download of shared folders, and change your Outlook Data File settings.
Turn Cached Exchange Mode on or off
-
In Outlook, choose File > Account Settings > Account Settings.

-
Select the email account you want to change, and then choose Change.

-
Check or uncheck the Use Cached Exchange Mode box.
-
Choose Next > Finish > Close to return to Outlook.
Open additional mailboxes
-
In Outlook, choose File > Account Settings > Account Settings.

-
Select the email account you want to change, and then choose Change.

-
Choose More Settings > Advanced.
-
Choose Add, then enter the mailbox name you want to add and choose OK.
-
Choose OK > Finish > Close to return to Outlook.
Download shared folders
-
In Outlook, choose File > Account Settings > Account Settings.

-
Select the email account you want to change, and then choose Change.

-
Choose More Settings > Advanced.
-
Under Cached Exchange Mode Settings, check or uncheck the box for Download shared folders, then choose OK.
-
Choose OK > Finish > Close to return to Outlook.
Compact your Outlook data file
-
In Outlook, choose File > Account Settings > Account Settings.

-
Select the email account you want to change, and then choose Change.

-
Choose More Settings > Advanced.
-
Choose Outlook Data File Settings > Compact Now.
-
Choose OK twice, then Finish > Close to return to Outlook.
For other types of accounts, including all POP and IMAP accounts, Gmail, Yahoo, iCloud, and other personal email accounts, you can change a variety of settings, including your name, server settings, your default reply-to email address, and sent item settings.
Note: You can't change your account type from POP to IMAP. You'll need to add a new account. For example, if you have an email account setup to use POP, you'll have to add the account again and choose IMAP during the setup process. After that, copy the folders from the POP account to the IMAP account, then delete the POP account.
For more information, see Outlook email setup and Remove or delete an email account from Outlook.
Change the name people see when they receive your messages
For most types of accounts, you can choose the name that appears when someone receives your email message.
-
In Outlook, choose File > Account Settings > Account Settings.

-
Select the email account you want to change, and then choose Change.

-
In the Change Account window, update your name.

-
Choose Close after Outlook tests your account settings, then Finish > Close to return to Outlook.
Change your email address or server settings
When you change your email address, be sure to double-check your user name. Outlook won't update your user name automatically.
-
In Outlook, choose File > Account Settings > Account Settings.

-
Select the email account you want to change, and then choose Change.

-
In the Change Account window, update your email address, username, incoming mail server, or outgoing mail server.

-
Choose Close after Outlook tests your account settings, then Finish > Close to return to Outlook.
Change other account settings
There are many different settings you can update for your email accounts. The More Settings button in the Change Account window allows you to control the email address your recipients use when they reply to you, the name of your account, where different types of items are stored, and your email server encryption and port settings.
Note: Not all email accounts will allow you to change all settings. If a setting you want to change is grayed out or unavailable, contact your administrator or Internet Service Provider (ISP).
-
In Outlook, choose File > Account Settings > Account Settings.

-
Select the email account you want to change, and then choose Change.

-
Choose More Settings.
-
The General tab allows you to change the name of your account. This is what you see in the Outlook folder list. You can also enter your organization and the email address you want your recipients to reply to when you send them mail.
-
The Sent Items tab allows you to choose a folder where your sent items will be saved, or turn off the saving of sent items.
-
The Deleted Items tab controls what happens when you delete a message. You can move deleted messages to a specific folder or mark them for deletion, but only delete when the mailbox is purged.
-
The Drafts tab allows you to specify a folder where your drafts will be saved.
-
The Junk Email tab allows you to specify a folder where junk emails are moved to.
-
The Outgoing Server tab allows you to control the authentication settings for your outgoing server. In most cases, your outgoing server will use the same settings as your incoming mail server.
-
The Advanced tab allows you to change the email server port numbers, the type of encrypted connection, the server timeouts, and the root folder path.
-
-
Once you've updated your settings, choose OK, then Next.
-
Choose Close after Outlook tests your account settings, then Finish > Close to return to Outlook.
If you forget your password, think your password may be compromised, or your password has expired, you'll need to first change your password with your email provider, for example Office 365, Outlook.com, Gmail, Yahoo, or Xfinity, and then update Outlook with the new password.
Change your password with your email provider
-
For other email providers, go to the provider's website, for example Gmail or Yahoo, and follow their instructions for changing your password.
Update your password in Outlook
Once you've changed your password with your email provider, you can update Outlook with your new password. Select the type of account you have for detailed instructions.
Exchange, Office 365, or Outlook.com
For Office 365, Outlook.com, and Exchange accounts, Outlook will prompt you to update your password. When you see the Enter Password prompt, type your new password, and optionally, select the Remember Password checkbox.
Gmail, Yahoo, or other email account
-
In Outlook, choose Tools > Account Settings.
-
Select the email account you want to change, and then choose Change.
-
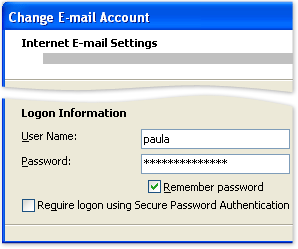
In the Change E-mail Account window, update your password.
-
Optionally, select the Remember password checkbox.
Change other Exchange account settings
-
On the Tools menu, click Account Settings.
-
Select the Exchange, Office 365, or Outlook.com account, and then click Change.
-
To turn on or turn off Cached Exchange Mode, select or clear the Use Cached Exchange Mode check box.
More information about Cached Exchange Mode
When you use Cached Exchange Mode, a copy of your mailbox is stored on your computer. This copy is frequently synchronized with the server running Exchange and provides quick access to your data.
If you are unable to turn on Cached Exchange Mode, one or more of the following might apply:
-
Your administrator may have disabled this functionality Exchange administrators can disable this feature in Microsoft Office Outlook 2007. For more information, contact your Exchange administrator. Additional information for administrators is in the Microsoft Office Resource Kit.
-
You have installed Microsoft Terminal Services Cached Exchange Mode uses an Offline Folder file (.ost). This file cannot be used if you have installed Microsoft Terminal Services for Microsoft Windows Server 2003. However, installation of Terminal Services Client or the Remote Desktop Connection client does not prevent access to Cached Exchange Mode.
-
-
Click More Settings.
-
You can change the following settings:
-
On the General tab, under Exchange Account, type a name that will help you identify the account, for example, My Work E-mail.
-
On the General tab, under When starting, click how you want the connection state to be determined when Outlook starts.
-
On the Advanced tab, you can specify additional Exchange mailboxes to open. This can be used if another person has given you access to some of his or her Exchange folders or someone has granted you Delegate Access permissions.
-
To reduce the size of your .ost file, on the Advanced tab, click Offline Folder File Settings, and then click Compact Now.
-
Security settings can be changed on the Security tab. You should not adjust these settings unless instructed to do so by your Exchange administrator.
-
To turn on Outlook Anywhere, on the Connection tab, under Outlook Anywhere, select the Connect to Microsoft Exchange using HTTP check box, and then click Exchange Proxy Settings. Find a link to more information about Outlook Anywhere in the See Also section.
-
Remote mail settings can be changed on the Remote Mail tab.
-
Change other POP3 or IMAP account settings
Change the way your name appears to others
Change your e-mail server address
Change the way your name appears to others
-
On the Tools menu, click Account Settings.
-
Select the e-mail account that you want to change, and then click Change.
-
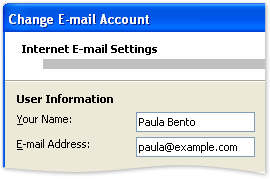
Under User Information, in the Your Name box, type your name the way you want it to appear to other people.
Change your e-mail address
Occasionally, e-mail domain names might change. This means that a person with the e-mail address of someone@example.com would need to change example.com to something new as specified by the ISP.
For example, say your current e-mail address is paula@contoso.com. Your ISP, Contoso, Ltd., notifies you that it merged with another company and will change your e-mail address to paula@example.com.
-
On the Tools menu, click Account Settings.
-
Under User Information, in the E-mail Address box, type the complete e-mail address that was assigned by your e-mail administrator or ISP. Make sure to include the user name @ domain name, for example, paula@example.com.

-
Click More Settings.
-
On the General tab, under Other User Information, if you already specified an e-mail address in the Reply e-mail address box, make sure that it is still correct. If you leave Reply e-mail address blank, when people reply to your e-mail, the address that you entered in step 2 is used.
Change your e-mail server address
On rare occasions, the server that you connect to in order to receive and send e-mail might change.
For example, say your current POP3 and SMTP e-mail servers are incoming.example.com and smtp.example.com. Your ISP notifies you that it has completed a server upgrade and will change your POP3 e-mail server to mail.example.com.
-
On the Tools menu, click Account Settings.
-
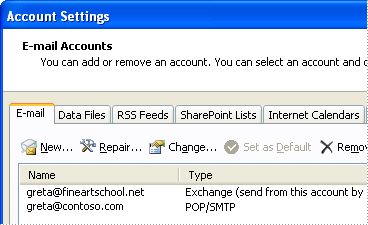
On the E-mail tab, click the e-mail account that you want, and then click Change.
-
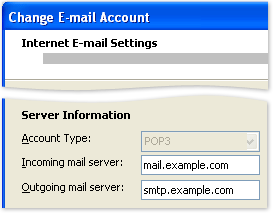
Under Server Information, in the Account Type list box, choose POP3, IMAP, or HTTP.
Tip: Your ISP can tell you the account type that you have, but POP3 is by far the most common type.
-
Under Server Information, in the Incoming mail server box, type the complete name of the server provided by your ISP or mail administrator. Often this is mail. followed by your domain name, for example, mail.example.com.
-
Under Server Information, in the Outgoing mail server box, type the complete name of the server provided by your ISP or mail administrator. Often this is smtp. followed by your domain name, for example, smtp.example.com.
Additional settings
-
On the Tools menu, click Account Settings.
-
Select the account you want to change.
-
Click More Settings, and then change the following:
-
On the General tab, under Mail Account, type a name that will help you identify the account, for example, My Home ISP E-mail.
-
If you're using an IMAP e-mail account, you can control when items are deleted. Under Purge Options, select the Purge items when switching folders while online check box.
-
On the Folders tab, you can choose where mail that you send from this account is saved.
-
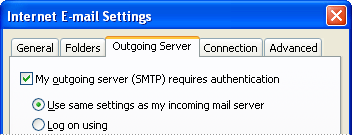
On the Outgoing Server tab, you can specify whether your outgoing SMTP mail server requires authentication. This is almost always required if your ISP allows you to send e-mail messages through your ISP e-mail account when you are not directly connected to the ISP network, for example, if you want to send an e-mail message with your home ISP e-mail account and you are away from home connected to your work network.
-
The Connection tab is where you configure how Outlook connects to the mail server.
-
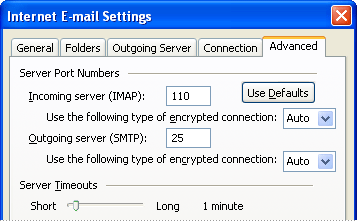
If you're instructed by your ISP or e-mail administrator to change the port numbers or encryption method used by your e-mail server, you can make the change on the Advanced tab.
-
How to Change AOL Password On Iphone
ReplyDeleteAol Mail Change Password
Yahoo Support Phone Number USA
ReplyDeleteYahoo Mail Phone Number
Yahoo customer service chat representatives are committed to providing high-quality services through the use of cutting-edge technology. Contact Yahoo Mail Support All of this is a support network that delivers on time and focuses on results. Professionals adhere to international standards and strive to provide the highest quality service. There are several reasons why this team is the best partner for billions of email account customers and web browsers.
ReplyDeletePhone Number for Yahoo com Customer Service
Yahoo Chat Support
ReplyDeleteIf you are problem with Aol Email Sign Up so do not worry we will help you solve this problem
AOL comlogin
AOL Email Sign Up
AOL download for Windows 10
ReplyDeleteAOL Gold Sign In