Automatically insert text
In Word you can insert text automatically with either blocks of preformatted text from your AutoText gallery, or with words, phrases, or sentences that Word automatically completes after you've typed only a few characters.
Note: If you're looking for information about the AutoFormat settings, such as automatic formatting of hyphens and dashes, fractions, hyperlinks, quotation marks, and bulleted or numbered lists, see Configure or turn off automatic text formatting (AutoFormat).
Add text to the AutoText gallery
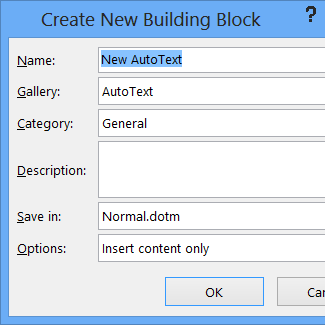
AutoText entries are stored as building blocks. To create a new entry, use the Create New Building Block dialog box.
-
In your document, select the text that you want to add to your gallery of AutoText entries.
-
On the Insert tab, in the Text group, click Quick Parts, point to AutoText, and then click Save Selection to AutoText Gallery.
-
Fill out the information in the Create New Building Block dialog box. Most of the default values are fine, but including a unique name and description makes the AutoText easier to use.

-
Name Type a unique name for the AutoText building block.
-
Gallery Select the AutoText gallery.
-
Category Select the General category, or create a new category.
-
Description Type a description of the building block.
-
Save in Click the name of the template in the drop-down list. For example, click Normal.
A template must be open to be displayed in the drop-down list of template names.
-
Options Choose one of the following:
-
Select Insert content in its own page to place the building block on a separate page, set off from the rest of your content with page breaks.
-
Select Insert content in its own paragraph to make the content into its own paragraph, even if the user's cursor is in the middle of a paragraph.
-
Select Insert content only for all other content.
-
-
Enter text using AutoText
-
On the Insert tab, click Quick Parts, and then point to AutoText.
-
Click the entry that you want to add.
Add text to the AutoCorrect list
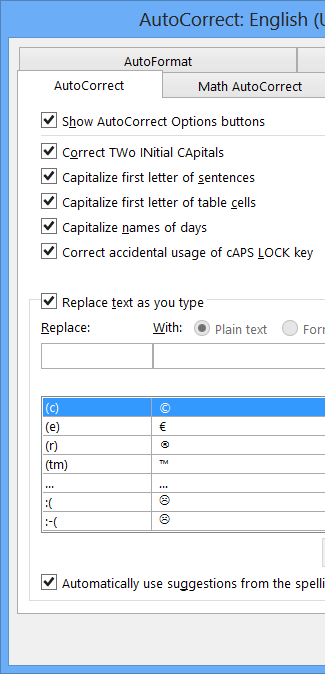
By adding text entries in the AutoCorrect dialog box, you can configure Word to automatically complete a word, phrase, or sentence after you've typed only a few characters.
-
Select the text you want to automatically insert.
-
Click the File tab.
-
Click Options.
-
Click Proofing.
-
Click AutoCorrect Options, and then click the AutoCorrect tab.

-
Select the Replace text as you type check box, if it is not already selected.
-
Under Replace, type the characters that you want to use for your automatic text. The text that you selected in your document should appear under With.
The AutoCorrect list is global across the Office programs that support this feature. When you add or delete a word from the list in one program, the other Office programs are also affected.
Enter text using AutoCorrect
As you type in your document, the text in the left column of the AutoCorrect list, under Replace, is automatically replaced with the text in the right column, under With.
See also
Configure or turn off automatic text formatting (AutoFormat)
Choose AutoCorrect options for capitalization, spelling, and symbols
Add an AutoText entry to your document
-
On the Insert tab, click Quick Parts, and then point to AutoText.
-
Click the entry that you want to add.
Create a new AutoText entry
In Word 2010, AutoText entries are stored as building blocks. To create a new entry, use the Create New Building Block dialog box.
-
In your Word document, select the text that you want to add to your gallery of AutoText entries.
-
On the Insert tab, in the Text group, click Quick Parts, point to AutoText, and then click Save Selection to AutoText Gallery.
-
Fill out the information in the Create New Building Block dialog box:
-
Name Type a unique name for the AutoText building block.
-
Gallery Select the AutoText gallery.
-
Category Select the General category, or create a new category.
-
Description Type a description of the building block.
-
Save in Click the name of the template in the drop-down list. For example, click Normal.
A template must be open to be displayed in the drop-down list of template names.
-
Options Choose one of the following:
-
Select Insert content in its own page to place the building block on a separate page with page breaks before and after the building block.
-
Select Insert content in its own paragraph to make the content into its own paragraph, even if the user's cursor is in the middle of a paragraph.
-
Select Insert content only for all other content.
-
-
Migrate Word 2003 AutoText entries into Word 2010
If you used AutoText entries in Microsoft Office Word 2003, you can manually migrate them into Word 2010. AutoText entries that you created in Word 2007 are migrated automatically.
-
Browse to the Normal11.dot file by doing one the following:
-
If your computer is running Windows 7 Open Windows Explorer, and browse to C:\Users\user name\AppData\Roaming\Microsoft\Templates.
Note: If you don't see the AppData folder in Windows Explorer, click Organize, click Folder and search options, click the View tab, and click Show hidden files, folders, and drives. Then close and reopen Windows Explorer.
-
If your computer is running Windows Vista Open Windows Explorer, and browse to C:\Users\user name\AppData\Roaming\Microsoft\Templates.
Note: If you don't see the AppData folder in Windows Explorer, click Organize, click Folder and search options, click the View tab, and click Show hidden files, folders, and drives. Then close and reopen Windows Explorer.
-
If your computer is running Windows XP Open Windows Explorer, and then browse to C:\Documents and Settings\user name\Application Data\Microsoft\Templates.
Note: If you don't see the Application Data folder in Windows Explorer, click the Tools menu, click Folder Options, click the View tab, and click Show hidden files and folders. Then close and reopen Windows Explorer.
-
Right-click Normal11.dot, and then click Open.
-
Click the File tab.
-
Click Save As.
-
In the Save As dialog box, browse to the correct location:
-
If your computer is running Windows 7 C:\Users\user name\AppData\Roaming\Microsoft\Word\Startup
-
If your computer is running Windows Vista C:\Users\user name\AppData\Roaming\Microsoft\Word\Startup
-
If your computer is running Windows XP C:\Documents and Settings\user name\Application Data\Microsoft\Word\Startup
Note: You might need to create the Startup folder by clicking New Folder.
-
In the File name box, type AutoText.
-
In the Save as type list, click Word Macro-Enabled Template.
-
Click Save.
If prompted, click OK.
-
Exit Word.
Add text automatically as you type
To add text entries that are inserted automatically when you type a specific set of characters, you need to use the AutoCorrect dialog box.
-
Click the File tab.
-
Click Options.
-
Click Proofing.
-
Click AutoCorrect Options, and then click the AutoCorrect tab.
-
Select the Replace text as you type check box, if it is not already selected.
-
Under Replace, type the characters that you want to use for your automatic text.
The text that you selected in your document should appear under With.
In Microsoft Office Word 2007, you can add AutoText entries in the AutoText gallery.
Or, if you want to add text automatically when you type a few characters, you add text entries in the AutoCorrect dialog box.
Add AutoText from a gallery
To add AutoText from the gallery, you need to add that gallery to the Quick Access Toolbar. After you add it, you can create new entries, and you can migrate you entries from Word 2003 into the gallery.
Add AutoText to the Quick Access Toolbar
-
Click the Microsoft Office Button
 , and then click Word Options.
 -
Click Customize.
-
In the list under Choose commands from, click All Commands.
-
Scroll through the list of commands until you see AutoText.
-
Click AutoText, and then click Add.
The AutoText button now appears in the Quick Access Toolbar. Click AutoText to choose from a gallery of AutoText entries.
Create a new AutoText entry
-
In your Word document, select the text that you want to add to your gallery of AutoText entries.
-
In the Quick Access Toolbar, click AutoText, and then click Save Selection to AutoText Gallery.
-
Fill out the information in the Create New Building Block dialog box:
-
Name Type a unique name for the building block.
-
Gallery Select the gallery that you want the building block to show up in.
-
Category Select a category, such as General or Built-In, or create a new category.
-
Description Type a description of the building block.
-
Save in Click the name of the template in the drop-down list.
-
A template must be open to be displayed in the drop-down list of template names.
-
Options Choose one of the following:
-
Select Insert content in its own page to place the building block on a separate page with page breaks before and after the building block.
-
Select Insert content in its own paragraph to make the content into its own paragraph, even if the user's cursor is in the middle of a paragraph.
-
Select Insert content only for all other content.
-
-
For information about using the Building Blocks Organizer to create and manage AutoText entries, see Use Quick Parts and AutoText in Word.
Migrate Word 2003 AutoText entries into Word 2007
If you used AutoText entries in Microsoft Office Word 2003, you can manually migrate them into Word 2007.
-
Copy the Normal11.dot file to the Document Building Blocks folder by doing one the following:
-
If your computer is running Windows Vista Open Windows Explorer, and then copy the Normal11.dot template from C:\Users\user name\AppData\Roaming\Microsoft\Templates to C:\Users\user name\AppData\Roaming\Microsoft\Document Building Blocks.
-
If your computer is running Windows XP Open Windows Explorer, and then copy the Normal11.dot template from C:\Documents and Settings\user name\Application Data\Microsoft\Templates to C:\Documents and Settings\user name\Application Data\Microsoft\Document Building Blocks.
-
-
In Office Word 2007, open the Normal11.dot template.
-
Save the file as AutoText.dotx.
When prompted, click Continue.
-
Click the Microsoft Office Button
 , and then click Convert.
-
When prompted, click OK.
The file upgrades to the new file format.
-
On the Insert tab, in the Text group, click Quick Parts, and then click Building Blocks Organizer.
-
In Building Blocks Organizer, select an AutoText entry, click Edit Properties, and then select the appropriate gallery in the Gallery list.
-
In the Save in list, click Normal.dotm, and then click OK.
-
Repeat for each AutoText entry that you want to use in Office Word 2007.
Add text automatically as you type
To add text entries that are inserted automatically when you type a specific set of characters, you need to use the AutoCorrect dialog box.
-
In your Word 2007, document, select the text that you want to add automatically.
-
Click the Microsoft Office Button
 , and then click Word Options.
 -
Click Proofing.
-
Click AutoCorrect Options, and then click the AutoCorrect tab.
-
Select the Replace text as you type check box, if it is not already selected.
-
Under Replace, type the characters that you want to use for your automatic text.
The text that you selected in your document should appear under With.
No comments:
Post a Comment