Simplify data entry with a data form
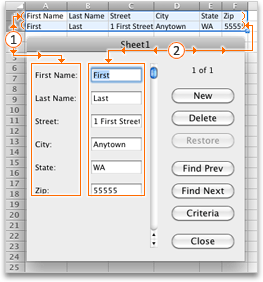
A data form provides a convenient way to enter or display one complete row of information in a range or table. The data form displays all the columns so that you can see all the data for a row at one time. This is especially useful when you have a range or table that has more columns of data than can be viewed on the screen.
Before you create a data form, you must add labels to the top of each column in the range or table. Excel uses these labels to create fields on the form.

 Column labels become field names.
 Data that you enter in each field on the form is put in the next blank row.
Important: You can't use a data form to add, change, or delete a formula.
Do any of the following:
Add data by using a data form
-
In the range or table that you want to add the row to, click any cell.
-
On the Data menu, click Form.
-
Click New.
-
Type the information for the new row.
Press TAB to move to the next field in the form.
-
When you finish typing data for this row, press RETURN to add the row to the bottom of the list.
-
When you finish adding rows, click Close to add the last new row and close the data form. You do not have to press RETURN for the last row.
Notes:
-
Excel automatically adds the row when you move to another record or close the data form.
-
Cells that contain formulas display the results of the formula and cannot be changed in the data form.
-
Change data in a row
-
In the range or table that contains the data that you want to change, click any cell.
-
On the Data menu, click Form.
-
Click New.
-
In the data form, click Find Prev or Find Next, or move the scroll bar to find the row that you want to change.
-
Change the data in the row.
Tip: To move to the next field in the form, press TAB . To move to the previous field, press SHIFT + TAB .
-
After you change the data, press RETURN to update the row.
Excel automatically moves to the next row.
Tip: Before you press RETURN , you can undo any changes by clicking Restore.
Delete a row
-
In the range or table that you want delete a row from, click any cell.
-
On the Data menu, click Form.
-
Click New.
-
In the data form, click Find Prev or Find Next, or move the scroll bar to find the row that you want to delete.
-
Click Delete.
Caution: Excel prompts you to confirm the operation. You can't undo a row deletion after you confirm it.
Any rows that follow the deleted row shift up.
No comments:
Post a Comment