Consolidate data in multiple worksheets
To summarize and report results from separate worksheets, you can consolidate data from each into a master worksheet. The worksheets can be in the same workbook as the master worksheet or in other workbooks. When you consolidate data, you are assembling data so that you can more easily update and aggregate as needed.
For example, if you have an expense worksheet for each of your regional offices, you might use consolidation to roll these figures into a master corporate expense worksheet. This master worksheet might also contain sales totals and averages, current inventory levels, and highest selling products for the entire enterprise.
Tip: If you frequently consolidate data, it might help to base your worksheets on a worksheet template that uses a consistent layout. To learn more about Templates, see: Create a template. This is also an ideal time to set up your template with Excel tables.
There are two ways to consolidate data: by Category or by Position.
Consolidation by position: When the data in the source areas is arranged in the same order and uses the same labels. Use this method to consolidate data from a series of worksheets, such as departmental budget worksheets that have been created from the same template.
Consolidation by category: When the data in the source areas is not arranged in the same order but uses the same labels. Use this method to consolidate data from a series of worksheets that have different layouts but have the same data labels.
-
Consolidating data by category is similar to creating a PivotTable. With a PivotTable, however, you can easily reorganize the categories. If you want a more flexible consolidation by category, consider creating a PivotTable instead.
Note: The examples in this article were created with Excel 2016, so your view might differ depending on which version you're using. The steps are the same however.
Consolidation steps
-
If you haven't already, then in each worksheet that contains the data that you want to consolidate, set up your data by doing the following:
-
Make sure that each range of data is in list format, so that each column has a label in the first row and contains similar data, and there are no blank rows or columns within the list.
-
Put each range on a separate worksheet, but don't enter anything in the master worksheet where you plan to put the consolidation - Excel will fill this in for you.
-
Make sure that each range has the same layout.
-
-
In the master worksheet, click the upper-left cell of the area where you want the consolidated data to appear.
Note: To avoid overwriting existing data in the destination worksheet with the data you are consolidating, make sure that you leave enough cells to the right and below this cell for the consolidated data.
-
On the Data tab, in the Data Tools group, click Consolidate.

-
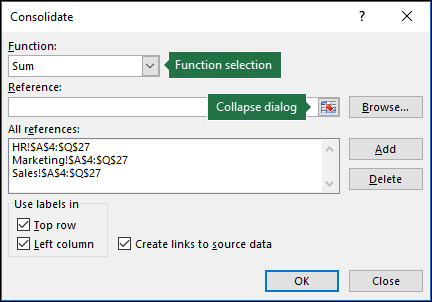
In the Function box, click the summary function that you want Excel to use to consolidate the data. The default function is SUM.
Following is an example with three worksheet ranges selected.

-
Select your data
-
If the worksheet that contains the data that you want to consolidate is in another workbook, first click Browse to locate that workbook, and then click OK to close the Browse dialog box. Excel will enter the file path in the Reference box followed by an exclamation point, and you can continue to select your data.
Next, in the Reference box, click the Collapse Dialog button to select the data in the worksheet.

Click the worksheet that contains the data you want to consolidate, select the data, and then click the Expand Dialog button on the right to return to the Consolidate dialog.
-
-
In the Consolidate dialog box, click Add, and then repeat to add all of the ranges that you want.
-
Automatic vs. Manual updates: If you want Excel to update your consolidation table automatically when the source data changes, select the Create links to source data check box. If unchecked, you can update the consolidation manually.
Notes:
-
You cannot create links when source and destination areas are on the same sheet.
-
If you need to change ranges once you've added them, you can click each one in the Consolidate dialog and update them when they show up in the Reference box, then click Add. This will create a new range reference, so you'll need to delete the previous one before you consolidate again. Just select the old reference and press Delete.
-
-
Press OK, and Excel will generate the consolidation for you. It will be unformatted, so it's up to you to format, but you only need to do that once, unless you rerun the consolidation.
-
Any labels that don't match up with labels in the other source areas result in separate rows or columns in the consolidation.
-
Make sure that any categories that you don't want to consolidate have unique labels that appear in only one source range.
-
Use a formula to consolidate data
-
If the data to consolidate is in different cells on different worksheets
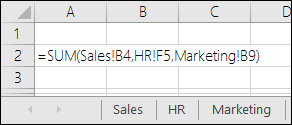
Enter a formula with cell references to the other worksheets, one for each separate worksheet. For example, to consolidate data from worksheets named Sales (in cell B4), HR (in cell F5), and Marketing (in cell B9), in cell A2 of the master worksheet, you would enter the following:

Tip: To enter a cell reference, like Sales!B4, in a formula without typing, type the formula up to the point where you need the reference, click the worksheet tab, and then click the cell - Excel will fill in the sheet name and cell address for you. Just note that formulas like this can be error prone, because it's very easy to accidentally select the wrong cell. It can also be difficult to spot a mistake once a formula has been entered.
-
If the data to consolidate is in the same cells on different worksheets
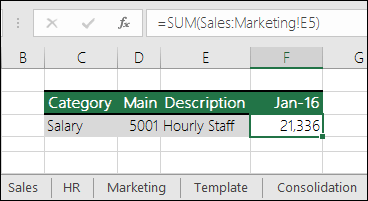
Enter a formula with a 3-D reference that uses a reference to a range of worksheet names. For example, to consolidate data in cells A2 from Sales through Marketing inclusive, in cell E5of the master worksheet you would enter the following:

Did you know?
If you don't have an Office 365 subscription or the latest Office version, you can try it now:

Do you have a specific function question?
Help us improve Excel
Do you have suggestions about how we can improve the next version of Excel? If so, please check out the topics at Excel User Voice
No comments:
Post a Comment