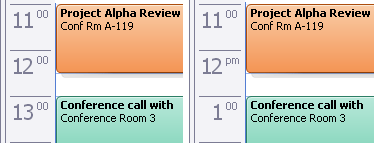
Microsoft Outlook uses the country/region settings for your computer to determine how the times appear.
For example, in Calendar in the month view, if you are using the default settings for the United States, Outlook displays a 12-hour clock. After 12:59 P.M., the time is displayed as 1 P.M. Other countries/regions use a 24-hour clock.

You can change how the clock appears in your display. However, changing this display is an option provided by the operating system, not Outlook.
Change the time settings in Windows
- Which version of Windows are you using?
- Windows 10
- Windows 8
- Windows 7
- Windows Vista
-
Start Control Panel, and then under Clock, Language, and Region, click Change date, time or number formats.
-
On the Formats tab, under Date and time formats, do one of the following:
-
To change to 24-hour format, on the Short time drop-down list, select HH:mm and on the Long time drop-down list, select HH:mm:ss.
-
To change to 12-hour format, on the Short time drop-down list, select h:mm:tt and on the Long time drop-down list, select h:mm:ss:tt.
-
-
Click Apply and then click OK.
-
In Windows, click the Start
 button.
 -
Click Control Panel, and then click Clock, Language, and Region.
-
Under Regional and Language, click Change the date, time, or number format.
-
On the Format tab, under Date and time formats, do one of the following:
-
To change to 24-hour format, on the Short time drop-down list, select HH:mm and on the Long time drop-down list, select HH:mm:ss.
-
To change to 12-hour format, on the Short time drop-down list, select h:mm:tt and on the Long time drop-down list, select h:mm:ss:tt.
-
-
Click Apply and then click OK.
-
In Windows, click the Start
 button.
 -
Click Control Panel, and then click Clock, Language, and Region.
Note: If you are using Control Panel in Classic View, double-click Regional and Language Options, and then skip to step 3.
-
Click Regional and Language Options.
-
Click Customize this format.
-
On the Time tab, do one of the following:
-
Change Time format to HH:mm:ss for a 24-hour clock.
-
Change Time format to hh:mm:ss tt for a 12-hour clock.
-
Microsoft Office Tutorials: Switch Calendar Views Between A 12 Hour Clock And 24 Hour Clock >>>>> Download Now
ReplyDelete>>>>> Download Full
Microsoft Office Tutorials: Switch Calendar Views Between A 12 Hour Clock And 24 Hour Clock >>>>> Download LINK
>>>>> Download Now
Microsoft Office Tutorials: Switch Calendar Views Between A 12 Hour Clock And 24 Hour Clock >>>>> Download Full
>>>>> Download LINK WQ