In this article
Organize shifts by group
In a new schedule, start with one unnamed group, give it a name, then add people and shifts to it. You can add additional groups as needed and give them all names. Group names help to organize your team members by role or department on the schedule. For example, a hotel might have the following groups: "Front Desk", "Room Service", and "Valet".
It's best to create groups before you start adding people to the schedule. People and their shifts can't be moved from one group to another.
To add a group:
-
Click Add group and type a name for the group.
To name or rename a group:
-
Click Enter group name or the name of an existing group and type a new name.
Once you've created your groups, you're ready to add people to them.
Add people to the schedule
Organize your schedule by groups so you can add people to the default group.
-
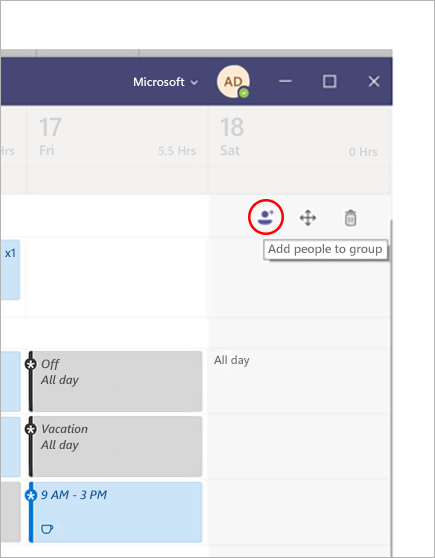
Locate the group you want to add someone to and click Add people to group .

-
Type their name or email and select them in the list.
-
Select Add.
-
Continue adding people if needed, and then select Close when you're done.
Notes:
-
A schedule belongs to a team in Teams, so you can only add members of that team to the schedule. If you don't find the person you want to add, use the Manage team link to make them a team member or owner. (Owners can create and update schedules.)
-
Changes you make to the team might not be available right away in Shifts, so if you don't find the new team member you want to add to the schedule, wait a bit and try again.
Add a shift
To add a shift from scratch:
-
In the row of the person you're assigning the shift to, under the date you want, click
 > Add shift, or just double-click the empty shift.
 -
Fill out the information for the shift. Consider picking a theme color to organize things.
-
Give the shift a name so it's easy to tell apart from other shifts. By default, the shift name is its start and end time.
-
Add notes for the shift, such as "tasks to be done".
-
Add breaks or lunch in the Activities section.
-
Choose Save to save without sharing, or Share if you're ready to save and share the shift with the team.
To base a new shift on an existing one
Go to the row of the person you're assigning the shift to. Under the date you want, click  , and then choose the shift from the list. If the list is long, you can search for the one you want.
To copy a shift to another place in the schedule
On an existing shift, click  > Copy, and then go to the place you want to put the shift and click
  > Paste.
Tips:
-
Speed your copying and pasting by using the keyboard shortcuts: Ctrl+C for copying, and Ctrl+V for pasting.
-
Select several shifts at once in either of these ways:
- Select a shift, hold down the Shift key, and use the arrow keys.
- Click and drag your cursor by using a mouse (or other pointing device).
Add an open shift
Add an open shift now and assign it to someone later as part of your schedule planning or share it with the team so people can request it.
-
In the Open shifts row under the date you're creating the shift for, click
 , then select + Add shift to start from scratch, or select an existing shift from the list to base the new one on.
 -
Fill out the information for the shift, including the number of slots you want to make available. To find the number of slots, slide the Open shift toggle to On.
-
Give the shift a name so it's easy to tell it apart from other shifts. By default, the shift name is the start and end time.
-
Add activities such as breaks or lunch.
-
Choose Save to save without sharing, or Share if you're ready to save and share the open shift with the team.
Notes: If you want to edit the shift after you've shared it with the team, here are a couple of things to remember:
-
If you change the number of slots available, you'll need to choose Share. You can't save your changes and share it later.
-
If you change the start or end time of the shift, all pending requests for that shift will be declined automatically when you share it again with the team.
-
Share a schedule with your team
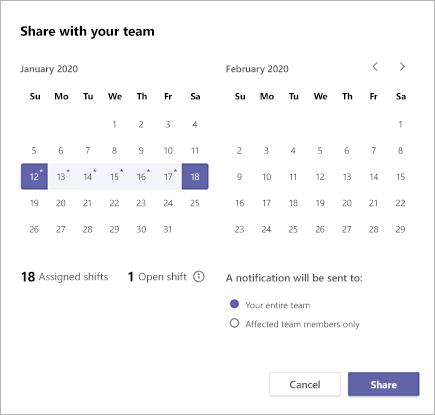
When you make changes to the schedule, you get to choose when to share those changes with the team. You can move things around in the schedule until you've got everything just right. Any changes you make will be noted with an asterisk (*)—there's an asterix on the Share with team button, too, just to remind you to share the updates with colleagues.
To share the schedule:
-
Click Share with team.

-
Make sure the time frame that's selected is what you want to share.
-
Decide if you want to notify the whole team or only the people affected by the changes.
-
Click Share.
Open a different schedule
Here's how to open a different schedule if you're on more than one team:
-
At the top left of Shifts, select
 Menu.
Menu. -
Choose the team you want to start working on the other schedule.
Copy a schedule
-
Select Copy Schedule at the top right of the app.
-
Choose the start and end dates for the timeframe you want to copy.
-
Select Shift notes, Time off, Activities, or Open shifts if you want to include them.
-
Select Copy, and a duplicate schedule will appear below the copied schedule.

Microsoft Office Tutorials: Fill Out A Schedule In Shifts >>>>> Download Now
ReplyDelete>>>>> Download Full
Microsoft Office Tutorials: Fill Out A Schedule In Shifts >>>>> Download LINK
>>>>> Download Now
Microsoft Office Tutorials: Fill Out A Schedule In Shifts >>>>> Download Full
>>>>> Download LINK Vh