If you get an error that contains 30033 when you try to install Office. here are some things you can try to fix the problem. We've listed the most common solutions first, so try them in order.
Tip: Sometimes restarting your computer is enough to fix the problem.
1 - Use the offline installer to install Office
The Office offline installer may help bypass potential proxy, firewall, antivirus, or Internet connection issues that might occur during an Office installation.
For steps to install an offline version of Office, see Use the Office offline installer and select the correct tab for your version of Office.
2 - Repair Office from the Control Panel
The steps to access the repair tool vary depending on your operating system. Choose your operating system from the options below.
Windows 10
-
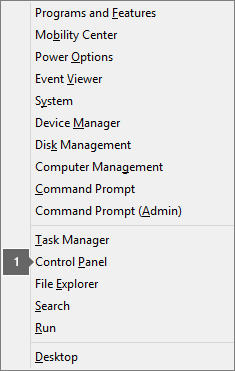
Right-click the Start button
 (lower-left corner), and select Apps and Features on the pop-up menu.
-
Select the Microsoft Office product you want to repair, and select Modify.
Note: This will repair the entire Office suite even if it's just one application you want to repair such as Word or Excel. If you have a standalone app installed, then search for that application by name.
-
Depending if your copy of Office is Click-to-run or MSI-based install, you'll see the following options to proceed with the repair. Follow the steps for your installation type.
Click-to-run
In the window How would you like to repair your Office Programs, select Online Repair > Repair to make sure everything gets fixed. (The faster Quick Repair option is also available, but it only detects and then replaces corrupted files.)
MSI-based
In Change your installation, select Repair and then click Continue.
-
Follow the instructions on the screen to complete the repair.
Windows 8 and 8.1
-
Right-click the Start button
 (lower-left corner), and select Control Panel from the pop-up menu.
-
From Category view, under Programs, select Uninstall a program.
-
Right-click the Microsoft Office product you want to repair, and from the drop-down, select Change.
Note: If you have a suite such as Microsoft 365 Family, Office Home & Student 2016, or Office Home and Student 2013, search for the suite name, even if it's just a particular application you want to repair such as Word or Excel. If you have a standalone application such as Word or Excel, search for the application name.
-
Depending if your copy of Office is Click-to-run or an MSI-based install, do the following for your Office installation type:
Click-to-Run installation type:
In How would you like to repair your Office Programs, select Online Repair to make sure everything gets fixed, and then select Repair. (The faster Quick Repair option is also available, but it only detects and then replaces corrupted files.)
MSI-based installation type:
In Change your installation, select Repair and then click Continue.
-
Follow the remaining instructions on the screen to complete the repair.
Windows 7 or Vista
-
Click the Start button
 > Control Panel.
 -
From Category view, under Programs, select Uninstall a program.
-
Click the Office product you want to repair, and then click Change.
Note: If you have a suite such as Microsoft 365 Family, Office Home & Student 2016, or Office Home and Student 2013, search for the suite name, even if it's just a particular application you want to repair such as Word or Excel. If you have a standalone application such as Word or Excel, search for the application name.
-
Depending if your copy of Office is Click-to-run or an MSI-based install, do the following for your Office installation type:
Click-to-Run installation type:
In How would you like to repair your Office Programs, select Online Repair to make sure everything gets fixed, and then select Repair. (The faster Quick Repair option is also available, but it only detects and then replaces corrupted files.)
MSI-based installation type:
In Change your installation, select Repair and then click Continue.
-
Follow the remaining instructions on the screen to complete the repair.
3 - Uninstall and reinstall Office
-
Click the button below to download and install the Office uninstall support tool.
-
Follow the steps below to download the uninstall support tool according to your browser.
Tip: The tool may take a few minutes to download and install. After completing the installation, the Uninstall Office products window will open.
Edge or Chrome
-
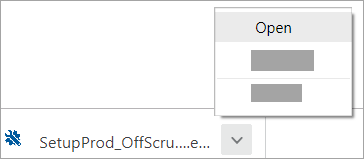
In the lower-lower left corner right-click SetupProd_OffScrub.exe > Open.

Edge (older) or Internet Explorer
-
At the bottom of the browser window, select Run to launch the SetupProd_OffScrub.exe.

Firefox
-
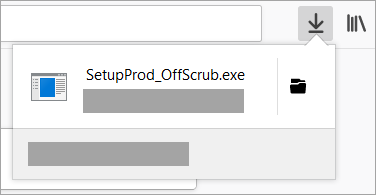
In the pop-up window, select Save Fileand then from the upper-right browser window, select the downloads arrow > SetupProd_OffScrub.exe.

-
-
Select the version you want to uninstall, and then select Next.
-
Follow through the remaining screens and when prompted, restart your computer.
After you restart your computer, the uninstall tool automatically re-opens to complete the final step of the uninstall process. Follow the remaining prompts.
-
Select the steps for the version of Office you want to install or reinstall. Close the uninstall tool.
Microsoft 365 | Office 2019 | Office 2016 | Office 2013 | Office 2010 | Office 2007
4 - Temporarily turn off antivirus software
For information about how to turn off your antivirus software, check your antivirus manufacturer's website. Uninstalling your antivirus software may also help. Don't forget to reinstall it after Office is finished installing and if you turned it off, be sure to turn it on again.
If you're not sure which antivirus software you have, use the following instructions to get to Control Panel to find the name of your antivirus software.
Tip: Windows 10 comes with default antivirus software, Windows Defender. If you determine that you're using it, select the Start button > Settings > Update & Security, and then select Windows Defender on the left. Slide the button to Off. Remember to turn it On again.
-
On the Start
 menu, enter Control Panel in the search box and select Control Panel from the results.
 -
Do one of the following:
-
In Category view, select System and Security > Security and Maintenance, and then select the down arrow next to Security.
-
In Large icons or Small icons view, select Security and Maintenance, and then select the down arrow next to Security.
-
If Windows can detect your antivirus software, it's listed under Virus protection.
-
Go to the Control Panel by right-clicking the Start button
 (lower-left corner), and choosing Control Panel.
-
Do one of the following:
-
In Category view, select System and Security > Action Center, and then select the down arrow next to Security.
-
In Large icons or Small icons view, select Action Center, and then select the down arrow next to Security.
-
If Windows can detect your antivirus software, it's listed under Virus protection.
-
Go to Control Panel by choosing the Start button
 (lower-left corner), and choosing Control Panel.
 -
Do one of the following:
-
In Category view, select System and Security > Action Center, and then select the down arrow next to Security.
-
In Large icons or Small icons view, select Action Center, and then select the down arrow next to Security.
-
If Windows can detect your antivirus software, it's listed under Virus protection.
5 - Temporarily turn off the firewall
If you're using a firewall from another manufacturer, visit the manufacturer's website for information about how to temporarily disable the firewall. For Windows Firewall, please see below.
Windows 10
-
Please go to Turn Windows Firewall on or off
Windows 8.1 and 7
-
Please scroll to Turn Windows Firewall on or off in Protect my PC from viruses

I was really stuck by searching for genuine content on this topic. I got it here as every single sentence is written very carefully by a well-experienced writer What one should know regarding Bullguard scanner.exe?
ReplyDelete