OneNote 2016 is a digital notebook that provides a single place for all of your notes and information—everything you need to remember and manage in your life at home, at work, or at school.
In OneNote, your notebooks never run out of paper. They are easy to reorganize, print, and share, and you can search all your notes quickly so you can find notes even if you forget where you put them. Best of all, you can store your notebooks online and get to them on any of your devices.
Here are some of the basic steps to help get you started with OneNote.
Type or write notes
When you are ready to take notes, do any of the following:
-
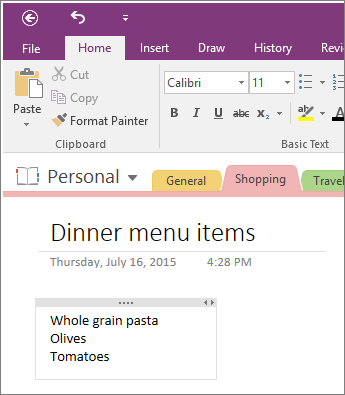
To type notes on a page in OneNote, click wherever you want them to appear, and then start typing.
-
Whenever you want to begin a note elsewhere on the page, just click and start typing there.
-
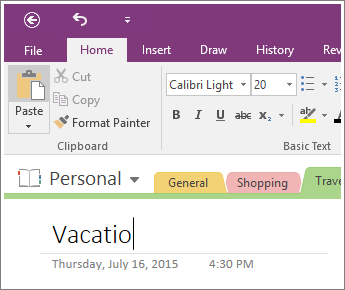
To add a page title, click the page header area at the top of the page and type the title. Titles also show up in the page tabs near the right of the page.
-
If your computer supports handwriting, on the Draw tab, select a pen, and then draw or write directly on your screen.
Add links
Whenever you type text that OneNote recognizes as a link, OneNote automatically formats it as one. For example, if you type www.microsoft.com into your notes, OneNote turns that into a link. Clicking it will open the Microsoft website in your browser.
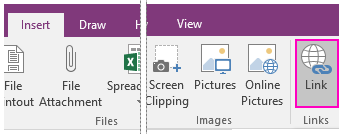
You can also manually insert links into your notes (including links to text, pictures, and to other pages and sections of your notebooks), by doing the following:
-
Select the text or picture where you would like to insert a link.
-
Choose Insert > Link.
-
In the Link dialog box, type the link's destination URL into the Address field and then click OK.
Add files to your notes
OneNote can keep all of your information about any subject or project together in one place — including copies of related files and documents.
-
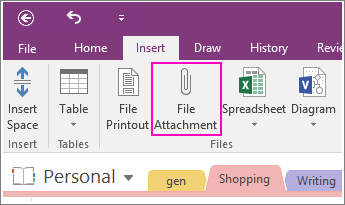
In your notes, go to the page where you want to insert a file or document.
-
Choose Insert > File Attachment.
-
In the Choose a file or a set of files to insert dialog box, select one or more files, and then choose Insert.
Inserted files show up as icons on your notes page. Double-click any icon to open its file.
Remember, inserted files are just copies. OneNote doesn't automatically update the copies if the original files change.
Insert pictures
You can insert screen clippings, photos, scanned images, cell phone photos, and any other kind of images into your notes.
-
On any page, put the cursor where you want to insert the picture.
-
Choose Insert and then choose one of the following:
-
Screen Clipping — captures a selection of your computer screen and insert it as a picture into your notes.
-
Pictures — inserts a picture file that's stored on your computer, your network, or another disk drive, such an external USB drive.
-
Online Pictures — finds and insert pictures from a Bing Image Search, your OneDrive account, or elsewhere on the Web.
-
Scanned Image — scans a picture into OneNote if you have a scanner attached to your computer.

-
Insert a table
Tables are a great way to organize information in your notes pages. Start by choosing a simple grid.
-
Choose Insert > Table.

-
Move the mouse pointer over the grid to select the table size you want, and then click to insert the table.
To quickly modify a table or any of its parts, right-click any table cell, choose Table, and then use the commands on the menu that appears.
Tip: If a table gets to be too complex, you can convert it into a real spreadsheet right in OneNote. Right-click the table and then choose Convert to Excel Spreadsheet.
Add more pages
For more room in your notebook, add as many pages as you want.
-
In the section of your notebook that you want to add pages to, near the right side of the page, choose Add Page.
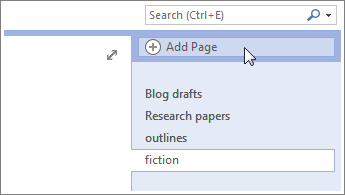
-
When you are ready to use one of the new pages, type a page title into its page header area, and then press Enter.
Tip: To change the order of your pages, drag any page tab to a new position.
Add more sections
Sections in OneNote are like the tabs in a typical five-subject paper notebook. With OneNote, you can have as many sections as you want.
-
Right-click any section tab at the top of the current page, and choose New Section.
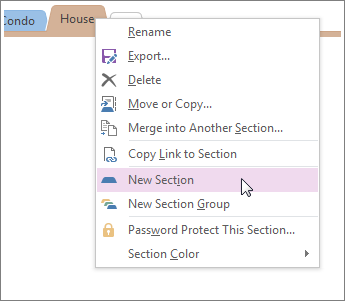
-
Type a title for the new section, and then press Enter.
New sections always contain one blank new page. You can start taking notes on this page or delete it and start with a page from your favorite template.
Save your notes
OneNote doesn't have a Save button. That's because you never have to save your work in OneNote like you do in other apps.
As you work in your notebooks, OneNote automatically saves everything for you—no matter how small or large the changes you've made. This lets you think about your projects, thoughts, and ideas instead of worrying about your computer files.
Microsoft Office Tutorials: Basic Tasks In Onenote 2016 For Windows >>>>> Download Now
ReplyDelete>>>>> Download Full
Microsoft Office Tutorials: Basic Tasks In Onenote 2016 For Windows >>>>> Download LINK
>>>>> Download Now
Microsoft Office Tutorials: Basic Tasks In Onenote 2016 For Windows >>>>> Download Full
>>>>> Download LINK 3x