Adding horizontal lines, sometimes called horizontal rules, to a document or email message can help separate sections of text add visual appeal.
Draw a line
To add a line, follow these steps.
-
On the Insert tab, select Shapes.
-
Under Lines, select any line style you like.

-
Select a location in the document, hold and drag your pointer to a different location, and then release the mouse button.
Insert a line by typing a few characters
The fastest way to add a horizontal line or rule is to use the AutoFormat feature. When you type certain characters three times on their own line and then press Enter, those characters instantly become a horizontal line.
-
Place the cursor where you want to insert the horizontal line.
-
Type three of the characters listed here, and then press Enter.
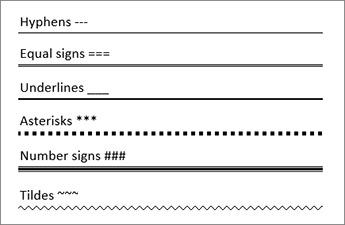
The line is inserted for the full width of the page. When inserted into a column, the line is inserted to match the width of the column. To add text above the line, put your cursor where you want the text and begin typing.
No comments:
Post a Comment