Reduce the file size of a picture in Microsoft Office
You can send files with high-quality images easily, and without file limits, by saving to the cloud and then sharing files from OneDrive. However, if you still need to reduce the file size of an image, you can try the options below or crop your images. It's worth noting that how much you can compress a picture, and how much space you'll save in your file, depends a lot on the existing size and resolution of the picture. Some pictures can be compressed quite a bit; others hardly at all.
Note: These features are not yet available in Office Online, only the desktop versions of the Office suite.
Compress or change the resolution of a picture
When you do not need every single pixel in an image to get an acceptable version of it, you can compress pictures to make the file size smaller.
-
With your file open in your Microsoft Office application, select the picture or pictures that you want to compress.
-
Under Picture Tools, on the Format tab, in the Adjust group, click Compress Pictures.
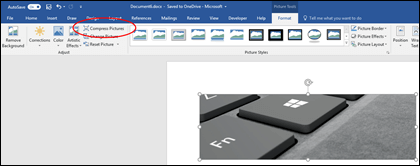
If you do not see the Picture Tools - Format tab, make sure that you selected a picture. You may have to double-click the picture to select it and open the Format tab.
Also, depending on your screen size, you might only see the icons for the Adjust group. The Compress Pictures button appears without a label.

-
To compress the selected pictures only and not all of the pictures in the document, select the Apply only to this picture check box.
Clearing the Apply only to this picture checkbox will override any previous changes you have made for other individual pictures in this document.
-
Under Resolution, click the resolution that you want, then click OK.
Notes:
-
Pictures in Office are automatically compressed for printing at 220 ppi. You can Change the default picture resolution or turn off picture compression.
-
Compression changes are made when you close this dialog box. If you aren't satisfied with the results, you can undo the changes.
-
Compressing a picture may make the image look different because of loss of detail. Because of this, you should compress the picture and save the file before applying an artistic effect.
Click the headings below for more information
-
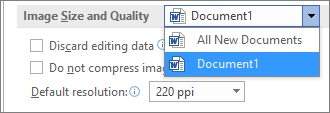
Change default picture resolution for all pictures in a document
Important: This setting applies only to pictures in the current document or the document selected in the list next to Image Size and Quality. To make it the default for all new documents change the drop down.
Note that this feature is not available in Microsoft Project 2013 or in Office 2007.
-
Click the File tab.
-
Click Options and then click Advanced.
-
Under Image Size and Quality, use the drop down to select whether you want the change to apply to a specific document or all new (and future) documents.
-
Set the resolution that you want to default to, then click OK
Delete all picture editing data
Any info on the changes you've made to your picture are stored in your file. You can reduce the size of your file by deleting this editing data, but if you want to undo your edits you will need to reinsert the picture.
Note: This feature is not available in Microsoft Project 2013 or Microsoft Project 2016.
-
Click the File tab.
-
Click Options and then click Advanced.
-
Under Image Size and Quality, click the document that you want to remove picture editing data from.
-
Under Image Size and Quality, select the Discard editing data checkbox.
Note: This setting applies only to pictures in the current document or the document selected in the list next to Image Size and Quality.
See Also
Change the default resolution for inserting pictures in Office 2016
Editing photos without Picture Manager
We're listening!
This article was last updated by Ben on 3/14/2018 as a result of your comments. If you found it helpful, and especially if you didn't, please use the feedback controls below to leave us some constructive ideas on how we can make it better.
No comments:
Post a Comment