Market your products and services in Business Contact Manager
In the Marketing workspace in Business Contact Manager for Outlook, you can create and launch a variety of marketing activities and track the success of each one, either individually or in combination, as part of a multi-channel marketing campaign.
Build a call list for a specific promotion, send a personalized e-mail message to the customers you choose, create brochures and flyers for direct mail, or develop your own marketing activity with the tools provided in Business Contact Manager for Outlook.
This article describes how to create and use mass e-mail and direct mail print marketing activities. You will also find details on how to analyze the success of your marketing efforts, and how to use the reports and marketing gadget in Business Contact Manager for Outlook.
For information about how to create a call list marketing activity, see Create and use Call Lists in Business Contact Manager.
What do you want to do?
Create and launch a mass e-mail or direct mail print marketing activity
For your business to grow, you need to market it. Business Contact Manager for Outlook makes it simple to create e-mail messages for mass distribution, direct-mail promotions, and to develop other marketing activities.
Creating and launching a marketing activity is basically a three-step process of planning the activity, creating the content for it, and then launching it.
Plan the activity
During the planning stage, you'll create a marketing activity record by selecting a name for the activity, and specifying who among your Accounts and Business Contacts or Leads is the target audience.
Note: The recipient list for a marketing activity can include only one record type. For example, the Recipient list can include Accounts, but not Accounts and Business Contacts. Business Contacts and Leads can be in the same list because the Lead record is based on the Business Contact record type.
-
In the Navigation Pane, under Business Contact Manager, click Marketing.
-
On the Ribbon, on the Home tab, in the New group, click one of the following buttons:
-
Mass E-mail

-
Keyboard shortcut To create a new Mass E-mail marketing activity press ALT + NE.
-
-
New Items, point to Marketing, and then click Direct Mail Print
 , or Other Activity.
 -
Keyboard shortcut To create a new Direct Mail Print marketing activity press ALT + NN.
-
-
-
Type a name for the marketing activity on the form.
-
If you want this activity to be part of a marketing campaign, in the Campaign field, type a name for the campaign or select a campaign name from the list. If the activity is not part of a marketing campaign, leave the default text, Current activities in place.
-
In the Recipient list section, to send your message to the e-mail or business address of one of the following types of customers, click All Accounts, All Business Contacts and Leads, All Business Contacts, or All Leads.
Or, click one of the following options:
-
Search Folder. Choose a search folder that contains a pre-filtered list of recipients, to create a custom list. The field is renamed Custom List after you select a folder.
-
Existing Marketing Activity. Choose the recipient list used for a previous activity.
-
New List. Open the Filter Business Contacts dialog box and select criteria to filter the list.
You can also create a marketing activity from the names in a report. For information about this option, see Use reports and charts in Business Contact Manager.
-
-
To edit the selected list by filtering it, click Review and Filter.
For more information about filtering a list, see Filter records in Business Contact Manager.
-
On the Ribbon, on the Home tab, in the Show group, click Details to open the Activity details page.
-
If you want to, type information in the Campaign code, Budgeted cost, Start date, End date, and Comments fields.
-
Click Save & Close to save the record, or continue on to Create the marketing content, next in this article.
When you are ready to start the activity, click Launch, or see Launch a marketing activity later in this article.
Create the marketing content in Outlook, Word, or Publisher
To create the content to be distributed, you can use Outlook, Word, or Publisher to draft e-mail messages, print letters, flyers, brochures, and other marketing materials, and other types of documents, and then link them to the activity in Business Contact Manager for Outlook.
After you've created the marketing activity record and selected the recipients, as described in Plan the activity, you can link the content to the activity.
You can choose to develop the content as you plan the marketing activity and create the activity record, or you can create the content in Outlook, Publisher or Word first, and then create the record for the marketing activity. If you create the content beforehand, you'll just select the file in the marketing activity record.
-
In the Navigation Pane, under Business Contact Manager, click Marketing.
-
Do one of the following:
-
Create a new marketing activity record.
-
In the workspace, click the Mass E-mail, Direct Mail Print, or Other Marketing Activities tab, and then double-click a record to open it.
-
-
Decide whether to create new marketing content for the activity, or to use content that's already been created.
To create a new file
-
In the marketing activity window, click one of the following content sources:
-
Outlook Editor.
-
Publisher Mail Merge.
-
Word Mail Merge.
-
-
The program you chose will open. Use the program to create your message, which you can personalize using Mail Merge.
-
If you selected Outlook Editor, click the Create button.
If you selected Publisher Mail Merge or Word Mail Merge, click Create/Browse, and then click Create.
-
Create the message, flyer, pamphlet, or brochure for distribution.
To personalize your marketing message for each recipient, follow the instructions in the Mail Merge pane in Publisher or Word. For information about how to use mail merge, see Publisher or Word Help.
-
Save the file, and then return to the marketing activity window.
The default name of the file is the same as the name of the activity unless you save the file using a different name.
To select an existing file
-
In the marketing activity window, in the content source section, click Create/Browse, and then click Browse.
After you've created or selected a file, an Edit command is added to the button. If you save and then reopen the activity, the button is renamed Edit/Browse. Click Edit to revise the selected file.
-
When you are done making changes, save the file, and then return to the marketing activity window.
You can click Edit recipient list in the Mail Merge pane in Publisher or Word, to modify your activity's recipients, as well as in Business Contact Manager for Outlook if the activity has not been launched.
-
-
The file you selected is listed in the Use file field.
-
Click Save & Close if you want to start the activity later. Otherwise, click Launch, and see Launch a marketing activity next in this article.
If you want to track the results of this marketing activity, you must also record the name of the activity in the Initiated by field in each Account, Business Contact, Lead, or Opportunity record generated by the activity. Then, to view the results of the activity, see the Track page of the marketing activity record.
Launch a marketing activity
When you are ready to start one of the marketing activities you've created, all you need to do is click Launch.
-
Open the activity record.
How?
-
In the Marketing workspace, click the tab, Mass E-mail, Direct Mail Print, or Other Marketing Activities, for the type of activity that you want to launch.
-
In the List Pane, double-click the activity to open it.
If you have a long list of activities, look for the activity under the name of the campaign. If you did not assign it to a campaign, the activity is listed under Current activities. You can also type the name of the activity in the Search box to quickly find it.
-
-
Review the names in the Recipient list to be sure you've selected all the Accounts, Business Contacts and Leads whom you want to receive your mailing.
You can also review and update the list of recipients in the Mail Merge pane in Publisher or Word.
-
Click Launch.
Your document opens in the program you used to create it.
-
Do one of the following:
If you are sending a mass e-mail message
Make any needed changes to the document, such as personalizing your message through the Mail Merge feature. To send the message, on the Ribbon, in the Finish group, click Finish & Merge, and then click Send e-mail Messages.
If you are creating a direct mail publication
Make any needed changes to the document, and then follow the steps in the window to print the document, merge it to a new publication, or add it to an existing publication.
Track or analyze marketing activities
Whenever you launch a marketing activity, it is important to track the results. At the very least, you need to understand if the activity was worth the time or money.
To see the results of a marketing activity, you should record which Accounts, Business Contacts, Leads, and Opportunities resulted from each marketing activity. As you complete the new records, note the name of the marketing activity in the Initiated by field in each record.
In this section
Add the name of a marketing activity to Account, Business Contact, Lead, or Opportunity records
To effectively track the return on investment of a marketing activity, be sure to record the budgeted and actual costs of the activity.
You must also add the name of the activity to the Initiated by field of each Account, Business Contact, Lead, or Opportunity record that comes from the activity. The total number of each record type is listed in the Activity results section on the Track page of the marketing activity record.
-
Do one of the following:
-
For Accounts or Business Contacts, in the Navigation Pane, under Business Contact Manager, click Contact Management.
-
For Leads or Opportunities, in the Navigation Pane, under Business Contact Manager, click Sales.
-
-
Click the tab that contains the record that you want.
-
In the List Pane, double-click an Account, Business Contact, Opportunity, or Lead record to open it.
-
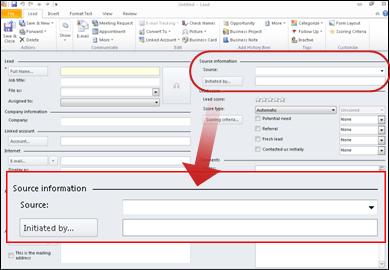
In the Source information section of the record, click Initiated by.
-
In the Select an Account, Business Contact, or Marketing Activity dialog box, under Item Type, click All Marketing Activities, or click the type of marketing activity that generated the record.
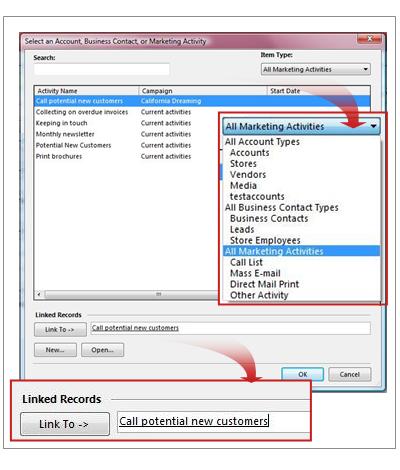
-
Under Activity Name, click the name of the marketing activity.
-
In the Linked Records section, click Link to.
The record is linked to the marketing activity, and is included in the totals displayed on the Track page of the activity record.
-
Click OK to close the window.
-
Repeat this procedure for each Account, Business Contact, Lead, or Opportunity that resulted from the marketing activity.
View the results of a marketing activity
You have several ways to monitor your marketing activities, such as using the Track page of the activity, viewing analysis tools and gadget on the Marketing workspace, and reviewing the data in reports. The Track page will provide the most detail about activities. It is also where you can mark activities as closed, and store actual cost information.
-
Open the Track page by first opening a marketing activity.
-
On the Ribbon, in the Show group, click Track.
Keyboard shortcut To open the Track page, press ALT + H, then press 03.
-
In the Activity information section, you can type in the actual cost of the activity, and select the check box to mark the activity as closed.
-
In the Activity results section, you can view the number of new opportunities and contacts resulting from the activity, and click Show Report to create a detailed business report for the information in the selected field.
Where do the tracking numbers come from?
The data displayed on the Track page is automatically calculated, based on the information you enter about each activity:
-
Each Account, Business Contact, Lead, and Opportunity that has the selected activity name in its Initiated by field is included in the corresponding count for Initiated opportunities, Initiated accounts, and Initiated contacts fields.
-
If the activity is a call list, the Initiated Phone logs field is updated when you save changes to the call list record.
-
Expected revenue information is calculated from the sales probability percentage and the value of products and services on each Opportunity record linked to the activity.
Analyze a marketing activity or campaign
The Analysis tab in the Marketing workspace brings together a list of all of your marketing activities, sorted by campaign.
Note: Details are provided for individual marketing activities only. There is no campaign-wide analysis function that incorporates all of the activities.
-
In the Navigation Pane, under Business Contact Manager, click Marketing.
-
In the List Pane of the workspace, click the Analysis tab.
The tab displays each of your marketing activities organized by campaign; activities not linked to a campaign are displayed under Campaign: Current Activities.
-
To review details for a specific activity, double-click the activity name to open the record. See View the results of a marketing activity for more information.
Note: When a report is open, you can use the marketing buttons on the Ribbon to initiate a new marketing activity directed to the contacts selected in the report.
Display a marketing gadget
Marketing gadgets are useful for giving you a quick look at how a particular marketing activity or campaign is succeeding.
To get the best information from a gadget, you'll need to keep your marketing activity data up-to-date. As you create new activity records and assign them to campaigns, that data will be displayed in the gadgets. For specific details, such as the numbers of Accounts, Business Contacts, Leads or Opportunities that came from a particular activity, you must type the activity name in the Initiated by field of each new record. For accurate financial numbers, include the budgeted and actual cost figures on the Details and Track pages for each activity.
-
In the Navigation Pane, under Business Contact Manager, click Marketing.
-
On the Ribbon, click the Gadgets tab.
Keyboard shortcut To display the Gadgets tab on the Ribbon, press ALT + G.
-
In the Add Gadgets group, click Marketing, and then click one of the following:
-
Activity Type Analysis
-
Campaign Analysis
-
Campaign Comparison
-
Gadget information is updated whenever new information is saved to a relevant record.
Use gadgets to analyze marketing activity results
The marketing gadgets available in Business Contact Manager for Outlook include:
-
Activity Type Analysis. Displays information for all marketing activities of a certain type, such as Mass E-mail.
-
Campaign Analysis. Displays information for all marketing activities under a single campaign.
-
Campaign Comparison. Displays information for all marketing campaigns.
You can configure each marketing gadget to show only the activities or campaigns you want to view, and the number of Opportunities, Accounts, Business Contacts or Leads that came from each activity or campaign, or their actual costs, budgets, or expected revenue.
Note: Be sure that any new records created as a result of a marketing activity have the name of the activity entered in the Initiated by field.
For more information about using gadgets, see Use gadgets in Business Contact Manager.
Use marketing reports
You can review the results of your marketing activities in various reports in Business Contact Manager for Outlook, print them out, or export them to Excel for further analysis.
The following reports are provided by default:
-
Opportunities by Marketing Activity
-
Business Contacts by Marketing Activity
-
Accounts by Marketing Activity
-
Marketing Activities by Campaign
-
Marketing Activities by Type
Note: To view the latest information about marketing activities in your reports, be sure that any records created as a result of a marketing activity include the name of the marketing activity in the Initiated by field.
For more information about using reports and charts, see Use reports and charts in Business Contact Manager.
Hi, I have read your blog and I am amazed to know the significance of business report. The information you have provided is very knowledgeable and useful. Thanks for the blog.
ReplyDelete