Delete data from an Access database by using a query
To delete large amounts of data quickly, or to regularly perform the same delete operations, consider using a query. A query can help you make sure that you are deleting the correct data, and can be saved and then easily repeated.
Note: If you want to remove a small number of records — any quantity that you feel comfortable deleting by hand — you can open the table in Datasheet view, select the fields or rows that you want to delete, and press DELETE.
Important: Make sure that you have a backup of your database before you delete the data.
In this article
Choose a query type based on the data you want to delete
You have the option of using either an update query or a delete query depending on the type of deletion that you need to perform.
Delete query
Use a delete query to remove entire records (rows) from a table or from two related tables, in one operation. Delete queries remove all the data in each field, including the key value that makes a record unique.
Note: If the records that you want to delete reside on the "one" side of a one-to-many relationship, you might need to change the relationship before you run the delete query. See the section Deleting data from related tables in this article.
Update query
Use an update query to delete individual field values from a table, An update query let you delete values by updating the existing values to either a null value (that is, no data) or a zero-length string (a pair of double quotation marks with no space between them).
What to verify before using a query to delete data
-
Ensure that the database file is not read-only. To do so, in Windows Explorer, right-click the database file and then click Properties.
-
Verify that you have the necessary permissions to delete records from the database. If you are not sure, contact your system administrator or the database designer.
-
Make sure that you have enabled content in the database. By default, Access blocks all action queries (delete, update, and make-table queries) unless you first trust the database. For information about trusting a database, see Stop Disabled Mode from blocking a query later in this article.
-
Ask other users of the database to close all tables, forms, queries, and reports that use the data that you want to delete. This helps avoid lock violations.
-
Before you edit or delete records, back up the database. You cannot reverse operations that are performed by delete and update queries, so making a backup copy ensures that you can always reverse your changes.
Tip: If a large number of users connect to the database, you might need to close the database and then reopen it in Exclusive mode.
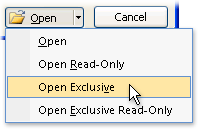
To open a database in Exclusive mode
-
Click the File tab, and then click Open.
-
Browse to and point to select the database, click the arrow next to the Open button, and then click Open Exclusive.
Back up the database
-
Click the File tab, point to Save & Publish, and then, under Save Database As, click Back Up Database.Access closes the original file, creates a backup, and then reopens the original file.
-
In the Save As dialog box, specify a name and location for the backup copy, and then click Save.
To revert to a backup, close and rename the original file so that the backup copy can use the name of the original version. Assign the name of the original version to the backup copy, and open the renamed backup copy in Access.
Create and use a delete query
The steps in this section explain how to create and use a delete query to delete entire records from a table:
-
On the Create tab, in the Queries group, click Query Design.
The Show Table dialog box appears.
-
Double-click each table from which you want to delete records, and then click Close.
The table appears as a window in the upper section of the query design grid. The window lists all of the fields in the selected table.
-
Double-click the asterisk (*) to add all of the fields in the table to the design grid.
Optionally, double-click any field that you want to use to specify criteria for deletion, enter one or more criteria in the Criteria row of the designer, and then clear the Show check box for each criteria field.
For example, suppose that a customer goes out of business and you need to remove all of the pending orders for that customer. To find just those records, you add the Customer ID and Order Date fields to the design grid, and then you enter the ID number of the customer that went out of business, and the date on which that customer's orders became invalid.
Important: Use criteria to return only the records that you want to delete. Otherwise, the delete query removes every record in the table.
-
On the Design tab, in the Results group, click View, and then click the Datasheet View.
-
Verify that the query returns the records that you want to delete, and then press CTRL+S to save the query.
-
To run the query, double-click the query in the Navigation Pane.
Create and use an update query
The steps in this section explain how to use an update query to delete individual fields from tables on the "many" side of a one-to-many relationship. You can also follow these steps to delete data from tables that are not related to other data. Remember that running an update query to delete data will change the existing values to either NULL or a zero-length string (a pair of double quotation marks with no space in between), depending on the criteria that you specify.
-
On the Create tab, in the Queries group, click Query Design.
The Show Table dialog box appears.
-
Select the table that contains the data you want to delete (if the table is related, select the table on the "one" side of the relationship), click Add, and then click Close.
The table appears as a window in the upper section of the query design grid. The window lists all of the fields in the selected table.
-
Double-click the asterisk (*) to add all of the fields in the table to the design grid. Adding all the table fields enables the delete query to remove entire records (rows) from the table.
Optionally, you can enter criteria for one or more fields in the Criteria row of the designer, and then clear the Show check box for each criteria field. For more information about using criteria, see the Sample criteria for select queries table.
Note: You use criteria to return only the records that you want to change. Otherwise, the update query sets to NULL every record in each of the fields in your query.
-
On the Design tab, in the Results group, click View, and then click Datasheet View.
-
Verify that the query returns the records that you want to set to NULL or a zero-length string (a pair of double-quotation marks with no space between them ("").
-
As needed, repeat steps 3 to 5 and change the fields or criteria until the query returns only the data that you want to delete, the then and then press CTRL+S to save the query.
-
To run the query, double-click the query in the Navigation Pane.
Deleting data from related tables
If you want to delete data from several related tables, you must enable the Referential Integrity and Cascade Delete Related Records options for each relationship. This allows your query to delete data from the tables on the "one" and "many" sides of the relationship. Preparing to deleted related data requires verification of the following:
-
Determine which records reside on the "one" side of the relationship and which reside on the "many" side.
-
If you need to delete records on the "one" side of the relationship and the related records on the "many" side, you enable a set of rules called Referential Integrity, and you enable cascading deletes. Steps in this section explain Referential Integrity, and how to perform both tasks.
-
If you need to delete records only on the "one" side of the relationship, you first delete that relationship, and then delete the data.
-or-
If you need to remove data only on the "many" side of the relationship, you can create and run your delete query without having to change the relationship.
Determine the relationships
To determine which records reside on the "one" and "many" sides of a relationship:
-
On the Database Tools tab, in the Relationships group, click Relationships.
The Relationships tab appears and displays all of the tables in your database and also the relationships between each table and every other table. Each relationship is depicted as a line that connects tables between fields.
The following figure shows a typical relationship. Most, if not all, of the relationships in a database have a "one" side and a "many" side. The relationship diagram denotes the "one" side with the numeral one (1) and the "many" side with the infinity (∞) symbol.

As a rule, when you delete records on the "one" side of the relationship, you also delete all of the related records on the "many" side of the relationship. However, when you delete records on the "many" side of a relationship, you typically don't delete records on the "one" side.
Also, by default, Access enforces a set of rules called referential integrity. These rules ensure that the foreign keys in a database contain the correct values. A foreign key is a column whose values match the values in the primary key column of another table.
Edit the relationship
Follow these steps only when you need to delete data on the "one" and "many" sides of a relationship.
-
On the Database Tools tab, in the Relationships group, click Relationships.
-
Right-click the relationship (the line) connecting the tables involved in the deletion operation, and then click Edit Relationship on the shortcut menu.
The Edit Relationships dialog box appears.
-
Ensure that the Enforce Referential Integrity check box is selected.
-
Select the Cascade Delete Related Records check box.
Note: Until you disable this property again, deleting a record on the "one" side of the relationship will delete all of the related records on the "many" side of the relationship.
-
Click OK, close the Relationships pane, and then go on to the next set of steps.
Delete a relationship
-
If you haven't done so already, open the Relationships pane.
-
On the Database Tools tab, in the Relationships group, click Relationships.
Make a note of the fields involved in the relationship so that you can restore the relationship after you delete your data.
-
Right-click the relationship (the line) connecting the tables involved in the deletion operation, and then click Delete on the shortcut menu.
Note: To restore the relationship, follow the previous steps to open the Relationships pane, and then drag the primary key field from the "one" table and drop it on the foreign key field of the "many" table. The Edit Relationship dialog box appears. If the old relationship enforced referential integrity, select Enforce Referential Integrity, and then click Create. Otherwise, just click Create.
Sample criteria for select queries
The following table lists some sample criteria that you can use in select queries when you want to make sure that you delete only the data that you want deleted. Some of these examples use wildcard characters.
| Criteria | Effect |
| > 234 | Returns all numbers greater than 234. To find all numbers less than 234, use < 234. |
| >= "Cajhen" | Returns all records from Cajhen through the end of the alphabet. |
| Between #2/2/2010# And #12/1/2010# | Returns dates from 2-Feb-2010 through 1-Dec-2010 (ANSI-89). If your database uses the ANSI-92 wildcard characters, use single quotation marks (') instead of pound signs (#). Example: Between '2/2/2010' And '12/1/2010'. |
| Not "Germany" | Finds all records where the exact contents of the field are not exactly equal to "Germany." The criterion will return records that contain characters in addition to "Germany," such as "Germany (euro)" or "Europe (Germany)". |
| Not "T*" | Finds all records except those beginning with T. If your database uses the ANSI-92 wildcard character set, use the percent sign (%) instead of the asterisk (*). |
| Not "*t" | Finds all records that do not end with t. If your database uses the ANSI-92 wildcard character set, use the percent sign (%) instead of the asterisk (*). |
| In(Canada,UK) | In a list, finds all records containing Canada or UK. |
| Like "[A-D]*" | In a Text field, finds all records that start with the letters A through D. If your database uses the ANSI-92 wildcard character set, use the percent sign (%) instead of the asterisk (*). |
| Like "*ar*" | Finds all records that include the letter sequence "ar". If your database uses the ANSI-92 wildcard character set, use the percent sign (%) instead of the asterisk (*). |
| Like "Maison Dewe?" | Finds all records that begin with "Maison" and contain a 5-letter second string in which the first 4 letters are "Dewe" and the last letter is unknown. If your database uses the ANSI-92 wildcard character set, use the underscore (_) instead of the question mark (?). |
| #2/2/2010# | Finds all records for February 2, 2010. If your database uses the ANSI-92 wildcard character set, surround the date with single quotation marks instead of pound signs ('2/2/2010'). |
| < Date() - 30 | Uses the Date function to return all dates more than 30 days old. |
| Date() | Uses the Date function to return all records containing today's date. |
| Between Date() And DateAdd("M", 3, Date()) | Uses the Date and the DateAdd functions to return all records between today's date and three months from today's date. |
| Is Null | Returns all records that contain a null (blank or undefined) value. |
| Is Not Null | Returns all records that contain any value (that are not null). |
| "" | Returns all records that contain a zero-length string. You use zero-length strings when you need to add a value to a required field, but you don't yet know what the actual value is. For example, a field might require a fax number, but some of your customers might not have fax machines. In that case, instead of entering a number, you enter a pair of double quotation marks with no space between them (""). |
Additional information
Why am I seeing this error message, and how do I fix it?
If you build a delete query by using multiple tables and the query's Unique Records property is set to No, Access displays the error message Could not delete from the specified tables when you run the query.
To fix this problem, set the query's Unique Records property to Yes.
-
Open the delete query in Design view.
-
If the query property sheet is not open, press F4 to open it.
-
Click the query designer to show the query properties (rather than the field properties).
-
In the query property sheet, locate the Unique Records property, and set it to Yes.
Stop Disabled Mode from blocking a query
By default, if you open a database that you have not chosen to trust or that does not reside in a trusted location, Access blocks all action queries from running.
If you try to run an action query and it seems like nothing happens, check the Access status bar for the following message:
This action or event has been blocked by Disabled Mode.
When you see that message, take the following step to enable the blocked content:
-
On the Security Warning Message Bar, click Enable Content, and run your query again.
No comments:
Post a Comment