Format a shape
In Microsoft Visio you can customize the appearance of shapes by changing their text colors, font, fill colors and patterns, line weight and style, or shadow.
-
Click the shape that you want to format.
-
On the Home tab, in the Shape Styles group, select one of the style options from the gallery.
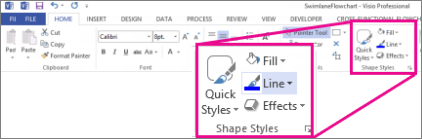
To customize the style, click the drop-down lists in the Shape Styles group and choose formatting options:
-
Fill – the color or pattern filling the shape. Choose or specify colors, set gradients or transparency.
-
Line – the shape's outline. Set the color, line thickness or type, or specify no line.
-
Effects – add shadow, reflection, glow, or 3-D effects to shapes.
To apply formatting to the whole diagram instead of a selected shape, on the Design tab, in the Themes group, select one of the themes from the gallery.

Notes:
-
If you want to apply the same formatting to all shapes in your drawing, you may want to create and apply a custom theme. To learn more about themes, see Apply a theme to a shape.
-
If you would like to add a text box to a shape or change the orientation of the text box within a shape, see Add, edit, move, or rotate text and text blocks.
-
You have to select a shape before you can apply text formatting, change the line color, or apply a fill to it. To learn more about how to select a shape, see Select, move, resize, and rotate shapes.

Format text in a shape
You can change the font, character spacing, paragraph spacing and alignment, positioning of a text block, bullets or number, and tab stops of text in a shape.
Quick Tasks
| Task | Action |
| Add text to a shape | Select the shape on the page and type your text. |
| Select the text in a shape | Double click the shape that contains the text you want to format. |
| Format a text block |
|
| Copy text formatting from one shape to another |
|
| Change the text block background color |
|
| Format symbols and punctuation |
|
 .
.Change the line of a shape
You can change the line color, line weight, dash type, and transparency of a shape's border.
Quick Tasks
| Task | Action |
| Change the line color or formatting |
|
| Remove the line from a shape |
|
Apply a new fill to a shape
In Visio 2010, you can change the fill color, the fill pattern, and even add your own fill patterns to a shape.
Quick Tasks
| Task | Action |
| Change the fill color |
|
| Copy fill formatting from one shape to another |
|
| Apply a pattern fill |
|
| Create a new fill pattern |
Note: You will need to have the Developer tab in the Ribbon visible to do this. Show the Developer tab
|
| Remove the fill from a shape |
|
 Create multiple copies of the image to fill a shape (tile the image)
 Tile multiple images along the line without distorting them.
 Stretch a single image to fill the shape.
Apply a shadow to a shape
You can apply shadows to the shapes in your drawing and easily change the color, style, pattern, size, position, and angle of those shadows.
Quick Tasks
| Task | Action |
| Apply a shadow to a shape |
|
| Change the style, pattern, size, or position of a shadow |
|
| Remove the shadow from a shape |
|
Apply a theme to your shapes
When you apply a theme in Visio 2010, you specify the formatting (font, text colors, fill colors, borders, and shadows) of every shape on the drawing page.
The built-in themes apply both color formatting (font color, fill color) and shape effects (border style, shadow) to shapes. You can choose to change only the effects (border, shadow, font, and connector styles) or only the colors (text, line, connector, fill, and shadow colors) of the shapes in your drawing.
To learn more about themes, see Apply a professional look to your drawings with themes.
Quick Tasks
| Task | Action |
| Apply a theme to the shapes in your drawing | On the Design tab, in the Theme group, click the theme that you want or click |
| Change the theme colors | On the Design tab, in the Theme group, click Colors, and select the color that you want. |
| Change the theme effects | On the Design tab, in the Theme group, click Effects, and select the effects that you want. |
| Create your own theme |
|
| Remove a theme from a shape | Right-click the shape, point to Format, and select Remove Theme. |
 for more options.
No comments:
Post a Comment