Images in Power View
Images are great for adding visual appeal to a Power View sheet in Excel or to Power View in SharePoint. You can:
-
Add static images as a background, such as a watermark, or as a design element, such as a company logo.
-
Add data-bound images that are linked to the data you're displaying in your report.

In this article
Add static images to Power View
You can add images and background images for design or identification purposes. Pictures and background images don't repeat on each sheet or view of a workbook or report. You can use unique images or reuse them on each sheet or view.
Add a background image
-
If you're in Excel, ensure that you're on a Power View sheet. If not, Insert > Power View.
-
On the Power View tab > Background Image section > Set Image.
You can position the image by using either Stretch, Tile, or Center.
-
Set transparency. The higher the percentage, the more transparent (and less visible) the image.
Add an image
-
On the blank canvas on a Power View sheet, on the Power View tab > Insert > Picture.
-
Navigate to the image and click Open.
-
After the image is on the sheet, you can:
-
Move it: select it and then hover over the edge until you see the pointing-hand cursor.

-
Resize it: select it and then hover over the sizing handles at the middle and corners of the edges until you see the double-arrow cursor.

-
Use data-bound images in Power View
Data-bound images are part of the data in your data model. For example, you could have photos of the employees in your company, or of your products.
You can use these images in Power View in ways that make your report more meaningful and engaging:
-
As the tabs in a tile container.
-
In cards.
-
As the values in a slicer.
You may need to set properties in Power Pivot so you can use images in Power View. Data-bound images may be internal or external to your data model. Their source makes a difference in how you can use them.
Images as the tabs in a tile container

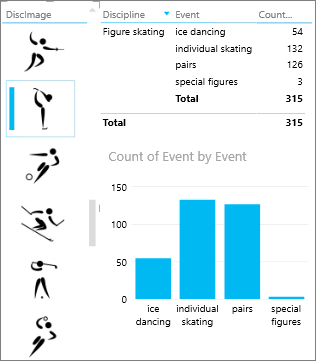
Tiles in Power View are containers with a dynamic navigation strip. Tiles act as filters – they filter the content inside the tile to the value selected in the tab strip. Images make great tabs in tiles.
-
On a Power View sheet or view, create a visualization you want in the tile.
-
Drag the image field to the Tile By box.
Power View creates tiles with images in the tab strip.
You can do much more with tiles. Read about Tiles in Power View.
Images in a card

-
On a Power View sheet, add the fields you want in the card.
-
On the Design tab > Table > Card.
Power View arranges the fields in the same order they are in the Fields box, with two exceptions:
-
The default field is displayed as a heading.
-
The default image is large and prominently displayed.
Read about cards in Power View.
Images as the value in a slicer

-
On a Power View sheet or view, click the blank canvas.
-
In the Field List, check the box for the field that contains your images.
-
Power View creates a table with those images.
-
On the Design tab > Slicer.
Tip: If Slicer is grayed, check to see if you have more than one field in the table. You can only make a slicer from a table with one field.
-
Now when you click the images in the slicer, the sheet is filtered to values associated with that image.
Read about slicers in Power View.
Set image properties in Power Pivot to use in Power View
Set a default image in Power Pivot
You can set a default image in Power Pivot if your data is in Excel. Default images are larger and more prominently placed when added to a card. To set as a default image, the images (or links to the images) have to be in a table in which they're unique – meaning each row contains a different image.
-
On the Power Pivot tab in Excel > Manage Data Model.
Don't see the Power Pivot tab? Enable Power Pivot.
-
Click Advanced > Table Behavior.
-
Set a Row Identifier – for example, a column that contains a unique ID. The values in the Row Identifier column must be unique.
-
Set Default Image to the name of your image column.
Tip: If you set a Default Label, too, it appears under the image in a tile container.
Read about configuring table behavior properties for Power View reports.
Control sort order
Another advantage of setting a default image is that you can control the sort order of images. By default, images in slicers and tiles are sorted by the file name of the image, but if you identify an image as the default image, then it will be sorted according to the Row Identifier column. If you identify another column as the Default Label column, then the images will be sorted according to the values in that column.
If your data is in Excel and the images are in a table in which the rows are not unique, you can still set the sort order to another field.
-
On the Power Pivot tab > Manage Data Model.
Don't see the Power Pivot tab? Enable Power Pivot.
-
Click in the column that contains images or image URLs.
-
On the Home tab >Sort by Column.
-
The image column is in the Sort box.
-
In the By box, select the name of the column to sort the images by.
-
Click OK.
Sources for data-bound images
Images in your Power View report can come from several sources:
-
On an external site.
-
In the data model.
-
On a SharePoint site.
Images on an external site
When images are on an external site, Power View accesses the images anonymously, so the images must allow anonymous access. Thus, even if a report reader has permissions to view the images, the images still might not be visible.
The procedure for images on the external site also works for images on SharePoint, except of course the URL is to an external site rather than to a SharePoint site.
Say you have access to a set of images on an external site, and in Excel you have a column in a table that contains the image names. The most flexible way to manage links to the images is to create a calculated column to bring the image name and the URL to the location of the images on the external site.
-
Copy the URL to the external site.
-
On the Power Pivot tab in Excel > Manage Data Model.
Don't see the Power Pivot tab? Enable Power Pivot.
-
Click in a blank cell in the Add Column column and type an equal sign (=), the URL in quotation marks (""), and the image column name in square brackets ([]). For example:
="http://contoso.com/images" & [ImageNameColumn]
-
Power Pivot fills every cell in the column with the URL plus the name of the image.
-
Click the column heading, right-click, click Rename Column, and give the column an informative name.
-
To make sure this works, copy one of the values and paste it in the Address box in a browser. It should display the image.
Note: External images can't be displayed in Power View sheets in Office 365. The images need to be stored in a table in the data model.
Images stored in the data model
Having the images in the data model has advantages:
-
The workbook is complete. You can take it offline and still see the images.
-
The images will display in Power View sheets in Office 365.
Images need to be in a column with the Binary data type. You can't see the images in Power Pivot; each field in the column will just read "Binary Data". But when you add the field to Power View, the images are displayed there.
Important: Images in a Binary column are only visible in the Field List in Power View if the underlying table has a Row Identifier column. Read about configuring table behavior properties for Power View reports.
If you have access to SQL Server, you can bring the images into SQL Server and then upload them to your model. See this Microsoft blog post, Adding Images with Power Pivot: Visualizing the Olympics with Power View in Excel 2013, for more information.
Note: Power View doesn't support OLE objects as images.
This means you can't import images into your model from Access, because Access stores images as OLE objects.
Images in a SharePoint folder
If you're using Power View in SharePoint (not Power View in Excel), then you can link to images in a SharePoint folder the same way you link to them on an external site.
Note: In Excel on your desktop, Power View sheets can display images stored on a SharePoint site only if the images allow anonymous access, which most SharePoint configurations do not allow. Thus, even if you and your workbook readers have permissions to view the images directly on the SharePoint site, Power View in Excel may not be able to display them.
Thanks for sharin,get an affordable container site office at best quality.
ReplyDelete