Record your slide show in PowerPoint for Mac
If you have a headset or microphone and speakers you can record a PowerPoint presentation and capture the voice narration, and timing between slides. Once you have a recorded version you like, others can view the presentation exactly as you intended.
Prepare to record with PowerPoint 2016 for Mac
To begin, open the presentation you want and click the Slide Show tab.
Tip: If your presentation has a lot of slides, you might find it more convenient to work in Slide Sorter view. Click View > Slide Sorter to try it out.
Here are some things to check before you begin recording:
-
If you want to record only part of your slide deck, do one of the following before you begin:
-
Select the slides you don't want to include, and click Hide Slide.
OR
-
Click Custom Show > Custom Slide Show > + (add).

-
-
Use the Rehearse button to change the timing between slides without affecting the narration or gestures you've already recorded.

-
Make sure your microphone is set up correctly. On the Mac, go to System Preferences > Sound.
Record your slide show with PowerPoint 2016 for Mac
If you want to add narration or commentary to the slide show, make sure your microphone is set up and working.
To start recording:
-
Click the Slide Show tab, select the slide where you want the recording to begin, and then click Record Slide Show.

-
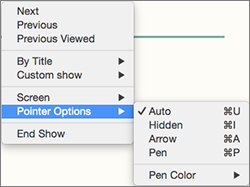
During recording, use Ctrl+click to access the recording commands that let you navigate through the slides, change cursors, or trigger screen blackouts or whiteouts.

-
Click End Show to stop recording.
-
A Save dialog box appears. Click Yes to save your recording, or No if you want to record it again.
Saving overwrites anything you've previously recorded. If you want to record another slide show with the same set of slides, save your presentation file with a different name.
-
Click Play from Start to preview your recording.
Keyboard shortcuts during the recording process
You may want to print this list of keyboard shortcuts to refer to while you're recording:
| Task | Keyboard Shortcut |
|---|---|
| Advance to the next slide or animation | N |
| Return to the previous slide or animation: | P |
| Go a specific slide | Slide number + Enter |
| Toggle screen blackout | B |
| Toggle screen whiteout | W |
| Stop/Restart automatic show: | S |
| End slide show | Esc |
| Erase drawing on screen | E |
| Go to next slide if hidden | H |
| Change pointer to pen | Command+P |
| Change pointer to arrow | Command+A |
| Hide arrow on mouse move | CONTROL+H |
| Shortcut menu | CONTROL+click |
| Advance on mouse click (rehearsing only) | M |
Set playback options with PowerPoint 2016 for Mac
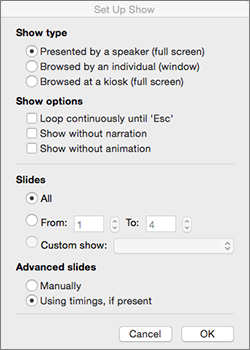
When you've finished recording and are ready to distribute the presentation, click Set up Slide Show and choose the options that are right for your audience.

-
Show type Show full screen or windowed.
-
Show options Turn off narration or transitions.
-
Slides Choose a subset of slides, or a Custom show if you've set one up.
-
Advance slides Set up this version of the slide show so someone can page through it manually.
-
To do this procedure, your computer must be equipped with a sound card, microphone, and speakers. Make sure that you aren't running any other sound recording applications, such as Speech Recognition.
-
Recording slide timings will also record the timing and duration of animation effects and the use of any triggers on your slide. You can turn the timings off when you don't want the presentation to use them.
-
When you save a presentation as a movie, narration is not saved.
Record a presentation with PowerPoint 2011 for Mac
-
In the navigation pane, click the slide that you want to start with.
How to select slides in the navigation pane
-
On the View menu, click Normal.
-
In the top of the navigation pane, click the Slides
 tab, and then click a slide. Depending on the width of the navigation pane, you will either see the
  and
and  named tabs or the Slides
  and Outline
  icon tabs.
-
-
On the Slide Show tab, under Presenter Tools, click Record Slide Show.

-
The recording automatically starts when you enter presenter view; however, you can pause and then restart the recording when you need to. Do any of the following:
To
Do this
Pause the recording
Click

Continue the recording
Click

Reset the recording for the current slide
Click

Advance to the next or previous slide
Click

-
When you reach the last slide or exit presenter view, PowerPoint prompts you to save the timings.
Tips:
-
In slide sorter view you can see the timing for each slide.
-
An audio icon
 appears in the lower-right corner of each slide that has narration. However, this icon is not visible to the audience during a slide show.
-
Change the narration on a slide with PowerPoint 2011 for Mac
When you change the narration for a single slide, the timing is also updated.
-
In the navigation pane, select the slide for which you want to change the narration.
How to select slides in the navigation pane
-
On the View menu, click Normal.
-
In the top of the navigation pane, click the Slides
 tab, and then click a slide. Depending on the width of the navigation pane, you will either see the
  and
and  named tabs or the Slides
  and Outline
  icon tabs.
-
-
On the Slide Show tab, under Presenter Tools, click Record Slide Show.

-
When you are finished recording, click Exit Show or press ESC.
-
When prompted to save the timings, click Yes.
Note: To delete the narration from a slide, select the audio icon
 on the slide, and then press DELETE.
Set slide timings manually with PowerPoint 2011 for Mac
PowerPoint automatically records your slide timings when you record the slide show, or you can manually set the slide timings to accompany your narration.
-
In the navigation pane, select the slide or slides for which you want to manually set slide timing.
How to select slides in the navigation pane
-
On the View menu, click Normal.
-
In the top of the navigation pane, click the Slides
 tab, and then click a slide. To select multiple slides, hold down
  as you click the slides. Or, if you organized your slides into sections, select a whole group of slides by clicking the section title. Depending on the width of the navigation pane, you will either see the
  and
and  named tabs or the Slides
  and Outline
  icon tabs.
-
-
On the Transitions tab, under Advance Slide, select the After check box, and then type the number of seconds.

Turn off narration or slide timings before you play a slide show with PowerPoint 2011 for Mac
Turning off the narration and slide timings does not delete them. You can turn the narration or timings back on at any time without having to recreate them.
Do one of the following:
| To | Do this |
| Turn off slide timings | On the Slide Show tab, under Set Up, clear the Use Timings check box.  |
| Turn off narrations for all slides | On the Slide Show tab, under Set Up, clear the Play Narrations check box.  |
Related information
Add, edit, or remove transitions between slides in PowerPoint 2016 for Mac
View your speaker notes as you deliver your slide show in PowerPoint 2016 for Mac
Add audio to your slide show in PowerPoint 2016 for Mac
No comments:
Post a Comment