Set tabs in a Word 2016 for Mac document
There are several ways to set tabs in a Word document.
Add tab stops
A quick way to set tab stops in your document is to click the ruler where you want the tabs to appear.

-
If you don't see the ruler at the top of your document, click View > Ruler to display it.

-
Click the ruler where you want a tab stop. For example, click 1, 2, 3, 4, and 5.

Now, when you press the TAB key, your text will line up with the tabs you've set.
Note: To adjust the position of a tab, drag it right or left along the ruler.
Add a hanging indent
With a hanging indent, the second and all the following lines of a paragraph are indented more than the first.

-
If you don't see the ruler at the top of your document, click View > Ruler to display it.

-
Select the text where you want to add a hanging indent.
-
On the ruler, drag the upper triangular part of the lower marker to the place you want the indentation to start, for example to the 1" mark.

Add dot leaders
The space between tabs can show dots, dashes, or other "leader" characters to line up information.

-
If you don't see the ruler at the top of your document, click View > Ruler to display it.

-
Click the lower edge of the ruler where you want to set the tab.
-
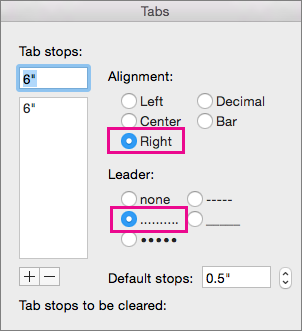
On the Format menu, select Tabs to open a window with tab options.
-
Select the tab.

-
Under Alignment select Right.
-
Under Leader, select the dotted lines option, and then click OK.
Now you can add entries and when you press TAB, a dotted line will appear across the page, to the 6" mark. The formatting will be added to each new line until you change the leader. To change the formatting so no leader appears, follow steps 3-5 and under Leader, choose none.
Note: If you're creating a table of contents, you can follow the steps for adding a table of contents.
Lifesaver. Thanks!
ReplyDeleteGreat post
ReplyDeleteThanks for sharing
buy MS Office Key