Import a pre-configured SAP workflow template
This article describes how to save a workflow task workspace as a template, and then import the template to a different site collection.
A workflow task workspace is a SharePoint site that hosts all the tasks for a SAP workflow task type. You can create the workflow task workspace in a development environment. After all customizations and testing are completed, you can save the workflow task workspace as a template and deploy it in a production environment.
Important: To perform the steps in the following procedures, you must be a site collection administrator on the site collection where the root workflow exists.
What do you want to do?
Save the workflow template
You can save a workflow template by working with options in SharePoint Designer 2013 or SharePoint Server. This procedure describes how to save a template by using SharePoint Server.
To save the workflow template by using SharePoint Server, follow these steps:
-
Browse to the workflow task workspace, click the Settings icon, and then click Site settings.
-
On the Site Settings page, in the Site Actions group, click Save site as template.
-
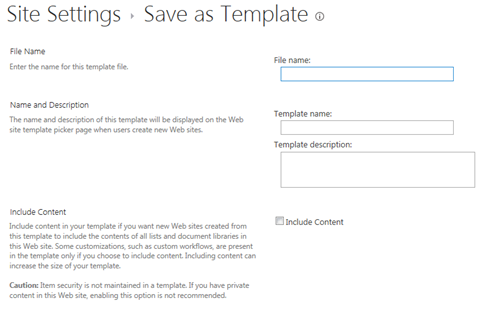
On the Save as Template page, in the File name box, type the name that you want to use for the template file. In the Template name and Template description boxes, type a name and a description for the template.

-
Verify that the Include Content box is not selected.
-
Click OK to accept the settings and save the template to the Solutions Gallery.
SharePoint Server displays an information window while it processes this request, and then displays a message when it finishes the process. -
In the Operation Completed Successfully page, click the solution gallery link to manage the new template in the Solutions Gallery.
-
In the Solutions Gallery, click the name of the template that you want to download.
-
In the File Download dialog box, click Save.
The template is saved in the computer's download folder location.
Upload the workflow template to the new site
-
Copy the workflow template that you saved in the previous procedure to the target environment.
-
Go to the root level site of the site collection where you want to use the new template.
-
From the home page of the root-level site, click the Settings icon, and then click Site settings.
-
In the Site Settings page, in the Web Designer Galleries group, click Solutions to open the Solutions page of the Solutions Gallery.
-
On the Solutions tab, click Upload Solution.
-
In the Add a document dialog box, click Browse to open the Chose File to Upload dialog box.
-
Select the name of the template file that you want to upload, and then click Open.
-
In the Add a document dialog, verify that the Choose a file box shows the path and file name that you want to upload, and then click OK. The Solution Gallery – Activate Solutions dialog opens.
-
In the Solution Gallery – Activate Solutions dialog box, click Activate to enable the template and return to the Solutions page.
You can now use this template to create a workflow site that uses the template that you uploaded.
Import the SAP workflow template
-
Go to the root workflow site that you want to contain the new workflow.
-
Click the Settings icon, and then click Site settings.
Note: A root workflow site is a site that has the Duet Enterprise – SAP Workflow feature activated.
-
On the Site Settings page, in the SAP Workflow Configuration group, click Import a pre-configured SAP Workflow template.
-
On the Import a pre-configured SAP Workflow template page, in the Template Selection pane, click the Custom tab.
-
Select the name of the workflow template that you saved.
-
In the External Content Type pane, enter Workflow Task. Alternatively, you can click the entity browse button, and select Workflow Task from a list. Click the check entity button to verify the name.
-
In the Activation Date pane, specify the time when you want Duet Enterprise to enable the workflow.
-
Click Activate.
-
In the Template Imported Successfully box, click OK.
A workspace is created to host all the tasks for a SAP workflow task type. Before you can use this workflow to receive and manage SAP business tasks, you must give users access to the SAP workflow task type. If the workflow template has not been used previously, you will also need to publish the workflow. For more information about how to grant users access and how to publish a workflow, see Create an SAP workflow on a Duet Enterprise site.
No comments:
Post a Comment