Format bulleted or numbered lists
You can change the style, color, and size of the bullets or numbers in your Microsoft PowerPoint 2010 presentation. You can also change the number that you want to start from, increase or decrease indents, and increase or decrease spacing between a bullet or number and its text.
PowerPoint does not support decimal numbered lists.
Note: If you have not yet added bullets or numbering to your slide, see Add bullets or numbers to text. To adjust the indent in bulleted or numbered lists that appear on all the slides in your presentation, see Adjust the indent in a bulleted or numbered list on the ruler. If you want to add or change bullets or numbering on multiple slides, see Create or customize a slide master for information about how to do so.
Change the look of a bullet or number
-
To change one bullet or number, place the cursor at the start of the line that you want to change. To change multiple bullets or numbers, select the text in all of the bullets or numbers that you want to change.
-
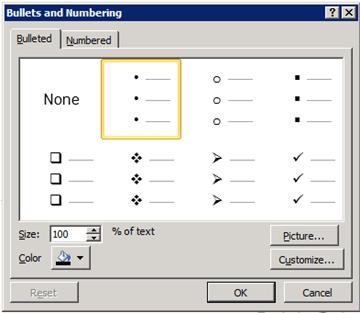
On the Home tab, in the Paragraph group, click the arrow on either the Bullets or Numbering button, and then click Bullets and Numbering.

-
In the Bullets and Numbering dialog box, do one or more of the following:
-
To change the style of the bullets or numbering, on the Bulleted tab or the Numbered tab, click the style that you want.

-
To use a picture as a bullet, on the Bulleted tab, click Picture, and then scroll to find a picture icon that you want to use.
-
To add a character from the symbol list to the Bulleted or Numbered tabs, on the Bulleted tab, click Customize, click a symbol, and then click OK. You can apply the symbol to your slides from the style lists.
-
To change the color of the bullets or numbers, on the Bulleted tab or the Numbered tab, click Color, and then select a color.
-
To change the size of a bullet or number so that it is a specific size in relation to your text, on the Bulleted tab or the Numbered tab, click Size, and then enter a percentage.
-
To convert the existing bulleted or numbered list to a SmartArt graphic, on the Home tab, in the Paragraph group, click Convert to SmartArt Graphic.
Change the indent, or spacing between text and points
-
To create an indented (subordinate) list within a list, place the cursor at the start of the line that you want to indent, and then on the Home tab, in the Paragraph group, click Increase List Level .

1. Decrease List Level (indent)
2. Increase List Level (indent)
-
To move text back to a less indented level in the list, place the cursor at the start of the line, and then on the Home tab, in the Paragraph group, click Decrease List Level.
-
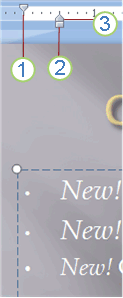
To increase or decrease the space between a bullet or number and the text in a line, place the cursor at the start of the line of text. To view the ruler, on the View tab, in the Show group, click the Ruler check box. On the ruler, click the hanging indent (as shown in diagram below) and drag to space the text from the bullet or number.
Note: There are three different markers that appear on the ruler to indicate the indentation defined for a text box.

1. first line indent Indicates the position of the actual bullet or number character. If the paragraph is not bulleted then this indicates the position of the first line of text.
2. left indent Adjusts both the First Line and Hanging indent markers and maintains their relative spacing.
3. hanging indent Indicates the position of the actual lines of text. If the paragraph is not bulleted then this indicates the position of the second line (and subsequent lines) of text.
No comments:
Post a Comment