This article presents basic concepts in Microsoft Word to help new users get started in creating sophisticated, professional-looking documents.
-
Click the Start button
 or press the Windows key on your keyboard to display the Start menu.
 -
In the list of applications, find Word and click it. The startup screen appears and Word starts.
Tip: The first time you start Word, the Microsoft Software License Agreement might appear.
To quit Word, click the x button  in the upper-right corner of your screen.
If you made any changes since you last saved the document, a message box appears asking if you want to save changes. To save the changes, click Yes. To quit without saving the changes, click No. If you clicked the x button by mistake, click Cancel.
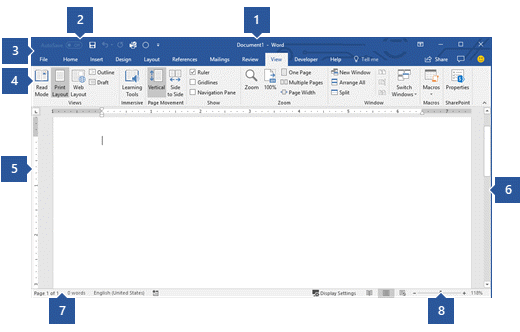
1 Title Bar: Displays the file name of the document that is being edited and the name of the software you are using. It also includes the standard Minimize, Restore, and Close buttons.
2 Quick Access Toolbar: Commands that are frequently used, such as Save, Undo, and Redo are located here. At the end of the Quick Access Toolbar is a pull-down menu where you can add other commonly used or commonly needed commands.
3 File Tab: Click this button to find commands that act on the document itself rather than the content of the document, such as New, Open, Save as, Print, and Close.
4 Ribbon: Commands needed for your work are located here. The appearance of the Ribbon will change depending on the size of your monitor. Word will compress the ribbon by changing the arrangement of the controls to accommodate smaller monitors.
5 Edit Window: Shows the contents of the document you are editing.
6 Scroll Bar: Lets you change the display position of the document you are editing.
7 Status Bar: Displays information about the document you are editing.
8 Zoom slide control: Lets you change the zoom settings of the document you are editing.
In Word, you must save your document so you can quit the program without losing your work. When you save the document, it is stored as a file on your computer or in a network location. Later, you can open the file, change it, and print it.
To save a document, do the following:
-
Click the Save button in the Quick Access toolbar. The Save As window appears.
-
Choose a location where you want to save the document and enter a file name in the File name box. To change the file name, type in a new file name.
-
Click Save.
You can open a Word document to resume your work. To open a document, do the following:
-
Open File Explorer, and click Documents. A list of documents appears.
-
If the document you want to work on is on the list, click the file name to open the document. If the document isn't on the list, navigate to the location where you stored your file, and double-click the file. The Word startup screen appears, and then the document is displayed.
Tip: You can also open a document from within Word by clicking the File tab and then clicking Open. To open a document you saved recently, click Recent.
Before you edit or format text, you must first select the text. Follow the steps below to select text.
-
Place the curser at the beginning of the text you'd like to edit or format and then press the left mouse button.
-
While holding down the left mouse button, move it to the right (called "dragging") to select the text. A background color is added in the location of the selected text to indicate the selection range.
You can find most text formatting tools by clicking the Home tab and then choosing from the Font group.
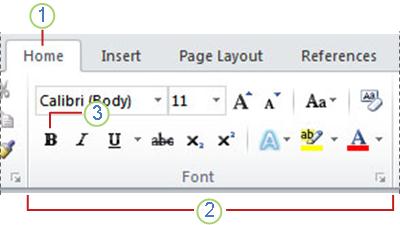
1 This is the Home tab.
2 This is the Font group on the Home tab.
3 This is the Bold button. See the table below for the names and functions of all the buttons in the Font group.
| Button | Name | Function |
|---|---|---|
| | Font | Changes the font. |
| | Font Size | Changes the size of the text. |
| | Grow Font | Increases the text size. |
| | Shrink Font | Decreases the text size. |
| | Change Case | Change all the selected text to uppercase, lowercase, or other common capitalizations. |
| | Clear Formatting | Clears all formatting for the selected text, leaving only the plain text. |
| | Bold | Makes the selected text bold. |
| | Italic | Italicizes the selected text. |
| | Underline | Draws a line under the selected text. Click the dropdown arrow to select the type of underline. |
| | Strikethrough | Draws a line through the middle of selected text. |
| | Subscript | Creates subscript characters. |
| | Superscript | Creates superscript characters. |
| | Text Effects | Apply a visual effect to selected text, such as shadow, glow, or reflection. |
| | Text Highlight Color | Makes text look like it was marked with a highlighter pen. |
| | Font Color | Changes the text color. |


Styles allow you to quickly format major elements in your document, such as headings, titles, and subtitles. Follow the steps below to apply styles to the text in your document.
-
Highlight the text you want to change.
-
On the Home tab in the Styles group, pause the pointer over any style to see a live preview directly in your document. To see the complete list of styles, click the More arrow to open the Styles pane.
-
To apply the style that's most appropriate for your text, just click it.
When you're done applying styles to the individual elements, Word lets you use a style set to change the look of your whole document all at once.
-
On the Design tab, in the Document Formatting group, choose one of the predefined style sets, such as Basic or Casual. Pause the pointer over any style set to see a live preview directly in your document. To see more predefined style sets, click the down arrow on the right side of the Document Formatting group.
-
To apply the style set that's most appropriate for your text, just click it.
With Word, you can easily change the spacing between lines and paragraphs in your document.
-
On the Design tab, click Paragraph Spacing to see a drop-down list of paragraph spacing options. Pause the pointer over any paragraph spacing style to see a live preview directly in your document.
-
When you find the look you want, click it.
Tip: To define your own paragraph spacing, choose Custom Paragraph Spacing.
It's easy to preview what the layout of your document will look like when printed without actually printing.
-
Click the File tab.
-
Click Print to see a preview of your document.
-
Review the Settings for any properties you might want to change.
-
When the properties for your printer and document appear the way that you want them to, click Print.

To use Word, look for the Word icon in the Start menu and click it.
-
Click the Start button
 to display the Start menu.
 -
Point to All Programs, Microsoft Office, and then clickMicrosoft Word 2010.
-
The startup screen appears, and Word starts.
Tip: The first time you start Word, the Microsoft Software License Agreement might appear.
To quit, choose the Exit command on the File tab.
-
Click the File tab.
-
Choose Exit.
If you made any changes since you last saved the document, a message box appears asking if you want to save changes. To save the changes, click Yes. To quit without saving the changes, click No. If you clicked the Exit button by mistake, click Cancel.
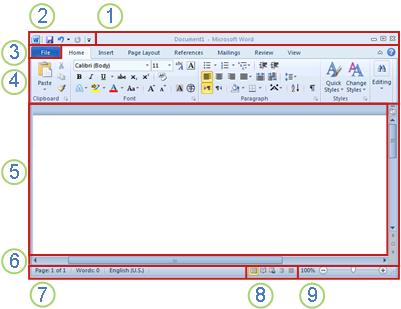
1 Title Bar: Displays the file name of the document that is being edited and the name of the software you are using. It also includes the standard Minimize, Restore, and Close buttons.
2 Quick Access Toolbar: Commands that are frequently used, such as Save, Undo, and Redo are located here. At the end of the Quick Access Toolbar is a pull-down menu where you can add other commonly used or commonly needed commands.
3 File Tab: Click this button to find commands that act on the document itself rather than the content of the document, such as New, Open, Save as, Print, and Close.
4 Ribbon: Commands needed for your work are located here. The appearance of the Ribbon will change depending on the size of your monitor. Word will compress the ribbon by changing the arrangement of the controls to accommodate smaller monitors.
5 Edit Window: Shows the contents of the document you are editing.
6 Scroll Bar: Lets you change the display position of the document you are editing.
7 Status Bar: Displays information about the document you are editing.
8 View Buttons: Lets you change the display mode of the document you are editing to fit your needs.
9 Zoom slide control: Lets you change the zoom settings of the document you are editing.
In Word, you must save your document so you can quit the program without losing your work. When you save the document, it is stored as a file on your computer. Later, you can open the file, change it, and print it.
To save a document, do the following:
-
Click the Save button in the Quick Access toolbar.
-
Specify the location where you want to save the document in the Save in box. The first time you save your document, the first line of text in the document is pre-filled in as the file name in the File name box. To change the file name, type in a new file name.
-
Click Save.
-
The document is saved as a file. The file name in the Title Bar changes to reflect the saved file name.
You can open a Word document to resume your work. To open a document, do the following:
-
Click the Start button, and then click Documents.
-
Navigate to the location where you stored your file, and double-click the file. The Word startup screen appears, and then the document is displayed.
Tip: You can also open a document from within Word by clicking the File tab and then clicking Open. To open a document you saved recently, click on Recent
.
Before you edit or format text, you must first select the text. Follow the steps below to select text.
-
Place the curser at the beginning of the text you'd like to edit or format and then press the left mouse button.
-
While holding down the left mouse button, move it to the right (called "dragging") to select the text. A background color is added in the location of the selected text to indicate the selection range.
Most text formatting tools are found by clicking the Home tab and then choosing from the Font group.
1 This is the Home tab.
2 This is the Font group on the Home tab.
3 This is the Bold button. See the table below for the names and functions of all the buttons in the Font group.
| Button | Name | Function |
|---|---|---|
| | Font | Changes the font. |
| | Font Size | Changes the size of the text. |
| | Grow Font | Increases the text size. |
| | Shrink Font | Decreases the text size. |
| | Change Case | Change all the selected text to uppercase, lowercase, or other common capitalizations. |
| | Clear Formatting | Clears all formatting for the selected text, leaving only the plain text. |
| | Bold | Makes the selected text bold. |
| | Italic | Italicizes the selected text. |
| | Underline | Draws a line under the selected text. Click the dropdown arrow to select the type of underline. |
| | Strikethrough | Draws a line through the middle of selected text. |
| | Subscript | Creates subscript characters. |
| | Superscript | Creates superscript characters. |
| | Text Effects | Apply a visual effect to selected text, such as shadow, glow, or reflection. |
| | Text Highlight Color | Makes text look like it was marked with a highlighter pen. |
| | Font Color | Changes the text color. |
Styles allow you to quickly format major elements in your document, such as headings, titles, and subtitles. Follow the steps below to apply styles to the text in your document.
-
Highlight the text you want to change.
-
On the Home tab in the Styles group, pause the pointer over any style to see a live preview directly in your document.
-
To apply the style that's most appropriate for your text, just click it.
When you're done applying styles to the individual elements, Word 2010 lets you change the look of your whole document all at once.
-
On the Home tab, in the Styles group, click Change Styles.
-
Point to Style Set to find predefined style sets. Pause the pointer over any style set to see a live preview directly in your document.
-
When you find the look you want, click it.
With Word 2010, you can easily change the spacing between lines and paragraphs in your document.
-
On the Home tab, in the Styles group, click Change Styles.
-
Point to Paragraph Spacing to find a selection of built-in paragraph spacing styles. Pause the pointer over any paragraph spacing style to see a live preview directly in your document.
-
When you find the look you want, click it.
Tip: To define your own paragraph spacing, choose Custom Paragraph Spacing.
It's easy to preview what the layout of your document will look like when printed without actually printing.
-
Click the File tab.
-
Click Print to see a preview of your document.
-
Review the Settings for any properties you might want to change.
-
When the properties for your printer and document appear the way that you want them to, click Print.
Welcome to the future! Financing made easy with Prof. Mrs. DOROTHY LOAN INVESTMENTS
ReplyDeleteHello, Have you been looking for financing options for your new business plans, Are you seeking for a loan to expand your existing business, Do you find yourself in a bit of trouble with unpaid bills and you don’t know which way to go or where to turn to? Have you been turned down by your banks? MRS. DOROTHY JEAN INVESTMENTS says YES when your banks say NO. Contact us as we offer financial services at a low and affordable interest rate of 2% for long and short term loans. Interested applicants should contact us for further loan acquisition procedures via profdorothyinvestments@gmail.com
I'm here to share an amazing life changing opportunity with you. its called Bitcoin / Forex trading options, Are you interested in earning a consistent income through binary/forex trade? or crypto currency trading. An investment of $200 can get you a return of $2,480 in 7 days of trading, We invest in all profitable projects with cryptocurrencies. We have excellent trading instruments and also support them with the best tools. Make as much as $1,000 or more every week with a starting capital of $200 to $350 You earn 100% of your initial profit every 7-14 business days and you get to do this from the comfort of your home/work. The truth is you must make profits trading in Cryptocurrency and investing in good signals with the best guidance from Crypto Coins Trading. Start investing with Crypto Coins Trading and start earning profitable interest quick without no doubt Payout weekly 100% guaranteed profit without any Hassles, It goes on and on The higher the investment, the higher the profits. Your investment is safe and secured and payouts assured 100%. if you wish to know more about investing in Cryptocurrency and earn daily, weekly OR Monthly in trading on bitcoin or any cryptocurrency and want a successful trade without losing Contact MRS.DOROTHY JEAN INVESTMENTS profdorothyinvestments@gmail.com
categories of investment
Cryptocurrency
Loan Offer
Mining Plan
Business Finance Plan
Binary option Trade Plan
Forex trade Plan
Stocks market Trade Plan
Return on investment (ROI) Plan
Gold and Silver Trade Plan
Oil and Gas Trade Plan
Diamond Trade Plan
Agriculture Trade Plan
Real Estate Trade Plan
YOURS IN SERVICE
Mrs. Dorothy Pilkenton Jean
Financial Advisor on Bank Instruments,
Private Banking and Client Services
Email Address: profdorothyinvestments@gmail.com
Operation: We provide Financial Service Such As Bank Instrument
From AA Rate Banks, Cash Loan,BG,SBLC,BOND,PPP,MTN,TRADING,FUNDING MONETIZING etc.