With Microsoft InfoPath 2010, you can specify control formatting rules that are based on conditions that occur in the form. If the specified conditions are true when a user fills out a form with formatting rules, then the formatting is applied. Formatting rules can be used to apply bold, underline, italic, strikethrough, font color, and background color to controls; or hide/show or disable controls.
In this article
Formatting rule examples
The following are some examples of how to use formatting rules in a form template:
-
Hide the shipping address section unless the Specify Shipping Address check box is selected.
-
Change the font color to blue and the font style to bold for all expenses that require a receipt.
-
Change control background color in a repeating table based on the value of a text box in the row. For example, make all controls red in a row for an overdue item and green for items that are on schedule.
-
Mark financial entries with red text when they are less than $0 and green text when they are $0 or more.
-
Filter rows in a repeating table.
Note: You can also use a validation rule to display a message when a user enters incorrect values into a form.
Add formatting
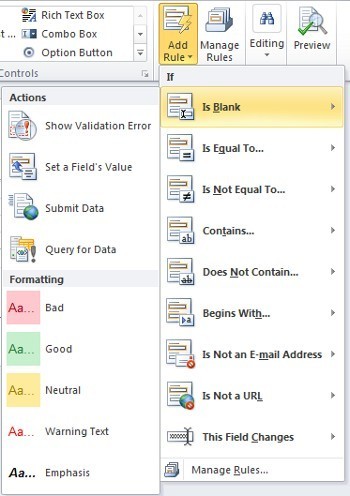
Use the Add Rule button
Out-of-the-box formatting rules can be added by using the Add Rule command.
-
Click a control.
-
On the Home tab, in the Rules group, click Add Rule.
-
Click the type of condition that the rule needs to meet in order to apply, such as Is Blank if you want the rule to apply if the value of the field is blank.
-
Click the type of formatting to apply, such as shading the background color of the cell or modifying the font to indicate a warning.
Note: Depending on the type of condition that you chose, you might be asked to enter additional information.
When finished, the Rules task pane appears and you can make any necessary changes to the rule.
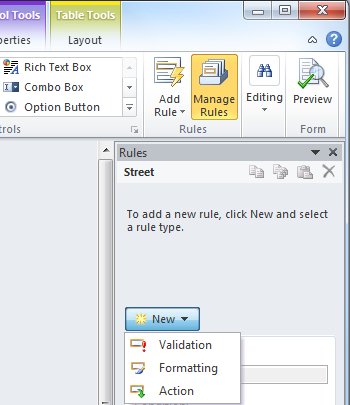
Use the Rules task pane
Complete the following steps to add a formatting rule from the Rules task pane:
-
Create a formatting rule
-
Click a control.
-
If the Rules task pane is not visible, then, on the Home tab, in the Rules group, click Manage Rules.
-
Click New.
-
Click Formatting.
-
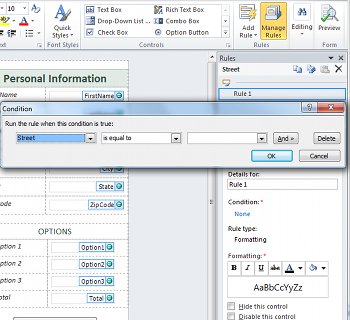
Enter a name for the rule in the Details for text box.
-
-
Specify the conditions.
-
In the condition section, click None.
-
If the condition for your rule is based on a field, complete the following:
-
In the first box, click a field or select Select a field or group.
-
In the second box, click an operator such as is equal to.
-
In the third box, enter a value.
Note: It is also possible to base a rule on an expression or a set of signable data. For more information about these advanced scenarios, see the corresponding section under Advanced condition scenarios.
-
-
Click And to add another condition, and then repeat step 2 or click OK.
Note: After adding a second condition, the And button is replaced with a box. Leave and selected if both the first and each subsequent condition needs to be true for the conditional formatting to be applied. Otherwise, if only one of the conditions should be true for the conditional formatting to be applied, click or.
-
-
Specify the formatting.
-
Make the desired selections from the Formatting section. From this section you can indicate that text in the control is bold or underlined, change the color of the text or background color of the control, or turn on or off the control.
-
Note: If you add multiple formatting rules and more than one is true, only the formatting for the first true condition is applied.
Data entry patterns
Formatting rules can be based on the text pattern that a user enters into a text field. For example, if you want to collect a United States ZIP code, then you want to make sure that only five numbers, no less, no more, and no alphabetical characters are entered. Likewise, if you want a user to enter an email address , then you can match the input to a pattern that includes text, an "@" symbol, a domain, and a domain suffix such as ".com".
To do this, from the Operator text box, select Matches Pattern when building the condition, and then select the Select a pattern option. The Data Entry Pattern dialog appears, from which you can select from several pre-defined, standard patterns. If one of these patterns does not meet your needs, then you can indicate a custom pattern. Custom patterns can require the use of special characters, which can be easily inserted by selecting them from the Insert special character box.
Advanced condition scenarios
The following are advanced scenarios that you can use when setting the condition of a data formatting rule.
-
Base a rule on an expression
An expression is a set of values, fields or groups, functions, and operators. You can use an expression to set the value of a field in such scenarios as automatically including today's date on a form, or adding the cost of items entered into an expense report to get the total.
-
In the first box, click an expression.
-
In the second box, enter the expression.
-
Base a rule on a set of signable data
If a form requires a digital signature and it has not been signed, you might want to disable the submit button. Or, for example, you can set the background color of the Signature field be a red until a the form is signed. This condition is only supported in InfoPath Filler forms.
-
In the first box, click Select set of signable data.
-
In the Select Set of Signable Data dialog box, select the set of signable data, and then click OK.
-
In the second box, click a condition, and then, in the third box, select any necessary criteria.
Note: For more information, see Digital Signatures in InfoPath 2010.
-
Base a rule on a user's role
While it is possible to create a form with different views, and display the appropriate view to a user, based on their role, it is also possible to have one view for all users, and hide or display individual controls in the view to a user based on their role. You can also use this to automatically fill in a user's manager, department, or other information, based on their role. User roles are only supported in InfoPath Filler forms.
-
In the first box, click User's current role.
-
In the second box, click the operator, such as is equal to.
-
In the third box, click the role or Manage roles to manage user roles.
Welcome to the future! Financing made easy with Prof. Mrs. DOROTHY LOAN INVESTMENTS
ReplyDeleteHello, Have you been looking for financing options for your new business plans, Are you seeking for a loan to expand your existing business, Do you find yourself in a bit of trouble with unpaid bills and you don’t know which way to go or where to turn to? Have you been turned down by your banks? MRS. DOROTHY JEAN INVESTMENTS says YES when your banks say NO. Contact us as we offer financial services at a low and affordable interest rate of 2% for long and short term loans. Interested applicants should contact us for further loan acquisition procedures via profdorothyinvestments@gmail.com
I'm here to share an amazing life changing opportunity with you. its called Bitcoin / Forex trading options, Are you interested in earning a consistent income through binary/forex trade? or crypto currency trading. An investment of $200 can get you a return of $2,480 in 7 days of trading, We invest in all profitable projects with cryptocurrencies. We have excellent trading instruments and also support them with the best tools. Make as much as $1,000 or more every week with a starting capital of $200 to $350 You earn 100% of your initial profit every 7-14 business days and you get to do this from the comfort of your home/work. The truth is you must make profits trading in Cryptocurrency and investing in good signals with the best guidance from Crypto Coins Trading. Start investing with Crypto Coins Trading and start earning profitable interest quick without no doubt Payout weekly 100% guaranteed profit without any Hassles, It goes on and on The higher the investment, the higher the profits. Your investment is safe and secured and payouts assured 100%. if you wish to know more about investing in Cryptocurrency and earn daily, weekly OR Monthly in trading on bitcoin or any cryptocurrency and want a successful trade without losing Contact MRS.DOROTHY JEAN INVESTMENTS profdorothyinvestments@gmail.com
categories of investment
Cryptocurrency
Loan Offer
Mining Plan
Business Finance Plan
Binary option Trade Plan
Forex trade Plan
Stocks market Trade Plan
Return on investment (ROI) Plan
Gold and Silver Trade Plan
Oil and Gas Trade Plan
Diamond Trade Plan
Agriculture Trade Plan
Real Estate Trade Plan
YOURS IN SERVICE
Mrs. Dorothy Pilkenton Jean
Financial Advisor on Bank Instruments,
Private Banking and Client Services
Email Address: profdorothyinvestments@gmail.com
Operation: We provide Financial Service Such As Bank Instrument
From AA Rate Banks, Cash Loan,BG,SBLC,BOND,PPP,MTN,TRADING,FUNDING MONETIZING etc.