You can create your own custom shapes and add them to your Favorites stencil or another editable stencil. Your shape then becomes a master shape. Your Favorites stencil and custom stencils that you create are editable; the stencils provided with Visio templates are not.
For more information about creating a custom shape, see Draw lines and shapes with the Pencil, Line, Arc, or Freeform tools. For more information about creating a custom stencil, see Create, save, and share custom stencils.
When you drag a master shape onto a drawing page, you create a copy (or instance) of the master. The master itself remains on the stencil so that you can use it repeatedly to create new copies of the master on your drawing pages.
To create a master shape and add it to a stencil
-
Open your Favorites stencil, or a custom stencil that you created.
To open Favorites, click More Shapes in the Shapes window, point to My Shapes, and then click Favorites.
-
If the stencil is not editable, right-click the stencil title, and then click Edit Stencil.
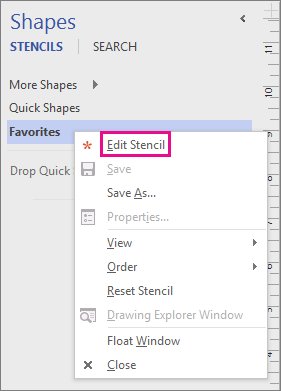
An asterisk icon
 appears on the title bar, which shows the stencil can be edited.
 -
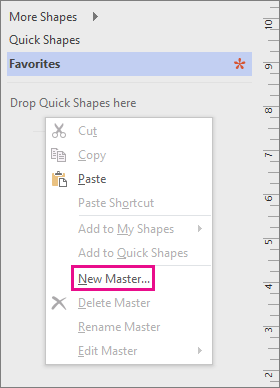
Right-click the stencil window and then click New Master.
-
In New Master, type a name and set other options for the shape, and then click OK.
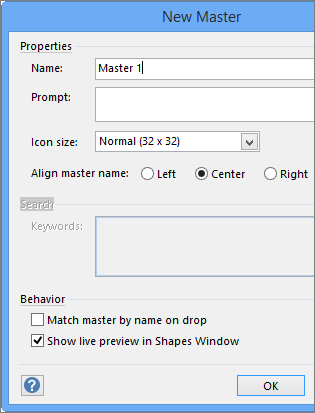
A blank shape icon appears in the stencil.
-
Right-click the icon for the new shape, point to Edit Master, and then click Edit Master Shape.
-
Create your shape by using the drawing tools, using shapes from other stencils, or pasting an object from another application.
-
Close the shape drawing window and click Yes to update the master shape.
-
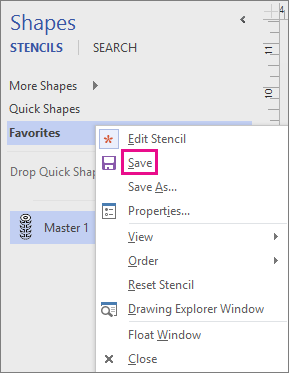
Right-click the stencil title bar and click Save to save the changes.
Important: Office 2010 is no longer supported. Upgrade to Microsoft 365 to work anywhere from any device and continue to receive support.
Upgrade now
Shapes in Visio stencils are often referred to as master shapes. When you drag a master shape onto a drawing page, you create a copy (or "instance") of the master. The master itself remains on the stencil so that you can use it repeatedly to create new copies of the master on your drawing pages.
Visio master shapes supplied by Microsoft Corporation are copyrighted. You may copy and reorganize them for your own use, modify them for your own use, and distribute drawings that contain them. You may not sell or distribute original or modified Visio master shapes.
To create a new shape, do the following:
-
Open a new stencil, your Favorites stencil, or a custom stencil that you created.
-
To open a new stencil, in the Shapes window, point to More Shapes, and then click New Stencil.
For more information about how to create a custom stencil, see Create, save, and share custom stencils. -
To open a custom stencil, in the Shapes window, point to More Shapes, click My Shapes, and then click the name of the stencil that you want.
-
-
If the stencil is not editable, right-click the stencil title bar, and then click Edit Stencil.
The icon in the stencil title bar changes to
(indicating that the stencil is editable). -
Right-click the stencil window and then click New Master.
-
In the New Master dialog box, specify characteristics for the shape.
-
Click OK.
A blank shape icon appears in the stencil.
-
Right-click the new shape, click Edit Master, and then click Edit Master Shape.
-
Create the custom shape.
You create the custom shape just as you would create a shape in a regular drawing page: by using shapes from different stencils, drawing the shape with the drawing tools, or pasting an object from another application.
-
Close the custom shape drawing window. When you are prompted to update the custom shape, click Yes.
-
To save your changes, right-click the stencil title bar, and then click Save.
Important: Office 2007 is no longer supported. Upgrade to Microsoft 365 to work anywhere from any device and continue to receive support.
Upgrade now
Shapes in Visio stencils are often referred to as master shapes. When you drag a master shape onto a drawing page, you create a copy (or "instance") of the master. The master itself remains on the stencil so that you can use it repeatedly to create new copies of the master on your drawing pages.
Visio master shapes supplied by Microsoft Corporation are copyrighted. You may copy and reorganize them for your own use, modify them for your own use, and distribute drawings that contain them. You may not sell or distribute original or modified Visio master shapes.
-
Open a new stencil, your Favorites stencil, or a custom stencil that you created.
-
To open a new stencil, on the File menu, point to Shapes, and then click New Stencil.
-
To open a custom stencil, on the File menu, point to Shapes, point to My Shapes, and then click the name of the stencil.
-
-
If the stencil is not editable, right-click the stencil title bar, and then click Edit Stencil.
The icon in the stencil title bar changes from
 (indicating that the stencil is read-only) to
  (indicating that the stencil is editable).
 -
Right-click the stencil window, and then click New Master.
-
In the New Master dialog box, specify characteristics for the shape.
-
Click OK.
A blank shape icon appears in the stencil.
-
Right-click the new shape, point to Edit Master, and then click Edit Master Shape.
-
Create the custom shape.
You create the custom shape just as you would create a shape in a regular drawing page: by using shapes from different stencils, drawing the shape with the drawing tools, or pasting an object from another application.
-
Close the custom shape drawing window. When you are prompted to update the custom shape, click Yes.
-
To save your changes, right-click the stencil title bar, and then click Save.
No comments:
Post a Comment