When you add a modern page to a site, you can add and customize web parts, which are the building blocks of your page.
Note: Some functionality is introduced gradually to organizations that have opted in to the Targeted Release program. This means that you may not yet see this feature or it may work differently than what is described in the help articles.
Use the Text web part to add paragraphs to your page. Formatting options like styles, bullets, indentations, highlighting, and links are available.
To use the Text web part:
-
On your page, hover your mouse above or below an existing web part and you'll see a line with a circled +, like this:

-
Click + and then choose Text from the list of web parts.
-
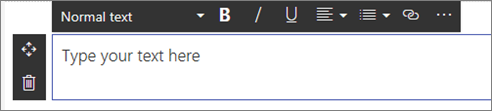
Click inside the box and the formatting toolbar will display.
-
Enter your text, and format it using the formatting toolbar. To open or close the Text and table formatting pane, click the ellipses (...) on the right side on the toolbar.

In the Text and table formatting pane, you can do everything you can do in the toolbar plus:
-
Undo and redo changes
-
Clear formatting from the selected text
-
Choose from 10 available font sizes
-
Change font color using standard or theme colors (theme colors change to reflect the theme of the site)
-
Add a highlight color
-
Use strikethrough
-
Use subscript and superscript
-
Indent text
-
Insert a table and choose table styles and alignment
-
Note: Line height is fixed and designed for legibility and ease of reading. It is set at 140% of font size. After the end of a line, you can press enter to create a new paragraph, and the spacing between the paragraphs is equal to the height of one line.
Insert a hyperlink
There are two ways to add a hyperlink. One way is using the Hyperlink command on the toolbar, and another way is to type directly in the web part.
-
Use the Hyperlink command
-
Click Hyperlink
 in the toolbar or in the Text and table formatting pane, or use CTRL+K. If you select a word before clicking, that word is used as a keyword to search for pages.
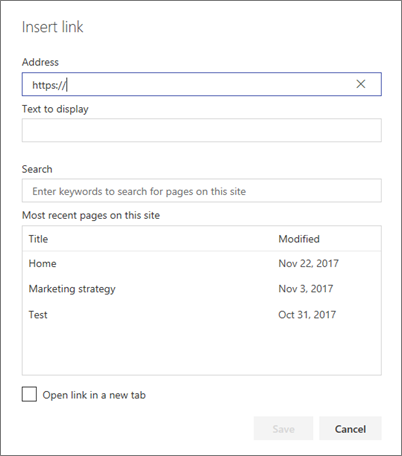
-
In the Insert Link dialog box, type the address of the link in the Address box, and the text you want linked in the Text to display box.
Optionally, if you want to link to a page on the site, you can search for it using the Search box, and then select the page in the results list.
-
When you're done, click Save.
-
-
Type directly in the web part
Type [[ within the Text web part where you want a link to appear, and you'll be able to select from a list of pages on your site. Or, you can enter a link without using the dropdown by typing [[your link name | URL]].
Page anchors
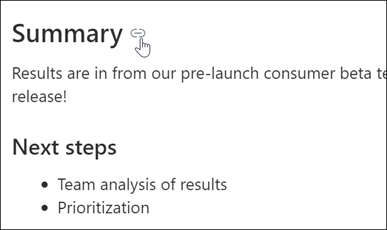
Page anchors (also known as bookmarks) are automatically added to Heading 1 styles in Text web parts on your page. When a page is published, and you hover over a Heading 1 in a Text web part, you'll see a link symbol indicating the page anchor.
You can right-click a page anchor and select "copy link" from your web browser's context menu to copy the page anchor location for use outside of SharePoint pages. Once the page anchor is on the clipboard, it can be pasted into emails, instant messages, or other such items.
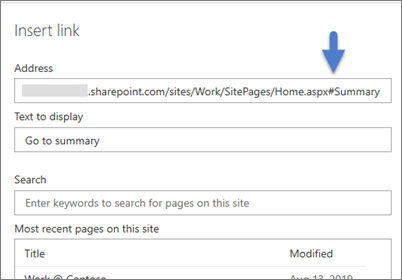
When you add a hyperlink to your page, you can jump to a Heading 1 in any text web part by appending the pound symbol (#) and the heading 1 text you want to jump to at the end of the link, as in this example:
Insert a table
-
Click the Insert table button in the Text and table formatting pane. A simple table of 3 columns and 3 rows is inserted.
You can format the text in the table by using the text formatting tools available on the toolbar or in the Text and table formatting pane.
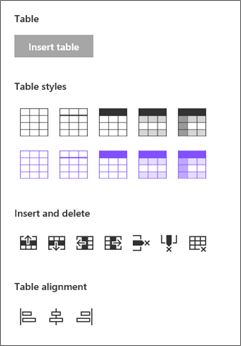
Choose a table style
In SharePoint (but not SharePoint Server 2019), you can choose a simple table style or a themed table style. The themed table styles (shown in the second row) reflect the theme color used on your site. From left to right, the table styles are:
-
Plain
-
Subtle header (header has a bottom border)
-
Header (header row has solid color and reverse font)
-
Alternating rows (header row has solid color and reverse font, and alternating rows are shaded)
-
Column header (header row has solid color and reverse font, first column and alternating rows are shaded)
Insert and delete rows and columns
Add or remove rows or columns, or delete the entire table, by clicking the appropriate buttons in the Text and table formatting pane. You can also use the Tab key to navigate within the table and to add rows. From the left to right, the options are:
-
Insert row above
-
Insert row below
-
Insert column to the left
-
Insert column to the right
-
Delete the selected row
-
Delete the selected column
-
Delete the entire table
Set table alignment
In SharePoint (but not SharePoint Server 2019), you can use the table alignment buttons to position the entire table within the web part space. You can align the table to the left, center, or right.
-
No comments:
Post a Comment