By default, protecting a worksheet locks all cells so none of them are editable. To enable some cell editing, while leaving other cells locked, it's possible to unlock all the cells. You can lock only specific cells and ranges before you protect the worksheet and, optionally, enable specific users to edit only in specific ranges of a protected sheet.
Lock only specific cells and ranges in a protected worksheet
Follow these steps:
-
If the worksheet is protected, do the following:
-
On the Review tab, click Unprotect Sheet (in the Changes group).
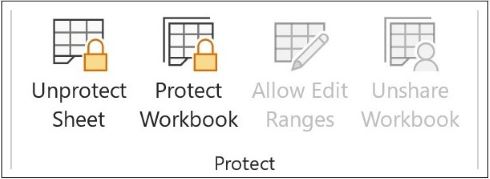
Click the Protect Sheet button to Unprotect Sheet when a worksheet is protected.
-
If prompted, enter the password to unprotect the worksheet.
-
-
Select the whole worksheet by clicking the Select All button.

-
On the Home tab, click the Format Cell Font popup launcher. You can also press Ctrl+Shift+F or Ctrl+1.

-
In the Format Cells popup, in the Protection tab, uncheck the Locked box and then click OK.
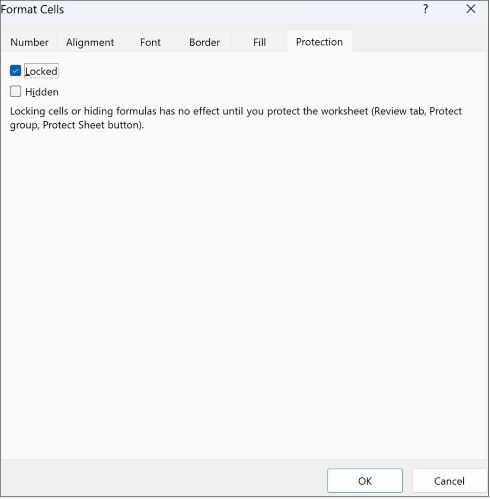
This unlocks all the cells on the worksheet when you protect the worksheet. Now, you can choose the cells you specifically want to lock.
-
On the worksheet, select just the cells that you want to lock.
-
Bring up the Format Cells popup window again (Ctrl+Shift+F).
-
This time, on the Protection tab, check the Locked box and then click OK.
-
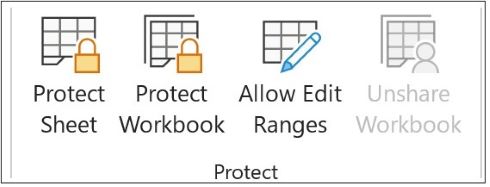
On the Review tab, click Protect Sheet.
-
In the Allow all users of this worksheet to list, choose the elements that you want users to be able to change.
More information about worksheet elements
Clear this check box
To prevent users from
Select locked cells
Moving the pointer to cells for which the Locked check box is selected on the Protection tab of the Format Cells dialog box. By default, users are allowed to select locked cells.
Select unlocked cells
Moving the pointer to cells for which the Locked check box is cleared on the Protection tab of the Format Cells dialog box. By default, users can select unlocked cells, and they can press the TAB key to move between the unlocked cells on a protected worksheet.
Format cells
Changing any of the options in the Format Cells or Conditional Formatting dialog boxes. If you applied conditional formats before you protected the worksheet, the formatting continues to change when a user enters a value that satisfies a different condition.
Format columns
Using any of the column formatting commands, including changing column width or hiding columns (Home tab, Cells group, Format button).
Format rows
Using any of the row formatting commands, including changing row height or hiding rows (Home tab, Cells group, Format button).
Insert columns
Inserting columns.
Insert rows
Inserting rows.
Insert hyperlinks
Inserting new hyperlinks, even in unlocked cells.
Delete columns
Deleting columns.
If Delete columns is protected and Insert columns is not also protected, a user can insert columns that he or she cannot delete.
Delete rows
Deleting rows.
If Delete rows is protected and Insert rows is not also protected, a user can insert rows that he or she cannot delete.
Sort
Using any commands to sort data (Data tab, Sort & Filter group).
Users can't sort ranges that contain locked cells on a protected worksheet, regardless of this setting.
Use AutoFilter
Using the drop-down arrows to change the filter on ranges when AutoFilters are applied.
Users cannot apply or remove AutoFilters on a protected worksheet, regardless of this setting.
Use PivotTable reports
Formatting, changing the layout, refreshing, or otherwise modifying PivotTable reports, or creating new reports.
Edit objects
Doing any of the following:
-
Making changes to graphic objects including maps, embedded charts, shapes, text boxes, and controls that you did not unlock before you protected the worksheet. For example, if a worksheet has a button that runs a macro, you can click the button to run the macro, but you cannot delete the button.
-
Making any changes, such as formatting, to an embedded chart. The chart continues to be updated when you change its source data.
-
Adding or editing comments.
Edit scenarios
Viewing scenarios that you have hidden, making changes to scenarios that you have prevented changes to, and deleting these scenarios. Users can change the values in the changing cells, if the cells are not protected, and add new scenarios.
Chart sheet elements
Select this check box
To prevent users from
Contents
Making changes to items that are part of the chart, such as data series, axes, and legends. The chart continues to reflect changes made to its source data.
Objects
Making changes to graphic objects — including shapes, text boxes, and controls — unless you unlock the objects before you protect the chart sheet.
-
-
In the Password to unprotect sheet box, type a password for the sheet, click OK, and then retype the password to confirm it.
-
The password is optional. If you do not supply a password, any user can unprotect the sheet and change the protected elements.
-
Make sure that you choose a password that is easy to remember, because if you lose the password, you won't have access to the protected elements on the worksheet.
-
Unlock ranges on a protected worksheet for users to edit
To give specific users permission to edit ranges in a protected worksheet, your computer must be running Microsoft Windows XP or later, and your computer must be in a domain. Instead of using permissions that require a domain, you can also specify a password for a range.
-
Select the worksheet that you want to protect.
-
On the Review tab, in the Changes group, click Allow Users to Edit Ranges.
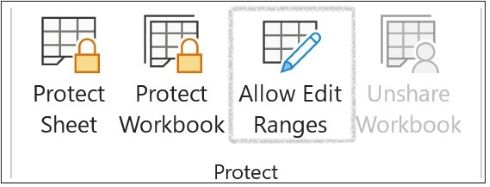
This command is available only when the worksheet is not protected.
-
Do one of the following:
-
To add a new editable range, click New.
-
To modify an existing editable range, select it in the Ranges unlocked by a password when sheet is protected box, and then click Modify.
-
To delete an editable range, select it in the Ranges unlocked by a password when sheet is protected box, and then click Delete.
-
-
In the Title box, type the name for the range that you want to unlock.
-
In the Refers to cells box, type an equal sign (=), and then type the reference of the range that you want to unlock.
You can also click the Collapse Dialog button, select the range in the worksheet, and then click the Collapse Dialog button again to return to the dialog box.
-
For password access, in the Range password box, type a password that allows access to the range.
Specifying a password is optional when you plan to use access permissions. Using a password allows you to see user credentials of any authorized person who edits the range.
-
For access permissions, click Permissions, and then click Add.
-
In the Enter the object names to select (examples) box, type the names of the users who you want to be able to edit the ranges.
To see how user names should be entered, click examples. To verify that the names are correct, click Check Names.
-
Click OK.
-
To specify the type of permission for the user who you selected, in the Permissions box, select or clear the Allow or Deny check boxes, and then click Apply.
-
Click OK two times.
If prompted for a password, type the password that you specified.
-
In the Allow Users to Edit Ranges dialog box, click Protect Sheet.
-
In the Allow all users of this worksheet to list, select the elements that you want users to be able to change.
More information about the worksheet elements
Clear this check box
To prevent users from
Select locked cells
Moving the pointer to cells for which the Locked check box is selected on the Protection tab of the Format Cells dialog box. By default, users are allowed to select locked cells.
Select unlocked cells
Moving the pointer to cells for which the Locked check box is cleared on the Protection tab of the Format Cells dialog box. By default, users can select unlocked cells, and they can press the TAB key to move between the unlocked cells on a protected worksheet.
Format cells
Changing any of the options in the Format Cells or Conditional Formatting dialog boxes. If you applied conditional formats before you protected the worksheet, the formatting continues to change when a user enters a value that satisfies a different condition.
Format columns
Using any of the column formatting commands, including changing column width or hiding columns (Home tab, Cells group, Format button).
Format rows
Using any of the row formatting commands, including changing row height or hiding rows (Home tab, Cells group, Format button).
Insert columns
Inserting columns.
Insert rows
Inserting rows.
Insert hyperlinks
Inserting new hyperlinks, even in unlocked cells.
Delete columns
Deleting columns.
If Delete columns is protected and Insert columns is not also protected, a user can insert columns that he or she cannot delete.
Delete rows
Deleting rows.
If Delete rows is protected and Insert rows is not also protected, a user can insert rows that he or she cannot delete.
Sort
Using any commands to sort data (Data tab, Sort & Filter group).
Users can't sort ranges that contain locked cells on a protected worksheet, regardless of this setting.
Use AutoFilter
Using the drop-down arrows to change the filter on ranges when AutoFilters are applied.
Users cannot apply or remove AutoFilters on a protected worksheet, regardless of this setting.
Use PivotTable reports
Formatting, changing the layout, refreshing, or otherwise modifying PivotTable reports, or creating new reports.
Edit objects
Doing any of the following:
-
Making changes to graphic objects including maps, embedded charts, shapes, text boxes, and controls that you did not unlock before you protected the worksheet. For example, if a worksheet has a button that runs a macro, you can click the button to run the macro, but you cannot delete the button.
-
Making any changes, such as formatting, to an embedded chart. The chart continues to be updated when you change its source data.
-
Adding or editing comments.
Edit scenarios
Viewing scenarios that you have hidden, making changes to scenarios that you have prevented changes to, and deleting these scenarios. Users can change the values in the changing cells, if the cells are not protected, and add new scenarios.
Chart sheet elements
Select this check box
To prevent users from
Contents
Making changes to items that are part of the chart, such as data series, axes, and legends. The chart continues to reflect changes made to its source data.
Objects
Making changes to graphic objects — including shapes, text boxes, and controls — unless you unlock the objects before you protect the chart sheet.
-
-
In the Password to unprotect sheet box, type a password, click OK, and then retype the password to confirm it.
-
The password is optional. If you do not supply a password, then any user can unprotect the worksheet and change the protected elements.
-
Ensure that you choose a password that you can remember. If you lose the password, you will be unable to access to the protected elements on the worksheet.
-
If a cell belongs to more than one range, users who are authorized to edit any of those ranges can edit the cell.
-
If a user tries to edit multiple cells at once and is authorized to edit some but not all of those cells, the user will be prompted to edit the cells one-by-one.
Need more help?
You can always ask an expert in the Excel Tech Community or get support in the Answers community.
No comments:
Post a Comment