Work offline in Outlook
With a Microsoft Exchange Server or Office 365 account, you can work offline to avoid connection charges or stop Outlook from attempting to send and receive messages over a slow network connection.
Switch between working offline and working online
-
Click Send / Receive > Work Offline.

When Outlook switches between working online and offline, all email accounts are changed.
You know you're working offline when Work Offline is highlighted on the ribbon or Working Offline appears on the status bar at the bottom of the Outlook window.

When you're ready to work online again, click Send / Receive > Work Offline. The button text doesn't change, but it's only highlighted when you're working offline. Working Offline on the status bar also goes away when you're working online.
Change how much mail to keep offline
-
Click File > Account Settings > Account Settings.

-
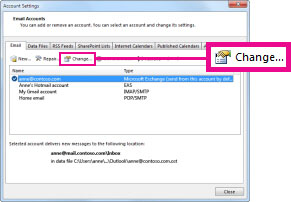
Select an Exchange account, and then click Change.

-
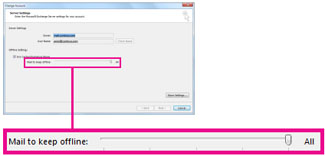
Under Offline Settings, move the slider to the desired amount of time, such as All, 12 months, 6 months, 3 months, or 1 month. Note: If you're using Outlook 2016, you can also select an amount of time as short as 3 days.

For example, if you move the slider to 3 months, only mail from the past three months will be synchronized to your Offline Outlook Data (.ost) file from the Exchange server. Items older than 3 months reside only in your mailbox on the server. You can change this setting at any time.
Cached Exchange Mode, which downloads a copy of your messages, must be turned on.
By default, Outlook configures Exchange accounts to only synchronize a specific number of months, depending on the size of the disk. The following table shows the default Sync Slider setting for different disk sizes:
| Disk size | Default setting |
|---|---|
| Smaller than or equal to 32 GB | 1 month |
| Greater than 32 GB, but smaller than 64 GB | 3 months |
| Equal to or greater than 64 GB | 1 year |
Use offline folders with your Exchange account
Offline folders make it possible to work with the contents of an Exchange folder while you are offline, that is, not connected to the network. The next time that you establish a connection to the server running Exchange, the offline folders are synchronized.
Offline folders are stored in your Offline Folder file (.ost), which is different from a Personal Folders file (.pst). The .ost file starts as a mirror image of your folders on the server running Exchange. Any changes made on the server running Exchange or on your computer while you are offline are synchronized when a connection becomes available. A .pst file, by contrast, is just a storage location on your hard disk drive. Changes to a .pst file are not synchronized back to the server running Exchange.
When you are working offline, you work with the contents of an offline folder exactly as you do with a folder that is on the server running Exchange. For example, you can change and move items in your offline Inbox and send messages that are placed in your offline Outbox. You continue to receive new messages in your mailbox on the server running Exchange. However, you will not be aware of these changes on the server until you connect to the network.
When you need to update the contents of the offline folder, you synchronize the folder with the server and then continue to work offline. The Send/Receive command connects to the server, copies the changes that were made, and then disconnects. Any item that you delete from either the offline folder or the corresponding server folder is deleted from both folders when synchronization occurs.
Note: If you are using Cached Exchange Mode, you are always working with an .ost file even when you have an active connection with the server running Exchange. Cached Exchange Mode allows you to work uninterrupted if your server connection is lost or if a network connection is not available. The procedures that follow in this section are not applicable to your configuration. For more information about Cached Exchange Mode, see the Use Cached Exchange Mode section of this article or the See Also section.
-
On the File menu, click Work Offline.
-
Select or clear the Prompt me at startup so I may choose to work offline or online check box, and then click OK.
If you clear the check box, Microsoft Outlook will automatically start offline if a connection to the server is not available.
-
Click Yes to copy the data from the server to your new Offline Folder file (.ost).
Note: Beginning with Microsoft Office Outlook 2003, a new Offline Folder file format was introduced that offers greater storage capacity for items and folders and supports multilingual Unicode data. A file that is created in this format is not compatible with earlier versions of Outlook and cannot be opened in an earlier version of Outlook. Outlook automatically determines the format in which the Offline Folder file is created, based on the version of Microsoft Exchange, the administrator settings, and the formats of the data files that are configured for the profile. If the settings do not allow the file to be created in the new format, Outlook creates the file in the format that is compatible with earlier versions of Outlook that do not support Unicode and that offer the same storage capacity that was available in earlier versions of Outlook.
-
Choose the folders that you want to be available for offline use.
The Inbox, Outbox, Deleted Items, Sent Items, Calendar, Contacts, and Tasks folders are automatically made available offline when you set up offline folders. To use any other folder offline, you must select it for offline use by doing the following:
-
On the Tools menu, point to Send/Receive, point to Send/Receive Settings, and then click Define Send/Receive Groups.
-
In the list, click a Send/Receive group that contains an Exchange account, and then click Edit.
-
Under Accounts, select your Exchange account.
-
Under Folder Options, select the folders that you want to use offline.
-
Do one of the following:
-
Select Download headers only.
-
Select Download complete item including attachments.
You can limit downloads of items that exceed a specified size to headers only. Select the Download only headers for items larger than check box, and then enter the size limit that you want in kilobytes (KB).
-
-
Use Cached Exchange Mode
By default, Microsoft Office Outlook 2007 uses Cached Exchange Mode. Cached Exchange Mode provides you with a better experience when you use a Microsoft Exchange account by using a copy of your mailbox that is stored on your computer. This copy provides quick access to your data and is frequently synchronized with the mail server.
When you use Cached Exchange Mode, all of your Exchange folders are available automatically.
-
On the Tools menu, click Account Settings.
The Account Settings command is missing
The Account Settings command is on the Tools menu in Microsoft Office Outlook 2007. If you are using an earlier version of Outlook, the following instructions do not apply. Use the Help that is included with that product. If the title bar of the program that you are using displays Microsoft Outlook Express, you are using a program that is not the same as Outlook. See Help in Outlook Express for assistance.
-
Select your Exchange account, and then click Change.
-
Under Microsoft Exchange, select the Use Cached Exchange Mode check box.
-
Exit and then restart Outlook.
All folders are kept synchronized; however, you can specify the folders that you want to be included in an immediate synchronization when you initiate a manual send/receive command to run by pressing F9.
-
On the Tools menu, point to Send/Receive, point to Send/Receive Settings, and then click Define Send/Receive Groups.
Keyboard shortcut To open the Send/Receive Groups dialog box, press CTRL+ALT+S.
-
In the list, click the Send/Receive group that contains your Exchange account, and then click Edit.
-
Under Accounts, select your Exchange account.
-
Under Folder Options, select the check box for each folder that you want to include when you initiate a manual Send/Receive All.
-
Do one of the following:
-
Select Download headers only.
-
Select Download complete item including attachments.
You can limit downloads of items that exceed a specified size to headers only. Select the Download only headers for items larger than check box, and then enter the size limit that you want in kilobytes (KB).
Note: You can download headers only when your Exchange account connects to Microsoft Exchange 2003 or later. Headers are not available on folders that do not contain mail items, for example, Calendar folders.
-
Change the folders and content that are available offline
Whenever you use offline folders, regardless of whether you use Cached Exchange Mode, you can change the folders that are copied to and synchronized on your computer.
-
On the Tools menu, point to Send/Receive, point to Send/Receive Settings, and then click Define Send/Receive Groups.
Keyboard shortcut To open the Send/Receive Groups dialog box, press CTRL+ALT+S.
-
In the list, click the Send/Receive group that contains your Exchange account, and then click Edit.
-
Under Accounts, select your Exchange account.
-
Under Folder Options, select the check box for each folder that you want to use offline.
-
Do one of the following:
-
Select Download headers only.
-
Select Download complete item including attachments.
You can limit downloads of items that exceed a specified size to headers only. Select the Download only headers for items larger than check box, and then enter the size limit that you want in kilobytes (KB).
-
Tip: To quickly designate a folder for offline use, click the folder in the Navigation Pane, and on the Tools menu, point to Send/Receive, point to Send/Receive Settings, and then click Make This Folder Available Offline.
No comments:
Post a Comment