Print your Access data
When you print data from your Microsoft Office Access 2007 database, the options you set depend on what kind of object you are printing and how you want your data to appear when printed. This article shows you the basic print options available, and how to change print layout options.
What do you want to do?
Select a print option
In some cases, you just want to quickly print objects from your database in order to verify the information. In other cases, you might want to format the data on the page to make it appear just right for printing. Select any of the following print options that suit your needs.
If you need to print data frequently, consider adding the print command to the Quick Access Toolbar. For more information about adding the toolbar, see the article Customize the Quick Access Toolbar.
Print data without changing settings
To quickly print your data without making any changes, use the Quick Print option.
-
Click the Microsoft Office Button
 , point to Print, and then click Quick Print.
Important: This option can result in many pages being printed, depending on the type of object you are printing and how many records exist in the record source for that object. In particular, if you are printing a form, make sure you have filtered the records. For more information about filtering, see the article Filter: Limit the number of records in a view.
Change printer settings
To change your printer settings, use the Print command. For example, you can choose a specific printer, the number of copies that you want to print, or choose between a single or a double-sided printout.
-
Click the Microsoft Office Button
 , and then click Print.
 -
In the Print dialog box, select the options that best fit your needs.
Preview before printing
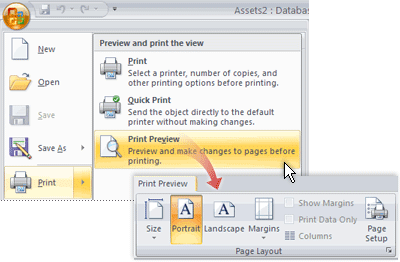
Use the Print Preview command if you want to see a preview of the page layout to ensure that what you're about to print meets your needs, or if you want to export the data to other programs.
Because datasheets and forms are not as easy to format for printing, previewing such objects can help you see how the data appears when printed. For example, you can change the page orientation or the margin settings.
-
If the object is not already open, select the object in the Navigation Pane.
-
Click the Microsoft Office Button
 , point to Print, and then click Print Preview.
Access opens the object in Print Preview.
-
On the Print Preview tab, in the Page Layout group, click any of the options that you want to use. For example, click Margins to set or change the margins of your print job, or click Landscape to change the page orientation (or click Portrait to change from Landscape orientation).
When an object is open in Print Preview, you can use the commands in the Data group of the Print Preview tab to export your data to another program.
Notes:
-
If you need to change options that cannot be changed by using the commands in the Page Layout group — such as selecting a printer, setting a print range, or selecting the number of copies — in the Print group, click Print, and then select options in the Print dialog box.
-
You cannot use Print Preview when you print Visual Basic for Applications (VBA) code modules.
-
Make page layout changes before printing
After you preview the data, you can fine tune the page layout settings to suit your formatting needs. For example, you can change the size of the paper, the page orientation, or the margins.
-
If the object is not already open, select the object in the Navigation Pane.
-
Click the Microsoft Office Button
 , point to Print, and then click Print Preview.
-
On the Print Preview tab, change any of the following page layout settings:
-
To change paper settings, in the Page Layout group, click Size and then select a paper size.
-
Page margins are the blank spaces between the edges of the page and the text. To increase or decrease the blank space to better align the data on a printed page, in the Page Layout group, click Margins and select a suitable margin width.
-
To change the page orientation, in the Page Layout group, click Portrait to orient the page vertically or click Landscape to orient the page horizontally.
The margin settings automatically change to suit the orientation.
Tip: To make the whole page visible, in the Zoom group, click the arrow next to Zoom and adjust the zoom level.
-
To change the print column settings, in the Page Layout group, click Columns, and then select the column and row grid settings, column size, and column layout that you want in your printout.
-
-
After you complete the page layout changes, click Print.
Print a table relationship diagram
You can use Access to create a visual report that shows the relationships between tables in a database. When you create the Relationship Report, Access automatically displays it in Print Preview.
-
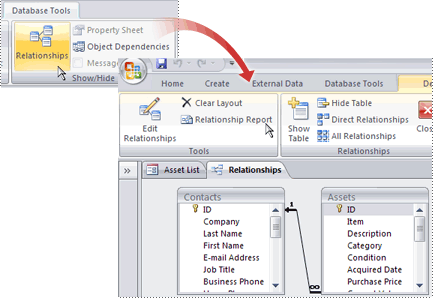
On the Database Tools tab, in the Show/Hide group, click Relationships.
The Relationships tab appears and displays the tables in the current database, plus the relationships between those tables, if any relationships exist.
-
On the Design tab, in the Tools group, click Relationship Report.

-
Use the commands in the Page Layout group of the Print Preview tab to change print options. For example, click Margins to set or change the margins of your print job, or click Portrait or Landscape to change the page orientation.

-
On the Print Preview tab, click Print.
Print a datasheet
Although datasheets are not formatted for printing, a printed datasheet can be useful for examining data.
-
To print an entire datasheet, click the Microsoft Office Button
 , point to Print, and then click Quick Print.
By default, subdatasheets are not printed when you print a datasheet. You can use a form with subform to print related records.
Print specific records from a datasheet
-
Select the data by using one of the procedures in the following table.
| To select | Do this |
| Data in a field | Drag across the data that you want to select. |
| An entire field | Position the pointer over the left edge of the field so that it changes into the plus pointer |
| Adjacent fields | Position the pointer over the left edge of the first field so that it changes into the plus pointer |
| A column | Click the column header. |
| Adjacent columns | Drag from the field name at the top of the column across the columns that you want to select. |
| A record | Click the record selector — the square to the left or right (depending on your language setting) of a row. If the record selector is not visible, press SHIFT+SPACEBAR. |
| Multiple records | Drag from the record selector of the first record across the records that you want to select. |
| All records | On the Home tab, in the Find group, click the down arrow next to Select, and then click Select All |
-
Click the Microsoft Office Button
 , and then click Print.
The Print dialog box appears.
-
Under Print Range, click Selected Record(s).
Print a form
Although Access forms are usually used for viewing and editing data on the screen instead of printing data, you might have occasions where printing a form is necessary. When you print a form, you might need to make some adjustments to printer settings. The fonts that appear in the printed version of the form depend on the fonts that are available for your printer.
Note: When you print a form, even though you might be viewing only a single record, Access prints all the records for the record source for the form. If you want to print only specific records, apply a filter to the form before continuing. For more information about filtering, see the article Filter: Limit the number of records in a view.
-
Open the form and click the Microsoft Office Button
 , point to Print, and then click Print Preview.
 -
Make any necessary page layout changes, and then click Print.
Set print options for a module
A module is an object containing custom procedures that use VBA code.
-
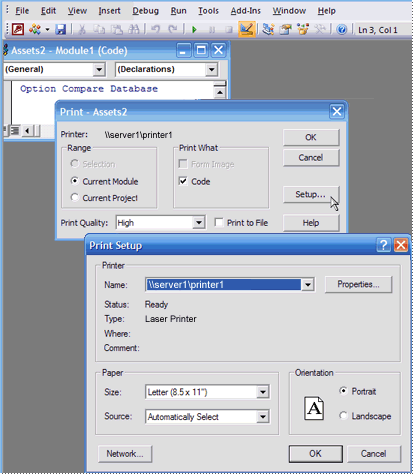
In the Navigation Pane, right-click the module that you want to print, and then click Design View. The Visual Basic Editor is started.

-
On the File menu, click Print.
-
In the Print dialog box, click Setup.
-
In the Print Setup dialog box, set the options that you want to change, and then click OK.
 and then click the field.
 .
.
Microsoft Office Tutorials: Print Your Access Data >>>>> Download Now
ReplyDelete>>>>> Download Full
Microsoft Office Tutorials: Print Your Access Data >>>>> Download LINK
>>>>> Download Now
Microsoft Office Tutorials: Print Your Access Data >>>>> Download Full
>>>>> Download LINK Mw