Create newsletter-style columns
Format text in newsletter-style columns so that it flows from one column to the next on the same page. You can add columns to all or part of a document.
Apply columns to your document
-
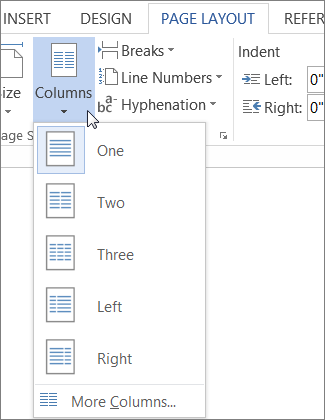
On the Page Layout tab, click Columns.

-
Click the column layout you want. This applies that layout to the entire document or section.
Notes: To apply columns to part of a document, or to change columns you've already applied:
-
Select the text or click in the section you want to change.
-
Click Page Layout > Columns.
-
Click the column layout you want.
Word automatically sets the column widths to fit your page. If the presets don't work for your layout or if you want more than three columns, choose More Columns and adjust the settings in the Columns dialog box.
-
More about columns
-
If your document has more than one section, a column layout will only be applied to the current section.
-
Insert a column break to control how text flows between columns. For example, insert a column break to end a paragraph in one column and start a new paragraph at the top of the next column.
-
To insert a line between columns, click Columns again and then click More Columns. In the Columns dialog box, select the Line between check box.
-
You can also use the Columns dialog box to adjust the column width and the spacing between columns.
No comments:
Post a Comment