Create and manage a project task list
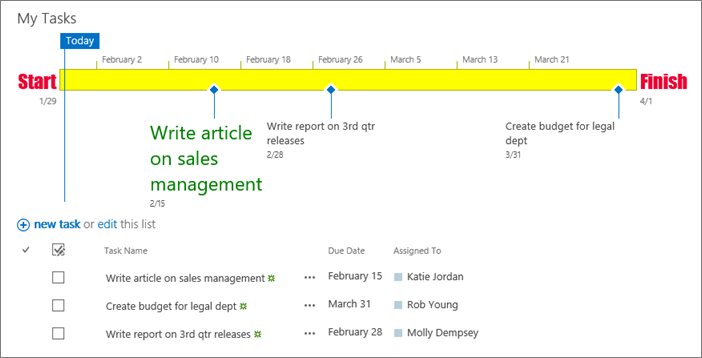
A SharePoint project task list displays a collection of tasks that are part of a project. A task is a discrete work item that a single person can be assigned. A project is typically a series of activities that has a beginning, middle, and end, and which produces a product or service, such as producing a product demonstration for a trade show, creating a product proposal for stakeholders, or even putting together a corporate morale event.
After you create a SharePoint project task list, you can add tasks, assign resources to tasks, update the progress on tasks, and view the task information on bars that are displayed along a timeline.
Updated January 27, 2017 thanks to customer feedback.
SharePoint Online, SharePoint 2016, and SharePoint 2013 offer a connection from a SharePoint task list to Project. Project may be licensed separately.
To make the connection, create a SharePoint task list and import it into Project Online or Project Server. Once connected, updates to a task list in SharePoint will be reflected in Project.
To import a task list into Project, follow the steps in Add an existing SharePoint task list to Project Web App.
Create a task list in SharePoint Online, 2016, or 2013
The task list can be a starting point for your project.
-
From your site's home page, click Settings
 and then click Add an app.
 -
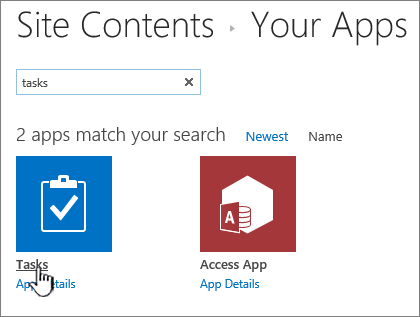
Type "Tasks" into the search box and press Enter. You'll get a list of all apps that match.
-
Type a name or title for the task and press Create.
-
SharePoint Online returns you to the Site contents page. Find the app you just created in the Site contents list and open it. SharePoint Online creates a default timeline and a blank list.
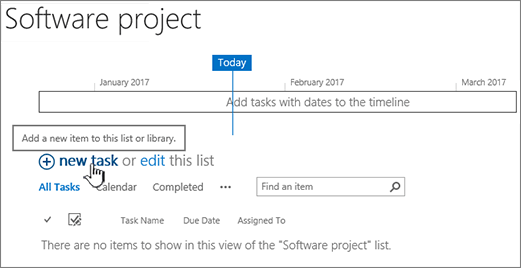
You can start entering data using +new task to add data.
Create and work with a SharePoint 2010 project tasks list
-
Click Site Actions
 , click View All Site Content, and then click Create.
Note: A SharePoint site can be significantly modified. If you cannot locate an option, such as a command, button, or link, contact your administrator.
-
In Search Installed Items, type Project, and click search
 .
. -
Click Project Tasks
-
Type the Name for the list. Name is required.
The name appears at the top of the list in most views, becomes part of the web address for the list page, and appears in site navigation to help users find the list. You can change the name of a list, but the web address will remain the same.
-
Click Create.
Add a task to a SharePoint 2010 project task list
When looking at a project tasks list, you'll see a table on the left side of the view, and a timeline on the right. The timeline is called a Gantt chart, and helps to visualize your project's progress. Bars on the Gantt chart are drawn using the Start Date and Due Date fields.
Note: If you have some idea of the structure you'd like to create for your tasks – for example, if you know certain sets of tasks fall within phases that you'd like to represent in your project tasks list – you can organize your tasks into summary tasks and subtasks. For more information, see Create a summary task.
In a project tasks list, complete the following columns for each row in the left table portion of the view:
Note: When filling out task columns, you might have to slide the divider to the right to reveal additional fields. This will reduce the calendar section.

-
Title Type the name of a task in your project.
-
Start Date Enter the date when the task should begin.
-
Due Date Enter the date by when the task should be completed.
-
Task Status Choose the descriptor that most accurately reflects the status of this task. If you are just planning a project and none of the tasks have begun, choose Not Started.
-
Priority Choose the priority level that most accurately reflects the importance of this task, as it relates to the other tasks in this project.
Tip: If several of your tasks share the same Start Date, Due Date, or data in any other column, you can click once in the cell you want to copy, to display the fill handle, and then drag the bottom right corner of the box down the column to fill the adjacent cells with the copied data. This can be particularly useful in the Task Status column, when you're initially entering your plan into a project tasks list and none of the tasks have begun.
Once you have these initial columns filled out in the table portion of the view, you have a high-level project tasks list in place. The next step is to provide more detail about your tasks, including who will be doing the work, and how the tasks may relate to each other. For example, in some cases, one task must be completed before another can begin.
Update a task in a SharePoint 2010 project task list
It's important to return to your project tasks list as your project progresses, and update the columns pertaining to each task's status. This helps to communicate what's going on in your project with those who may not be tuned in to the day-to-day details of your project's tasks.
In your project tasks list, complete the following columns for each task to provide an update on your project:
-
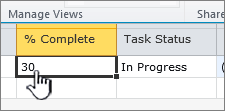
% Complete Type your best estimate as to how much work has been completed on the task, using a percentage. For example, if a task is about halfway complete, type 50% in the % Complete column. This percentage is used to draw a progress overlay on the Gantt bar for the task.
-
Task Status Choose the descriptor that most accurately reflects the current status of this task.
In addition, you may run into other changes to your project that require updates to your project tasks list. For example, the Start Date or Due Date for a task may change if a task gets started earlier than planned, or gets delayed. You can update these columns in the table portion of the view, just as you would any other column. In some cases, the person who is currently working on a task may no longer be available to the task. You can also update who is assigned to the task by updating the Assigned To column. For more information, see Assign people to tasks in a project tasks list.
Assign people to tasks in a SharePoint 2010 project task list
With your tasks added to a project tasks list, the next step is to assign them to people in your organization. When you assign a person to a task, you identify who is responsible for completing the work on that task.
-
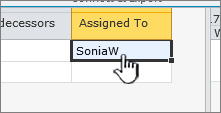
Click once in the Assigned To column for the task you are assigning.
-
Enter the name or login information of the person you are assigning, in one of these three ways:
-
Click Browse, which appears next to the Assigned To column, to search for the person you're assigning in your organization's address book.
-
Type the login information for the person you're assigning from your organization, including the domain, in the Assigned To column. For example, type contoso\mollyc, where "contoso" is the domain, and "mollyc" is the username.
-
Type the name of the person you're assigning in the Assigned To column. This is helpful if you're assigning a contractor or another individual who does not have an account within your organization.
-
-
Notify the assigned individuals about their task assignments, letting them know about the project tasks list, and about the work they're now responsible for.
Create a summary task in a SharePoint 2010 project task list
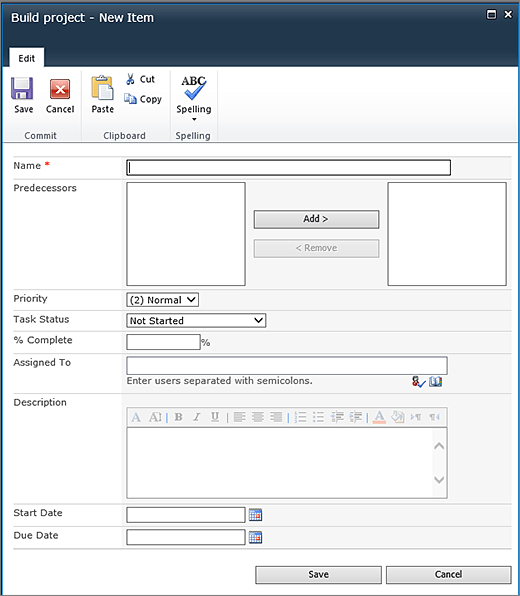
When creating tasks in a project tasks list, it's important to plan for which tasks might fall under larger tasks. For example, your project might be completed in phases, with several tasks occurring within each phase. Having the phases represented in your project tasks list provides a nice high-level look at what's going on in your project.
-
On the Items tab, in the New group, click the arrow on New Item, and then click Summary Task.
-
Complete the form to create the new summary task, filling out the following information, as appropriate:
-
Name Type the name of the summary task.
-
Predecessors Choose the summary tasks and/or subtasks that must be completed before this summary task can begin. With these selected in the left box, clickAddto move them to the right box. For more information on predecessors, see the next section in this article.
Tip: If you're feeling unsure of your understanding of predecessors, or if you aren't far enough along in your planning to have all of the summary task's predecessors added to your project tasks list, you can leave this blank for now and add predecessor relationships later, using the left table portion of the project tasks list view.
-
Priority Choose the priority level that most accurately reflects the importance of this summary task, as it relates to the other summary tasks in this project.
-
Task Status Choose the descriptor that most accurately reflects the status of the set of tasks that fall within this summary task. If you are just planning a project and none of the tasks in this summary task have begun, choose Not Started.
-
% Complete Type a percentage that best represents how much work is completed on the set of tasks that fall within the summary task. If you are just planning a project and none of the tasks in this summary task have begun, leave this field blank, or type 0%.
-
Assigned To Use this field to identify the person responsible for this summary task. For more information about assigning tasks, see Assign people to tasks in a project tasks list.
-
Description Type a brief description of the summary task.
-
Start Date Enter the date when the first subtask within this summary task should begin.
-
Due Date Enter the date by when the last subtask in this summary task should be completed.
-
-
Click Save to create the summary task.
Once the summary task is created, you can click the name of the summary task in the left table portion of the view to open the summary task in a new project tasks list view. Within that view, you can add the tasks that fall within that summary task. To get back to the view that shows your summary task, on the List tab, in the Manage Views group, click Navigate Up.
Set up relationships between tasks in a SharePoint 2010 project task list
Within a single project tasks list, there may be a certain order to how tasks, including summary tasks and subtasks, need to be completed. For example, if you're building a house, the foundation needs to be completed before the walls can go up, and the walls have to be up before the roof can go on. You can represent this order by using the Predecessors column.
-
In a task row, click the cell in the Predecessors column, and then click the arrow on the right side of the cell to display a list of all tasks within the current project tasks list. This includes any summary tasks and subtasks within the list.
-
Click the checkbox to the left of each task that must be completed before this task can begin.
Tip: It's easy to get overzealous here and select every task that comes before the current task. However, you really only need to select those tasks that come immediately before the current task. For example, let's say I have a project tasks list that contains three tasks: Task 1, Task 2, and Task 3. When Task 1 is complete, Task 2 can start, and when Task 2 is complete, Task 3 can start. When entering the predecessors for Task 3, it's easy to think that Task 1 and Task 2 both need to be complete before Task 3 can begin. However, since Task 1 is already listed as a predecessor for Task 2, there's no need to also list it as a predecessor to Task 3.
-
Adjust the dates in the Start Date and Due Date columns to reflect the relationships between the tasks. For example, let's say you have two tasks that you know will each take about two days to complete. You set up the first task as a predecessor for the second task. You'll need to adjust the Start Date column for the second task so that the date is after the Due Date for the first task, and you'll need to adjust the Due Date column for the second task so that it's two days after the new Start Date.
Tip: Want this process to be more automated? Consider using an enterprise project management solution compatible with SharePoint Foundation 2010, such as Microsoft Project 2010 and Microsoft Project Server 2010.
Once you've identified the appropriate predecessors for each task, you can see these relationships represented on the Gantt chart. When a predecessor is identified for a task, you'll see an arrow drawn between the end of the preceding task's Gantt bar and the beginning of the next task's Gantt bar.
Customizing a project task list view
Project task lists use the same view features in SharePoint as other lists. For more info, see Customize the project tasks list view
Create a project task list in SharePoint 2007
-
Click View All Site Content, and then click Create on the All Site Content page.
Tip: In most cases, you can use the Site Actions menu
 instead to complete this step.
-
Under Tracking, click Project Tasks.
-
In the Name and Description section, type a name for the list in the Name box. The list name is required.
-
In the Description box, type a description of how this list can be used. The description is optional.
-
In the Navigation section, click Yes if you want to create a link to this list on the Quick Launch.
-
If an E-Mail Notification section appears, you can set up your task list so that a notification is sent to someone when they are assigned a task.
Note: A server administrator must first enable e-mail settings for this option to appear.
-
Click Create.
Add tasks to a project task list in SharePoint 2007
-
If the project task list is not open, click its name on the Quick Launch.
Tip: If the name of your list does not appear, click View All Site Content, and then click the name of your list.
-
On the New menu
 click New Item.
To edit a task, click the task name in the Title column.
-
In the Title section, type a name for the task.
-
In the Priority section, click High, Normal, or Low to indicate the relative importance of this task compared with other tasks in your project task list.
-
In the Task Status section, click the status of the task.
-
In the % Complete section, type a number as a percentage value that indicates the extent to which the task is complete.
-
In the Assigned To section, type the name of the person who will complete the task. Only one person can be assigned to a task.
Click Check Names
 to determine if the person's name is found in the membership provider service that is used for authentication. See your server administrator if the name is not found in the membership provider service.
Tip: To find people whom you want to work on the task, click Browse to use the membership provider service.
-
In the Description section, type a description of the task.
-
In the Start Date and Due Date sections, enter the start date and finish date for the work that is performed on the task. Use the date picker
 to quickly enter a date.
 -
To attach a file to the task, click Attach File. Click Browse to locate the file, and then click OK.
Note: Depending on how your project task list is set up, you may not be able to attach a file to a task.
-
Click OK to add the task to your project task list.
View a project task list in SharePoint 2007
After you create a project task list and add tasks to it, you can see the project task list in a number of different ways by using views.
Note: See Add tasks to a project task list to learn more about the kind of information you can apply to tasks.
-
On the View menu, which is available when you are viewing your project task list, click one of the following views:
-
Project Tasks This is the default view that appears when you create a project task list. A bar chart with task names appears at the top of the view, and a list of tasks appears in the bottom half of the view. The list of tasks in the bottom half corresponds to the same tasks in the upper half.
The bar chart displays each task graphically, most often as a task bar.
-
| Graphic | Description |
| | If you enter a start date and a due date, the task bar shows the task's duration. |
| | If you type a percentage in the % Complete box (for example 15%), the task bar shows a progress bar to indicate what percentage of the task is complete. |
| | If you enter a start date without an end date, a milestone marker is displayed on the bar chart. By default, if you don't enter a start date, the current date is used. |
Tip: To quickly change the start date of a task, drag the task horizontally by using the mouse.
-
Active Tasks This view displays tasks that have a status other than Completed.
-
All Tasks This view displays all tasks regardless of their status.
-
By Assigned To This view displays all tasks grouped by the people who are assigned to the tasks.
-
Due Today This view displays tasks that are due today.
-
My Tasks This view displays tasks that are assigned to you.
Edit or delete items in a project task list in SharePoint 2007
-
If the project task list is not already open, click its name on the Quick Launch.
If the name of your project task list does not appear, click View All Site Content, and then click the name of your project task list.
-
In the lower part of the page, point to the task, click the arrow, and then click Edit Item.
-
Make the changes that you want.
-
Click OK.
To delete an item, point to the task, click the arrow, and then click Delete Item.
Leave us a comment
Was this article helpful? If so, please let us know at the bottom of this page. If it wasn't helpful, let us know what was confusing or missing. We'll use your feedback to double-check the facts, add info, and update this article.


No comments:
Post a Comment