Add, remove, or view a trusted publisher
This article describes what a trusted publisher is, how to enable content from a publisher, why it is more secure to use code projects created by trusted publishers. Also you can learn how to add, view, or remove trusted publishers from the Trusted Publishers list in the Trust Center.
What do you want to do?
Learn about trusted publishers
A publisher is a person or a company, usually a software developer, who has published code, such as a macro, an ActiveX control, or an add-in. Before you decide that a publisher is reliable, you need to know the identity of the publisher, and whether the publisher's credentials are valid. Trusted publishers are reputable and meet all the following criteria:
-
Their code is signed by their digital signature.
-
Their digital signature is valid.
-
Their digital signature is current (not expired).
-
The certificate associated with the digital signature was issued by a reputable certificate authority (CA).
If you try to run code that does not meet all of these criteria, Office disables the code and displays the Message Bar to notify you of potentially unsafe code.
Important: If you open a file from a publisher and you receive a warning message that there is no signature present, or that the signature is invalid, you should not enable the content or trust the publisher unless you are sure the code comes from a reliable source. You can learn more about digital signatures and their certificates in How to tell if a digital signature is trustworthy.
View more information about a security warning and the publisher
When Office displays the Message Bar to warn you about potentially unsafe code in a file, you can view more information about the code and the publisher before deciding whether to trust the code or the publisher.
Important: If you receive a warning that there is no signature present, or that the signature is invalid, you should not enable the content or trust the publisher unless you are sure the code comes from a reliable source. You can learn more about digital signatures and their certificates in How to tell if a digital signature is trustworthy.
To view details about code and the publisher after a security warning
-
click the File tab.
-
In the Security Warning area, click Enable Content > Advanced Options.
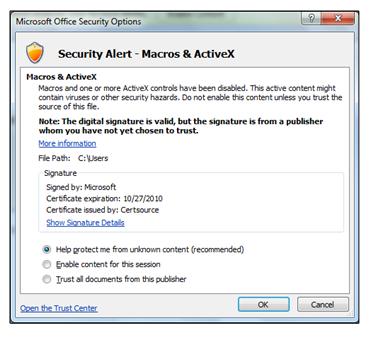
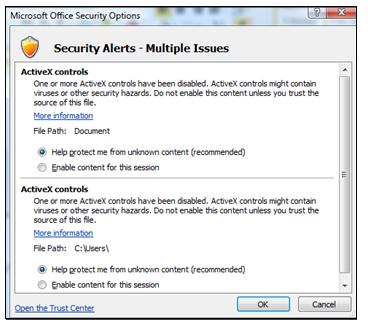
In Microsoft Office Security Options, Office displays additional information about the cause of the security warning, including any information about the publisher that is included with the publisher's code.

Enable active content from a publisher when the Message Bar appears
When new active content (such as a signed macro or add-in) is in a file from a publisher, the Message Bar appears with a shield icon, warning text, and the Enable Content button. If you know the publisher is reliable, you can enable the active content. By doing so, the file becomes a trusted document, but the publisher is not trusted. To learn about designating a publisher as trusted, see Add a trusted publisher when the Security Warning appears, later in this topic.

To enable active content in a file
-
On the Message Bar, click Enable Content.
The file opens and is a trusted document.
Add a trusted publisher when the Security Warning appears
If the code that Office has blocked identifies the publisher, and you are certain that you trust the publisher, you can add the publisher to the list of trusted publishers when you view more information about the security warning.
To add a publisher to the list of Trusted Publishers after a security warning
-
Open the file from the new publisher.
-
Click File.
-
In the Security Warning area, click Enable Content > Advanced Options.
-
In Microsoft Office Security Options, click Trust all documents from this publisher.
Enable a publisher's active content for one time when the Security Warning appears
To enable a publisher's active content for one time when the Security Warning appears, use the previous instructions to access the Microsoft Office Security Options dialog box. In the dialog box, click Enable content for this session for each piece of active content in the list.

Add a trusted publisher via Trust Center
If you know that active content (macros, ActiveX controls, data connections, and so on) from a publisher is reliable, you can add the publisher to the trusted publishers list in the Trust Center.
To add a publisher to the list of trusted publishers in Trust Center
-
Open the file from the new publisher.
-
Click File > Options.
-
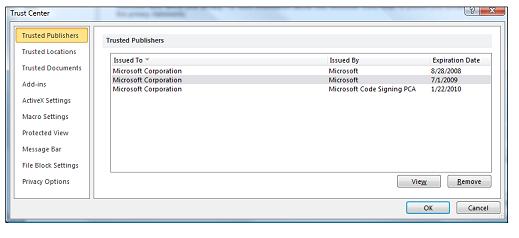
Click Trust Center > Trust Center Settings > Trusted Publishers.
-
In the list, select the publisher's certificate, and then click OK.

View or remove a trusted publisher
You can review the publishers that Office has on the list of trusted publishers and, optionally, remove a publisher by using the following procedure.
To view the list of trusted publishers and optionally remove a publisher
-
Open a file created by a publisher.
-
Click File > Options.
-
Click Trust Center > Trust Center Settings > Trusted Publishers.
-
In the Trusted Publishers list, select the publisher to remove, and then click Remove.
Note: If you do not see the Remove button in Trusted Publishers, the Office program isn't running with administrator rights.
If Office does not offer you the choice of removing a publisher, the Office program isn't running with administrator rights. To remove a publisher, you need to restart your Office program and provide administrative credentials. If your computer is running Windows 7, use the procedure for Windows 7, later in this section.
To run an Office program with administrative credentials
-
Swipe in from the right edge of the screen, and then tap Search, or if you are using a mouse, point to the upper-right corner of the screen, wait for the Charms Bar to appear, and then click Search.
-
Type the name of an Office program, like Word. In the results, locate an Office program, and then tap and hold for moment or right-click with the mouse. Release to display a menu, and then click Run as administrator.
If you did not log on to the computer with an account that has administrator rights, Windows will prompt you to provide the name and password of an account that does have those rights in User Account Control.
-
Follow the instructions in To view the list of trusted publishers and optionally remove a publisher
-
When you are done modifying the list of trusted publishers, exit from the Office program.
Running Office programs with administrator rights is less secure than running them as a regular user.
If your computer is running Windows 7, use the following procedure.
To run an Office program with administrative credentials on Windows 7
-
Click Start > All Programs > Microsoft Office.
-
Right-click an Office program, such as Word.
-
Click Run as administrator.
If you did not log on to the computer with an account that has administrator rights, Windows will prompt you to provide the name and password of an account that does have those rights in User Account Control.
-
Follow the instructions in To view the list of trusted publishers and optionally remove a publisher.
-
When you are done modifying the list of trusted publishers, exit from the Office program.
Running Office programs with administrator rights is less secure than running them as a regular user.
No comments:
Post a Comment