Add or remove data labels in a chart
To quickly identify a data series in a chart, you can add data labels to the data points of the chart. By default, the data labels are linked to values on the worksheet, and they update automatically when changes are made to these values.
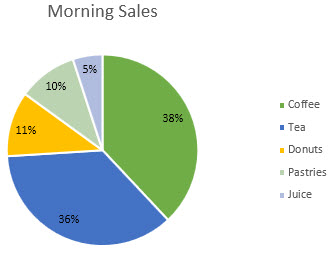
Data labels make a chart easier to understand because they show details about a data series or its individual data points. For example, in the pie chart below, without the data labels it would be difficult to tell that coffee was 38% of total sales. Depending on what you want to highlight on a chart, you can add labels to one series, all the series (the whole chart), or one data point.
Add data labels to a chart
-
Click the data series or chart. To label one data point, after clicking the series, click that data point.
-
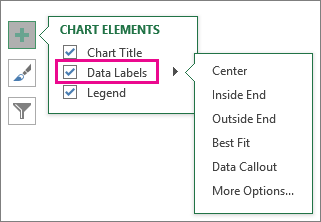
In the upper right corner, next to the chart, click Add Chart Element
 > Data Labels.
-
To change the location, click the arrow, and choose an option.
-
If you want to show your data label inside a text bubble shape, click Data Callout.
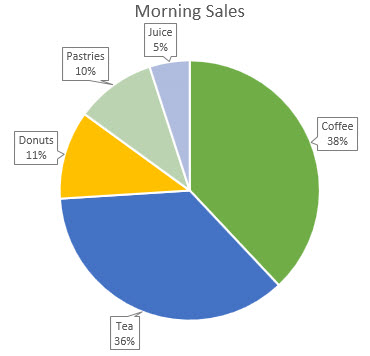
To make data labels easier to read, you can move them inside the data points or even outside of the chart. To move a data label, drag it to the location you want.
If you decide the labels make your chart look too cluttered, you can remove any or all of them by clicking the data labels and then pressing Delete.
Tip: If the text inside the data labels is too hard to read, resize the data labels by clicking them, and then dragging them to the size you want.
Change the look of the data labels
-
Right-click the data series or data label to display more data for, and then click Format Data Labels.
-
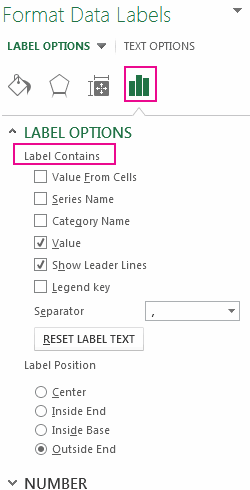
Click Label Options and under Label Contains, pick the options you want.
Use cell values as data labels
You can use cell values as data labels for your chart.
-
Right-click the data series or data label to display more data for, and then click Format Data Labels.
-
Click Label Options and under Label Contains, select the Values From Cells checkbox.
-
When the Data Label Range dialog box appears, go back to the spreadsheet and select the range for which you want the cell values to display as data labels. When you do that, the selected range will appear in the Data Label Range dialog box. Then click OK.
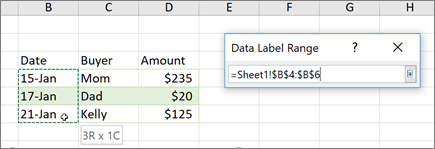
The cell values will now display as data labels in your chart.
Change the text displayed in the data labels
-
Click the data label with the text to change and then click it again, so that it's the only data label selected.
-
Select the existing text and then type the replacement text.
-
Click anywhere outside the data label.
Tip: If you want to add a comment about your chart or have only one data label, you can use a textbox.
Remove data labels from a chart
-
Click the chart from which you want to remove data labels.
This displays the Chart Tools, adding the Design, and Format tabs.
-
Do one of the following:
-
On the Design tab, in the Chart Layouts group, click Add Chart Element, choose Data Labels, and then click None.
-
Click a data label one time to select all data labels in a data series or two times to select just one data label that you want to delete, and then press DELETE.
-
Right-click a data label, and then click Delete.
Note: This removes all data labels from a data series.
-
-
You can also remove data labels immediately after you add them by clicking Undo
 on the Quick Access Toolbar, or by pressing CTRL+Z.
This pie chart displays percentages in data labels.

You can also display series names, category names, or custom text in data labels. For bubble charts, you can even display the size of the bubbles. For optimal detail, you can display more than one data label entry in each data label, separated by a comma or other separator that you specify.
To prevent data labels from overlapping and to make them easier to read, you can adjust their positions in the chart. And if you no longer want to display data labels, you can remove them.
Add data labels to a chart
-
On a chart, do one of the following:
-
To add a data label to all data points of all data series, click the chart area.
-
To add a data label to all data points of a data series, click one time to select the data series that you want to label.
-
To add a data label to a single data point in a data series, click the data series that contains the data point that you want to label, and then click the data point again.
This displays the Chart Tools, adding the Design, Layout, and Format tabs.
-
-
On the Layout tab, in the Labels group, click Data Labels, and then click the display option that you want.

Depending on the chart type that you used, different data label options will be available.
Change the data label entries that are displayed
By default, label entries show values when you add data labels. You can change this predefined label entry to display series names, category names, or a combination of predefined data label entries (series names, category names, and values). For a custom label entry, you can change the data label entries manually.
Apply a different predefined label entry
-
On a chart, do one of the following:
-
To display additional label entries for all data points of a series, click a data label one time to select all data labels of the data series.
-
To display additional label entries for a single data point, click the data label in the data point that you want to change, and then click the data label again.
This displays the Chart Tools, adding the Design, Layout, and Format tabs.
-
-
On the Format tab, in the Current Selection group, click Format Selection.

You can also right-click the selected label or labels on the chart, and then click Format Data Label or Format Data Labels.
-
Click Label Options if it's not selected, and then under Label Contains, select the check box for the label entries that you want to add.
The label options that are available depend on the chart type of your chart. For example, in a pie chart, data labels can contain percentages and leader lines.
-
To change the separator between the data label entries, select the separator that you want to use or type a custom separator in the Separator box.
-
To adjust the label position to better present the additional text, select the option that you want under Label Position.
If you have entered custom label text but want to display the data label entries that are linked to worksheet values again, you can click Reset Label Text.
Create a custom label entry
-
On a chart, click the data label in the data point that you want to change, and then click the data label again to select just that label.
-
Click inside the data label box to start edit mode.
-
Do one of the following:
-
To enter new text, drag to select the text that you want to change, and then type the text that you want.
-
To link a data label to text or values on the worksheet, drag to select the text that you want to change, and then do the following:
-
On the worksheet, click in the formula bar, and then type an equal sign (=).
-
Select the worksheet cell that contains the data or text that you want to display in your chart.
You can also type the reference to the worksheet cell in the formula bar. Include an equal sign, the sheet name, followed by an exclamation point; for example, =Sheet1!F2
-
Press ENTER.
Tip: You can use either method to enter percentages — manually if you know what they are, or by linking to percentages on the worksheet. Percentages are not calculated in the chart, but you can calculate percentages on the worksheet by using the equation amount / total = percentage. For example, if you calculate 10 / 100 = 0.1, and then format 0.1 as a percentage, the number will be correctly displayed as 10%. For more information about how to calculate percentages, see Calculate percentages.
-
-
The size of the data label box adjusts to the size of the text. You cannot resize the data label box, and the text may become truncated if it does not fit in the maximum size. To accommodate more text, you may want to use a text box instead. For more information, see Add a text box to a chart.
Change the position of data labels
You can change the position of a single data label by dragging it. You can also place data labels in a standard position relative to their data markers. Depending on the chart type, you can choose from a variety of positioning options.
-
On a chart, do one of the following:
-
To reposition all data labels for a whole data series, click a data label one time to select the data series.
-
To reposition a specific data label, click that data label two times to select it.
This displays the Chart Tools, adding the Design, Layout, and Format tabs.
-
-
On the Layout tab, in the Labels group, click Data Labels, and then click the option that you want.

For additional data label options, click More Data Label Options, click Label Options if it's not selected, and then select the options that you want.
Remove data labels from a chart
-
Click the chart from which you want to remove data labels.
This displays the Chart Tools, adding the Design, Layout, and Format tabs.
-
Do one of the following:
-
On the Layout tab, in the Labels group, click Data Labels, and then click None.

-
Click a data label one time to select all data labels in a data series or two times to select just one data label that you want to delete, and then press DELETE.
-
Right-click a data label, and then click Delete.
Note: This removes all data labels from a data series.
-
-
You can also remove data labels immediately after you add them by clicking Undo
 on the Quick Access Toolbar, or by pressing CTRL+Z.
- Which Office version are you using?
- Office 2016 for Mac
- Office for Mac 2011
Data labels make a chart easier to understand because they show details about a data series or its individual data points. For example, in the pie chart below, without the data labels it would be difficult to tell that coffee was 38% of total sales. Depending on what you want to highlight on a chart, you can add labels to one series, all the series (the whole chart), or one data point.
Add data labels
You can add data labels to show the data point values from the Excel sheet in the chart.
-
This step applies to Word 2016 for Mac only: On the View menu, click Print Layout.
-
Click the chart, and then click the Chart Design tab.
-
Click Add Chart Element and select Data Labels, and then select a location for the data label option.
Note: The options will differ depending on your chart type.
-
If you want to show your data label inside a text bubble shape, click Data Callout.

To make data labels easier to read, you can move them inside the data points or even outside of the chart. To move a data label, drag it to the location you want.
Note: If the text inside the data labels is too hard to read, resize the data labels by clicking them, and then dragging them to the size you want.
Click More Data Label Options to change the look of the data labels.
Change the look of your data labels
-
Right-click on any data label and select Format Data Labels.
-
Click Label Options and under Label Contains, pick the options you want.
Change the text displayed in the data labels
-
Click the data label with the text to change and then click it again, so that it's the only data label selected.
-
Select the existing text and then type the replacement text.
-
Click anywhere outside the data label.
Tip: If you want to add a comment about your chart or have only one data label, you can use a textbox.
Remove data labels
If you decide the labels make your chart look too cluttered, you can remove any or all of them by clicking the data labels and then pressing Delete.
Note: This removes all data labels from a data series.
Add data labels (Office for Mac 2011)
You can add data labels to show the data point values from the Excel sheet in the chart.
-
This step applies to Word for Mac 2011 only: On the View menu, click Print Layout.
-
Click the chart, and then click the Chart Layout tab.
-
Under Labels, click Data Labels, and then in the upper part of the list, click the data label type that you want.

-
Under Labels, click Data Labels, and then in the lower part of the list, click where you want the data label to appear.
No comments:
Post a Comment