Workflow example: Route an expense report for review
Your team fills out monthly expense reports that are forms designed with Microsoft Office InfoPath 2007. Your team fills out and stores these forms in a form library on your SharePoint site. When the expense report exceeds a certain amount, you want to automatically notify the appropriate person to review the report. You can quickly automate this process with a one-step workflow.
One of the great features of Office InfoPath 2007 is that you can specify fields in the actual form to display as columns in a form library. When you choose to display a form field as a column in the form library, you are promoting that field. Promoting a field is useful when you want to look at important information in a form without having to open each form individually. More importantly, by promoting data in the form to data in columns in the form library, you make it possible to create rules based on that data in the Workflow Designer. By promoting the total expenses from the form to a column, you can now create a workflow that routes the expense report for review when the total expenses exceed a certain amount.
To learn more about workflows, see Introduction to SharePoint workflow.
Important: To create a workflow, your site must be located on a server running Windows SharePoint Services 3.0 or Microsoft Office SharePoint Server 2007.
In this article
Before you begin
Before you design the workflow, you need to make any necessary changes or customizations to your site, list, or library — for example:
-
A workflow is always attached to exactly one SharePoint list or library. Your site must have at least one list or library before you create a workflow. If there are no lists in your site, you are prompted to create one when you create a workflow.
-
If you want your workflow to use any custom columns or settings, you must make those changes before you create the workflow so that those columns and settings are available to you in the Workflow Designer.
-
If you want your workflow to use any list or library features that are not turned on by default, such as Content Approval, you must turn on these features before you design the workflow.
Note: The workflow feature is built on the Microsoft Windows Workflow Foundation, a component of Microsoft Windows. The same version of the Workflow Foundation must be installed on both your computer and the server. The first time that you create a workflow, you may be prompted to install the Workflow Foundation.
Publish the form and create a form library
In this example, you need a form library to store your forms, and you need to promote certain fields from the form as columns in the form library. Office InfoPath 2007 makes it very easy to publish a form, promote fields, and even create the form library. All this can be done by using the Publishing Wizard (click Publish on the File menu).
In the following procedure, you use the ready-made Expense Report template in Office InfoPath 2007, and then use the Publishing Wizard to promote fields and create the form library on your SharePoint site.
-
Start Office InfoPath 2007.
-
In the Fill Out a Form dialog box, double-click the sample expense report.
The expense report opens in Design mode. The form already has the fields that you want to promote as columns in the form library: Name, ID Number, and Total expenses. You will use the template as is.
-
On the File menu, click Save As.
-
In the Save As dialog box, type a name in the File name box, and then click Save.
-
On the File menu, click Publish.
The Publishing Wizard opens.
-
Under Where do you want to publish the form template?, click To a SharePoint server with or without InfoPath Forms Services, and then click Next.
-
Type the address of your SharePoint site, and then click Next.
-
Under What do you want to publish?, click Document Library, and then click Next.
Note that you can also make the form available as a content type. You might want to choose this option, for example, if you want the make the form template available to all subsites in a portal site.
-
Under What do you want to do?, click Create a new document library, and then click Next.
-
Type Expense Reports as the name, type a description for the document library, and then click Next.
-
On the next page, click Add.
-
In the Select a Field or Group dialog box, in the employee folder, click name, and then click OK.
-
Repeat the previous step twice to add the identificationNumber field (in the employee folder) and the total field (in the items folder).
Note: In the Select a Field or Group dialog box, use the default settings for Site column group and Column name. Alternatively, you could map the form field to an existing site column or give the column a name different from that of the form field itself.
-
Click Next, verify that the information is correct, and then click Publish.
You now have a form library named Expense Reports with the columns that you need to create the workflow. In the browser, the columns in the form library should look like those in the following illustration.

Design the workflow
After you set up the form library with the correct columns, you are ready to use the Workflow Designer.
-
Start Microsoft Office SharePoint Designer 2007.
-
On the File menu, click Open Site.
-
In the Open Site dialog box, browse to and select the SharePoint site where you want to create the workflow, and then click Open.
-
On the File menu, point to New, and then click Workflow.
The Workflow Designer opens.
-
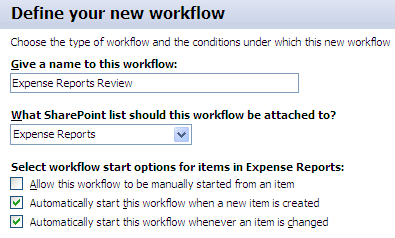
In the Give a name to this workflow box, type Expense Report Review.
Site visitors will see this name when they view the Workflow Status and Workflows pages in the browser.
-
In the What SharePoint list should this workflow be attached to? list, click Expense Reports.
-
Under Select workflow start options for items in Expense Reports, do all of the following:
-
Clear the Allow this workflow to be manually started from an item check box.
-
Select the Automatically start this workflow whenever an item is created check box.
-
Select the Automatically start this workflow whenever an item is changed check box.
By choosing these options, you ensure that the workflow runs whenever a team member fills out a new expense report or modifies an existing report.

-
-
Click Next.
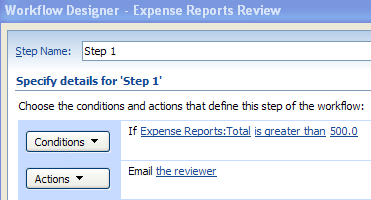
You want to create a rule where if total expenses reported in the form are greater than 500 dollars, the appropriate person is notified to review the expense report.
-
In the Workflow Designer, click Conditions, and then click Advanced Condition in the list.
The condition If value equals value appears in the workflow.
This list provides many ready-made conditions, but you want to create a condition where the workflow sends the message only when a specific value — in this case, total expenses — is greater than a certain value — in this case, 500. To accomplish this, you create an advanced condition.
-
In the condition If value equals value, click the first value hyperlink, and then click Display data binding
 .
. -
In the Define Workflow Lookup dialog box, in the Source list, click Current Item. In the Field list, click Total, and then click OK.
Using this dialog box, you can look up a value in any field in any list or library in the site, so that you can use that value in the workflow rule. In this case, you want the number from the Total field of the current item.
-
In the workflow rule, click equals, and then click is greater than in the list.
-
Click the second value hyperlink, and then type 500.
-
Click Actions, and then click Send an Email in the list.
If this action does not appear in the list, click More Actions, click the action that you want, and then click Add.
-
In the action Email this message, click this message, and then complete the form by entering the recipient, subject, and body text of the message.
For the recipient, choose the person who must review the expense report.
-
Click OK.

You now have a rule where if an expense report is created or changed in the Expense Reports library, and the total expenses for that report are greater than 500 dollars, the correct person is notified to review that report.
-
To check the workflow for errors before you exit the Workflow Designer, click Check workflow.
If there is a workflow error, the hyperlink changes color and asterisks appear before and after the invalid parameter. In addition, under Workflow Steps, an error symbol appears next to each step that contains an error.
-
Click Finish to save the workflow.
To test the workflow, browse to the Expense Reports library, click Fill Out This Form to create a new item, and make sure that you enter expenses greater than 500 dollars. Save the form to the form library, and then check to see if the designated person receives the message that you created.
No comments:
Post a Comment