Monday, July 24, 2017

Set up email on an Android phone or tablet with Office 365 operated by 21Vianet

Set up email on an Android phone or tablet with Office 365 operated by 21Vianet

Note: This article applies only to Office 365 operated by 21Vianet in China.

Select the type of email account you want to set up on your Android phone or tablet to access your email, calendar, contacts, and tasks:

Set up Outlook.com, Yahoo! Mail, or iCloud accounts

Tip: The appearance of Androids can vary so use these steps as a guide or consult the manufacturer's help for your particular device.

Outlook app Use Outlook for Android

Android mail app Use the built-in Android mail app
By using the Outlook for Android you can access your email, calendar, contacts, and OneDrive files from within the app rather than having to check separate apps.

Note: You cannot access tasks from the Outlook for Android app.

  1. Download the Outlook for Android app from the local Android store if you haven't installed it yet. To find a store, see local Android app stores in this article.

    If you already have it installed, open it and then depending on your device, tap the navigation control at the bottom of your Android, or tap More > Settings > Add Account.

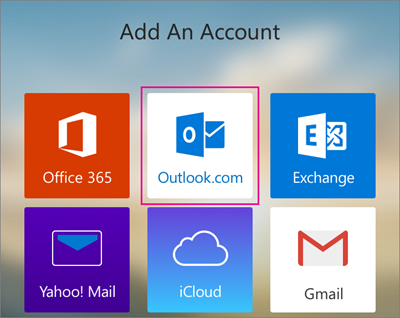
  2. On Add An Account, select Outlook.com. If you have a different mail account, tap one of the other options. For example, tap Yahoo! Mail, or iCloud if you want to add those accounts.

    Add an Outlook.com account
  3. Enter your full email address, for example <someone>@outlook.com, type your password, and then tap Sign in.

  4. If prompted, select Yes or Accept to let the app access your info. Outlook for Android then starts syncing the account.

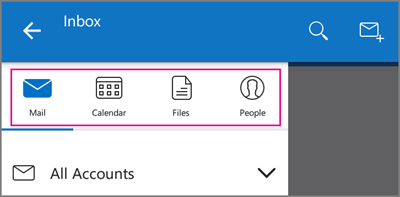
  5. To view your calendar, files, or contacts from the app, tap More Menu .

    Select mail, calendar, files, or contancts
Delete an account
  1. Depending on your device, tap the navigation control at the bottom of your device, or tap More > Settings.

  2. Tap the account you want to delete.

  3. Select Remove Account from Device and Remote.

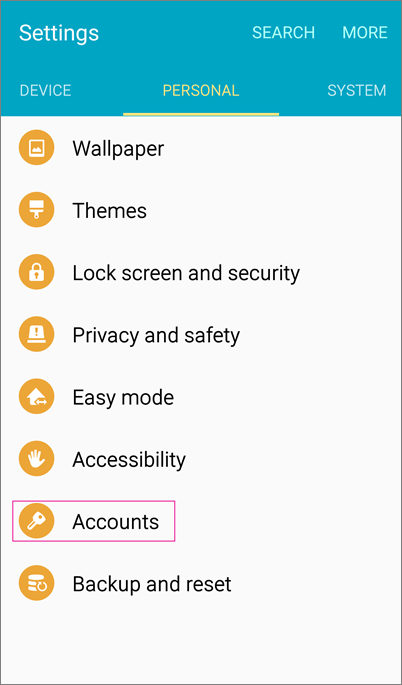
  1. Tap Settings > Accounts > Add account > Email.

    Select Accounts
  2. Type your full email address, for example <someone>@outlook.com, and your password, and then tap Next.

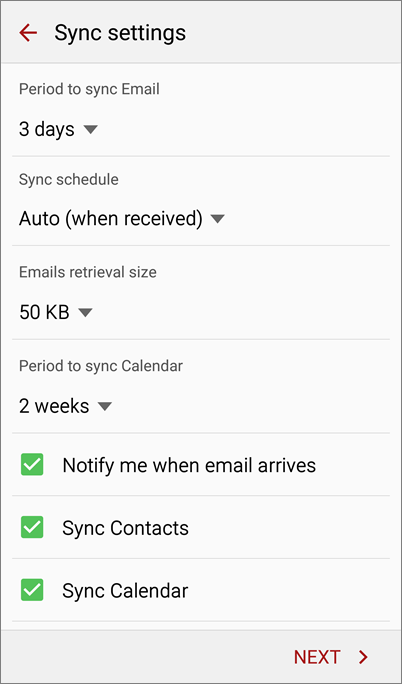
  3. On the Account Options page, select the options for how you want to receive your mail, and if you also want to sync your calendar and contacts, and tasks, and then tap Next.

    Select sync settings
  4. Give the account a name, and tap Done.

Not working? Make sure you entered your email and password correctly and try again because even one small typo will result in an error. If it's still not working, try setting up the account manually following the steps below.

Note: The manual steps below are for Outlook.com accounts only. If you're trying to set up a Yahoo or iCloud account, follow the steps below in Set up IMAP or POP email accounts.

Manual set up
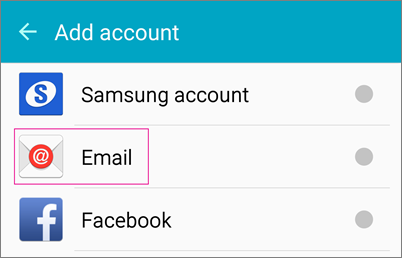
  1. Tap Settings > Accounts > Add account > Email.

    Select email to add accountl
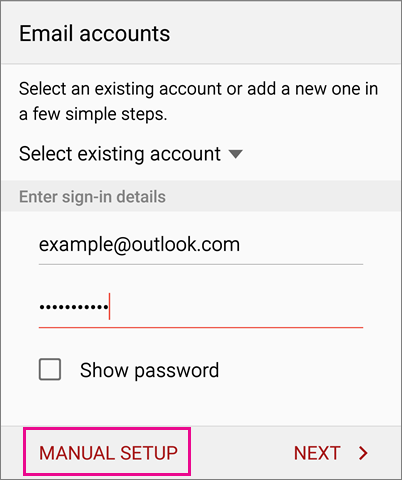
  2. Enter your full email address, for example <someone>@outlook.com, and your password, and then tap Manual setup.

    Select Manual Setup
  3. To set up an Outlook.com account, select Microsoft Exchange ActiveSync.

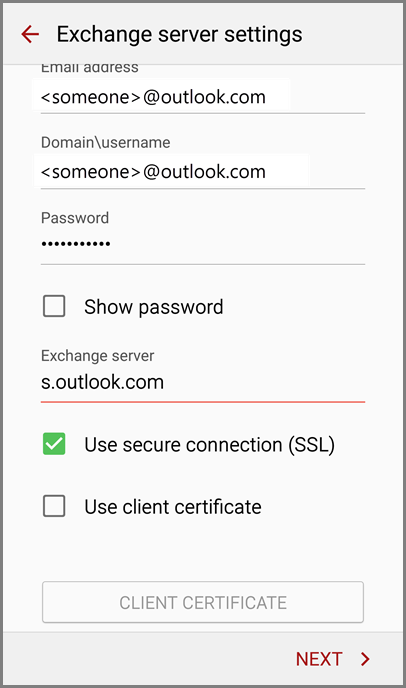
  4. Accept the defaults on the Exchange server settings page, and tap Next. If your device still can't connect, update the following account information.

    • Domain\Username If your full email address is not in the box, delete what's there and type your full email address, for example, <someone>@outlook.com. If Domain and Username are separate text boxes on your device, leave the Domain box empty, and type your full email address in the Username box.

    • Password Use the password that you use to access your account.

    • Server name Use s.outlook.com for any email account ending with @outlook.com, @hotmail.com, @msn.com, or @live.com, including international domains, such as @outlook.co.uk, or any custom domains hosted on Outlook.com.

    • Make sure the Use secure connection (SSL) checkbox is checked, then tap Next.

      Server settings for Outlook.com accounts
  5. If you receive an activation request, select OK if you want to continue with the setup.

  6. Change or accept the default sync settings, and then tap Next.

  7. Give the account a name, and then tap Done.

If you synced your calendar and contacts in step 6 you can go to those apps on your phone to view any items that might be there. If you synced tasks as well, you should see them in the calendar app on your device. It might take a few minutes for everything to sync.

Top of Page

Set up Exchange-based email accounts

Tip: The appearance of Androids can vary so use these steps as a guide or consult the manufacturer's help for your particular device.

Outlook app Use the Outlook for Android app

Android mail app Use the built-in Android mail app

By using the Outlook for Android you can access your email, calendar, contacts, and OneDrive files from within the app rather than having to check separate apps.

Note: You cannot access tasks from the Outlook for Android app.

  1. Download the Outlook for Android app from the local Android store if you haven't installed it yet. To find a store, see local Android app stores in this article.

    If you already have it installed, open it and then depending on your device, tap the navigation control at the bottom of your Android, or tap More > Settings > Add Account.

  2. Tap Exchange if your organization uses an Exchange-based mail account.

  3. Enter your full email address, for example tony@contoso.com, type your password, and then tap Sign in. Outlook for Android then starts syncing the account.

  4. To view your calendar, files, or contacts from the app, tap More Menu .

    Select mail, calendar, files, or contancts
Delete an account
  1. Depending on your device, tap the navigation control at the bottom of your device, or tap More > Settings.

  2. Tap the account you want to delete.

  3. Select Remove Account from Device and Remote.

  1. Tap Settings > Accounts > Add account > Email.

    Select Accounts
  2. Type your full email address, for example tony@contoso.com, type your password, and then tap Next.

  3. Select Exchange.

  4. Depending how the Exchange administrator in your organization set up your account, you might receive a message about additional security features. Select OK to continue.

  5. Once the device verifies the server settings, the Account Options page opens. Accept the defaults or select the options for how you want to receive and send your mail, and then tap Next. (You may need to scroll down to see Next.)

  6. On the Set up email page you can change the name of your account. When you're finished tap Done.

If you synced your calendar and contacts in step 5 you can go to those apps on your phone to view any items that might be there. If you synced tasks as well, you should see them in the calendar app on your device. It might take a few minutes for everything to sync.

If your device can't connect make sure you typed your email address and password correctly and try again. If you still can't connect try setting it up manually following the steps below.

Manual set up
  1. Tap Settings > Accounts > Add account > Email. This application might be named Mail on some versions of Android.

    Select email to add accountl
  2. Type your full email address, for example tony@contoso.com, type your password, and then tap Next.

  3. Select Manual.

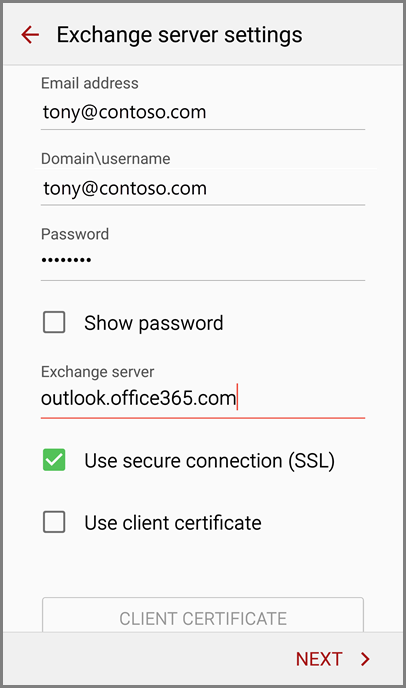
  4. Review the settings on the Exchange server settings page and update if necessary.

    • Email   
      Make sure your full email address is in this box, for example, tony@contoso.com.

    • Domain\Username   
      Type your full email address in this box, for example, tony@contoso.com. If Domain and Username are separate text boxes in your version of Android, leave the Domain box empty, and type your full email address in the Username box.

    • Password   
      Use the password that you use to access your account.

    • Exchange Server   
      If you don't know the name of your Exchange Server, contact your administrator.

    • Make sure the Use secure connections (SSL)    box is checked.

      Exchange server settings
  5. Tap Done.

  6. Depending how the Exchange administrator in your organization set up your account, you might receive a message about additional security features. Select OK to continue.

  7. Accept the defaults or make changes for how you want your account to sync on your device. When you're finished, swipe to the bottom and tap Next.

  8. On the Set up email page you can change the name of your account. When you're finished tap Done.

If you synced your calendar and contacts in step 7 you can go to those apps on your phone to view any items that might be there. If you synced tasks as well, you should see them in the calendar app on your device. It might take a few minutes for everything to sync.

Top of Page

Set up IMAP or POP email accounts

Tip: The appearance of Androids can vary so use these steps as a guide or consult the manufacturer's help for your particular device.

Outlook app Use the Outlook for Android app

Android mail app Use the built-in Android mail app

If you're setting up an IMAP account you can use Outlook for Android. If you want to set up a POP account, use the Android mail app that comes with your device.

By using the Outlook for Android you can access your email, calendar, contacts, and OneDrive files from within the app rather than having to check separate apps.

Note: You cannot access tasks from the Outlook for Android app.

  1. Download the Outlook for Android app from the local Android store if you haven't installed it yet. To find a store, see local Android app stores in this article.

    If you already have it installed, open it and then depending on your device, tap the navigation control at the bottom of your Android, or tap More > Settings > Add Account.

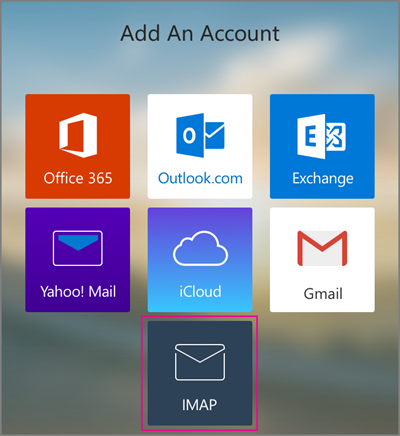
  2. Tap IMAP.

    Add an IMAP account
  3. Type your display name, full email address, for example tony@contoso.com, your password, and then tap Next. Outlook for Android then starts syncing the account.

  4. To view your calendar, files, or contacts from the app, tap More.

    Select mail, calendar, files, or contancts
  5. To learn more about using Outlook for Android, tap the navigation control at the bottom of your device, or tap Menu > Help.

Delete an account
  1. Depending on your device, tap the navigation control at the bottom of your device, or tap More > Settings.

  2. Tap the account you want to delete.

  3. Select Remove Account from Device and Remote.

Note: If you're setting up an IMAP or POP account, only your email will sync to your device. Any calendar and contacts associated with that account remains stored on your local computer.

  1. From the Applications menu, select Email. This application may be named Mail on some versions of Android.

    Select email to add accountl
  2. Type your full email address, for example tony@contoso.com, and your password, and then select Manual.

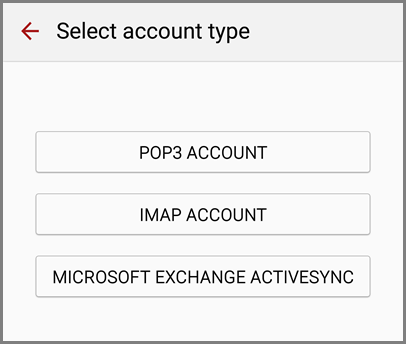
  3. Depending on the type of account you're setting up, select IMAP or POP.

    Select type of account to set up
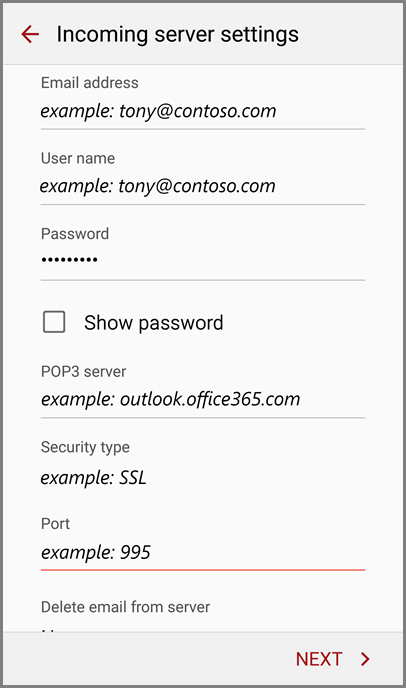
  4. On the Incoming server settings page, check that your email address is correct and add the following:

    Tip: If you're not using Office 365 for business for email and you don't know the necessary server and port settings to complete these steps, contact your email provider.

    • Domain\Username Type your full email address in this box, for example, tony@contoso.com. If Domain and Username are separate text boxes in your version of Android, leave the Domain box empty, and type your full email address in the Username box.

    • Password Use the password that you use to access your account.

    • IMAP Server or POP3 Server Use the address of your server.

    • Security type Select your security type. For example, the incoming security type for Office 365 for business is SSL.

    • Port number Add the port number. Tap Next.

      Incoming server settings
    • If you receive a message about additional security features, select OK to continue.

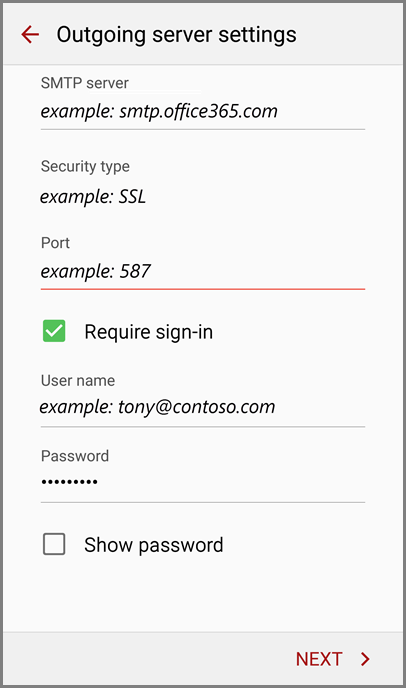
    On the Outgoing server settings page, add the following:

    • SMTP server Type your SMTP server name.

    • Security type Select your security type. For example, the outgoing security type for Office 365 for business is TLS.

    • Port number Add your port number. Tap Next.

      Outgoing server settings
  5. In Account name type a name for this account and the name you want displayed when you send e-mail to others.

  6. Tap Done.

    Tip:  You may need to wait ten-to-fifteen minutes after you set up your account before you can send or receive email.

Local Android app stores in China

Top of Page

1 comment:

  1. Microsoft Office Tutorials: Set Up Email On An Android Phone Or Tablet With Office 365 Operated By 21Vianet >>>>> Download Now

    >>>>> Download Full

    Microsoft Office Tutorials: Set Up Email On An Android Phone Or Tablet With Office 365 Operated By 21Vianet >>>>> Download LINK

    >>>>> Download Now

    Microsoft Office Tutorials: Set Up Email On An Android Phone Or Tablet With Office 365 Operated By 21Vianet >>>>> Download Full

    >>>>> Download LINK 92

    ReplyDelete