Build forms in Access 2007 using design tools
Microsoft Office Access 2007 Inside Out
By John Viescas and Jeff Conrad
John Viescas is the author of numerous books including Microsoft Office Access 2003 Inside Out and Building Microsoft Access Applications. He is also the coauthor of SQL Queries for Mere Mortals. John has written numerous articles for technical publications and has lectured at conferences and user group meetings around the world. He has been recognized as a Most Valuable Professional every year since 1993 by Microsoft Product Support Services for his assistance on public support forums.
Jeff Conrad has written and assisted with technical articles on Access and created several Access add-ins given freely to the Access community. Jeff maintains a Web site with a wealth of information and resource links for those needing guidance with Access. He has been awarded Microsoft's Most Valuable Professional award for his continual involvement with the online Access community. He is very active in the Microsoft-sponsored Access public newsgroups and several other online forums where he is best known as the Access Junkie. In addition to his full time work, Jeff also creates Access database solutions for small businesses.
To learn more about other books on the 2007 Microsoft Office system, visit Microsoft Press.
Tip: In Access 2010, reports have control layouts, which help keep things lined up and looking good!
In this article
From the perspective of daily use, forms are the most important objects you'll build in your Microsoft Office Access 2007 application because they're what users see and work with every time they run the application. This article explains how to design and build forms in an Office Access 2007 desktop application by using the design tools.
Building a new form with design tools
To begin building a new form that allows you to display and edit data from a table, you need to start with a blank form window. You'll build this first form without the aid of the Form Wizard so that you'll understand the variety of components that go into form design. Click the Blank Form command in the Forms group on the Create tab. By default Access opens a blank form window in Layout view with the Field List displayed on the right, as shown in Figure 1.
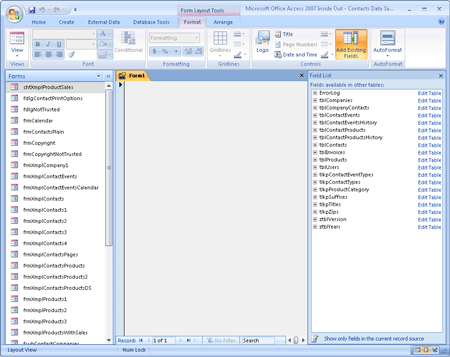
Figure 1 When you click the Blank Form command on the Ribbon, Access opens a new form window in Layout view.
Access does not know at this point from which tables or queries you want to display and edit data. The Field List on the right displays a list of each local or linked table. If you click the plus symbol next to the name of a table, Access expands the list and displays the name of every field in that table. You can click on a field name in the Field List and drag and drop it onto your form. If you click the Edit Table hyperlink on the right side of the Field List, Access opens that specific table in Design view, which is the view covered in this article.
When you ask Access to create a new blank form, Access initially displays the form in Layout view. To switch to Design view, click the arrow under the View button in the Views group and click Design View. Access switches the form window to Design view and provides several design tools on the Design contextual tab under Form Design Tools on the Ribbon, as shown in Figure 2.
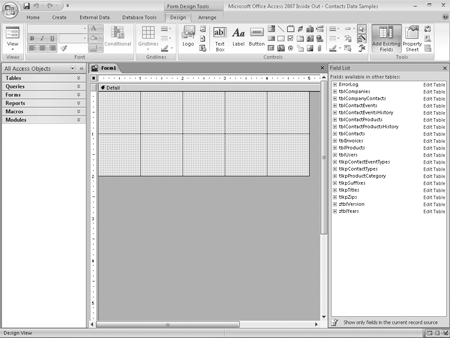
Figure 2 When you open a form in Design view you can use the form grid and tools to create your form elements.
Access starts with a form that has only a Detail section. The section has a grid on a background that is the color defined for 3-D objects in the Appearance Settings dialog box —usually a light gray or beige. You can click the edge of the Detail section and then drag the edge to make the section larger or smaller. (To see more of the grid you might also want to collapse the Navigation Pane on the left.) You can remove the grid dots from the Detail section by clicking the Show Grid command in the Show/Hide group on the Arrange tab under Form Design Tools. If you want to add a Header section or a Footer section to the form, click the Form Header/Footer command in the same Show/Hide group.
Set color for 3-D objects
To set the color for 3-D objects, right-click on the desktop and then click Personalize. Click Windows Color And Appearance. In the Appearance Settings dialog box, click Advanced. In the Item list, click 3D Objects. Use the Color 1 list to set the color you want to use for 3-D objects.
The Detail section starts out at 5 inches (12.7 centimeters) wide by 2 inches (5.08 centimeters) high. The measurement gradations on the rulers are relative to the size and resolution of your screen. By default, Access sets the grid at 24 dots per inch horizontally and 24 dots per inch vertically. You can change the density of the grid dots by altering the Grid X and Grid Y properties in the form's property sheet. To replace the Field List with the property sheet, click the Property Sheet command in the Tools group on the Design tab under Form Design Tools. You can find the Grid X and Grid Y properties near the bottom of the list on the Format tab of the property sheet when you have the form selected.
Choosing a form width and height
Although you can design a form that is up to 22 inches (55.87 centimeters) wide, and each form section can also be up to 22 inches high (a total of 66 inches if you include all three sections), you should design your forms to fit on your users' screens. We tend to design all our forms to comfortably fit on the lowest common screen resolution —1024×768. A form to fit this size should be about 9.75 inches (24.8 centimeters) wide, and the sum of the heights of the sections should be about 5.6 inches (14.2 centimeters) to allow space for the Ribbon, status bar, and Windows taskbar. If your user has set a higher screen resolution, and your application is designed using overlapping windows, extra space will be available on the Access desktop to work with multiple form windows at a time. If you are using tabbed documents, extra space appears to the right and bottom of the form when the user opens it on a higher-resolution screen.
When you're working in a higher resolution, you can open this form and overlay it on the form you're designing. If your form fits behind the sample form, your form should be displayed properly at the lowest common resolution.
The Grid X and Grid Y property settings determine the intervals per unit of measurement in the grid. You can enter a number from 1 (coarsest) through 64 (finest). You set the unit of measure (U.S. or metric) by default when you select a country/region on the Location tab in the Regional And Language Options dialog box. (You open this dialog box by first clicking Clock, Language, And Region in Control Panel and then clicking Regional And Language Options. If your Control Panel is set to Classic View, click Regional And Language Options.)
For example, if your unit of measurement is inches and you specify a Grid X setting of 10, Access divides the grid horizontally into 0.1-inch increments. When your measurement is in inches and you set the Grid X and Grid Y values to 24 or less, Access displays the grid dots on the grid. In centimeters, you can see the grid dots when you specify a setting of 9 or less. If you set a finer grid for either Grid X or Grid Y, Access won't display the grid dots but you can still use the grid to line up controls. Access always displays grid lines at 1-inch intervals (U.S.) or 1-centimeter intervals (metric), even when you set fine Grid X or Grid Y values.
The Field List
Use the Field List in conjunction with the Controls group to place bound controls (controls linked to fields in a table or a query) on your form. You can open the Field List by clicking the Add Existing Fields button in the Tools group on the Design tab. If the form is bound to a table or query, Access displays the name of the underlying table or query along with all the fields available, as shown in Figure 3. Any tables that have relationships to the underlying table defined are displayed under Fields Available In Related Tables. The last section of the Field List, Fields Available In Other Tables, lists the tables and fields from all other tables in this database. Click the Show Only Fields In The Current Record Source link to remove the bottom two sections of the Field List. You can undock the Field List by clicking the title bar and dragging it away from the right edge of the form window. After you undock the Field List, you can drag the edges of the window to resize it so that you can see any long field names. You can drag the title bar to move the window out of the way. When the list of available field names is too long to fit in the current size of the window, use the vertical scroll bar to move through the list.
To use the Field List to place a bound control on a form, first click the button for the type of control you want in the Controls group. Then drag the field you want from the Field List and drop it into position on the form. If you click the button for a control that's inappropriate for the data type of the field, Access selects the default control for the data type. For example, if you click anything but the Attachment button when placing an attachment field on a form, Access creates an attachment control for you anyway. If you try to drag any field after clicking the button for the subform/subreport, unbound object frame, line, rectangle, or page break control, Access creates a text box control or bound object frame control, as appropriate, instead. If you drag a field from the Field List without clicking a control, Access uses either the display control you defined for the field in the table definition or a control appropriate for the field data type.
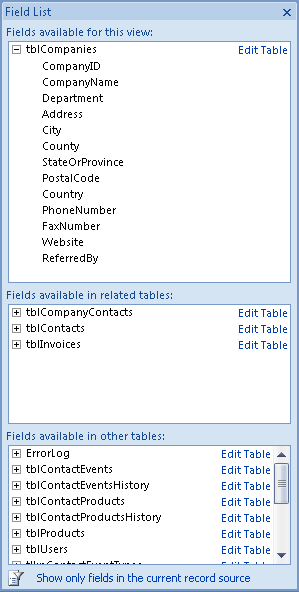
Figure 3 The Field List shows the names of the fields in the bound table or query, any related tables, and fields from all other tables in the current database.
The property sheet
The form, each section of the form (header, detail, footer), and each control on the form have a list of properties associated with them, and you set these properties using a property sheet. Each control on a form, each section on a form, and the form itself are all objects. The kinds of properties you can specify vary depending on the object. To open the property sheet for an object, select the object and then click the Property Sheet button in the Tools group on the Design tab. Access opens a window similar to the one shown in Figure 4 on the right side of the form window, replacing the Field List. (You cannot have both the property sheet and the Field List open at the same time.) If you have previously undocked either the Field List or property sheet, the property sheet appears in the undocked window. If the property sheet is already open, you can view the properties specific to an object by clicking the object. You can also click the arrow under Selection Type and then select the object name from the list at the top of the property sheet.
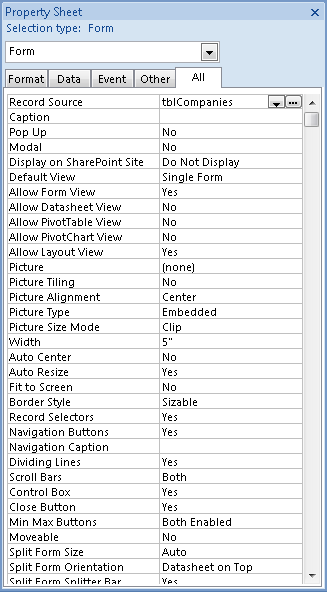
Figure 4 You can view the properties of form controls and sections using the property sheet.
You can drag the title bar to move the property sheet around on your screen. You can also drag the edges of the window to resize it so that you can see more of the property settings. Because a form has more than 100 properties that you can set and because many controls have more than 70 properties, Access provides tabs at the top of the property sheet so that you can choose to display all properties (the default) or to display only format properties, data properties, event properties, or other properties. A form property sheet displaying only the data properties is shown in Figure 5.
When you click in a property box that provides a list of valid values, a small arrow appears on the right side of the property box. Click this arrow to see a list of the values for the property. For properties that can have a very long value setting, you can click the property and then press SHIFT+F2 to open the Zoom dialog box. The Zoom dialog box provides an expanded text box for entering or viewing a value.
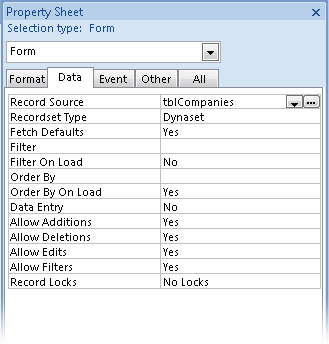
Figure 5 If you click the Data tab on the form property sheet, Access displays only the data properties.
In many cases, a window, dialog box, or wizard is available to help you create property settings for properties that can accept a complex expression, a query definition, or code (a macro or a Visual Basic procedure) to respond to an event. When such help is available for a property setting, Access displays a small button  with an ellipsis next to the property box when you select the property; this is the Build button. If you click the Build button, Access responds with the appropriate window, dialog box, or wizard.
Tip: Unlike previous releases, after you open the property sheet in table, query, form, or report Design view, the window will be open for all objects in Design view until you close it. Likewise, if you close the property sheet in Design view, the window will be closed for all other objects in Design view until you reopen it.

No comments:
Post a Comment