Saturday, December 31, 2016

Voice and Video Call Quality

Voice and Video Call Quality

Voice and video call quality for Office Communicator 2007 R2 and Live Meeting 2007 depends on the condition and quality of the network. The Office Communicator 2007 R2 and Live Meeting Console 2007 software handle a wide range of network conditions and still maintain high quality audio and video. However, under severe conditions you may experience one or more of the following effects:

  • Tinny audio     Occurs when the person you are talking to sounds unnatural and may have a higher pitch than expected.

  • Loss of words     Occurs when portions of the conversation are lost.

  • Choppy video     Occurs when the video image does not have a smooth motion.

  • Long delay     Occurs when there is a long delay between when one person talks and the other person hears the audio.

Common causes of poor network quality

Common causes for poor network quality include the following:

  • LAN congestion    Occurs when routers or other network equipment are overloaded with too much traffic. This could occur on your home network, your ISP, or your company's network.

  • Wireless LAN interference     Occurs when a large number of wireless devices are connected to the access points. It can also occur when there is interference from other devices such as cell phones, cordless phones, or a microwave oven.

  • Faulty LAN cabling or connection     Occurs when a cable is defective or becomes damaged.

  • Hardware configuration     Occurs when the network equipment is misconfigured in your home, in your ISP, or in your company's network.

What can you do to improve network quality?

If you are on a wireless network     you can try the following to improve the connection:

  • Move closer to the wireless access point.

  • Find a less busy wireless access point to use.

  • Switch to wired connection.

  • Check if other computers on the network are performing heavy downloads or uploads and see if they can be delayed or halted.

  • Ensure your router or modem has the latest firmware available.

  • Check the network cables between the router and modem to ensure that they are plugged in and do not show signs of damage.

  • Contact your ISP if you are at home.

  • Contact your system administrator if you are at work.

Note: You can also refer to the product documentation for the router/WLAN card for additional ways to improve the wireless connection.

If you are on a wired network     you can try the following to improve the connection:

  • Check if other computers on the network are performing heavy downloads or uploads and see if they can be delayed or halted.

  • Ensure that your router or modem have the latest firmware available.

  • Check the network cables between your computer and the router and between the router and the modem to ensure that they are plugged in and do not show signs of damage.

  • Contact your ISP if you are at home.

  • Contact your system administrator if you are at work.

Note: For IT Administrators     Consider deploying the Office Communications Server 2007 R2 Monitoring Server to get a detailed view of network quality in terms of packet loss, jitter, frame loss, and delay throughout your VoIP deployment .

Work with the Gantt Chart view

Work with the Gantt Chart view

The Gantt Chart view is the most commonly used view in Microsoft Office Project 2007. It lists the tasks in your project, and illustrates their relationship to one another and the schedule using Gantt bars. The Gantt Chart view is the default view for new projects.

Note: To access the Gantt Chart view, on the View menu, click Gantt Chart.

In this article

Use the task list

Use the chart

Why aren't my Gantt bars moving?

Use the task list

You can list each of your project's tasks in the grid portion on the left side of the Gantt Chart view, and then organize them into a hierarchy of summary tasks and subtasks. You can also link tasks together, to show task dependencies.

For more information about adding to the task list and organizing your project's tasks, see the following articles:

Top of Page

Use the chart

In addition to the grid portion of the view, the Gantt Chart view also provides an illustrated version of your task list, with Gantt bars that show the duration of your project's tasks across a timeline. This part of the Gantt Chart view is called the chart. For each task, the associated Gantt bar begins at the start date, and ends at the finish date. If you have linked tasks together, the Gantt bars are connected on the chart with link lines.

Zoom in and out

The timeline units for the right portion of the Gantt Chart view are displayed at the top of the chart. By default, Project 2007 displays two units of time. You can adjust these time units to display up to three units of time, and you can change it so that different time units are displayed. For example, you can zoom out to a bigger picture of your project's tasks by displaying Years and Months, or you can zoom in to see the exact start and finish dates for your project's tasks by changing the timescale to Weeks and Days. For more information about adjusting the timescale of the Gantt Chart view, see Change the timescale in a view.

Change colors and add text

Project 2007 provides a lot of flexibility in the way that Gantt bars are displayed in the Gantt Chart view.

You can:

  • Change the color, shape, or pattern of Gantt bars.

  • Create a new type of Gantt bar, such as one that shows available slack or delayed tasks.

  • Add text to Gantt bars.

  • Display task names for individual Gantt bars on a summary task bar.

  • Change the height of Gantt bars.

  • Change the appearance of link lines between Gantt bars.

All of these changes are described in Format the bar chart portion of a Gantt view.

Top of Page

Why aren't my Gantt bars moving?

Gantt bars are displayed using the start and finish dates for the tasks in your project. They don't move to reflect the progress of tasks. Instead, you can use the gridline for the current date to see where tasks should be according to the schedule.

  1. Right-click anywhere in the chart portion of the Gantt Chart view and then click Gridlines.

  2. In the Line to change box, select Current Date.

  3. In the Normal area, use the Type box and the Color box to change the how the gridline looks.

Top of Page

Embedded and linked sound files in a presentation

Embedded and linked sound files in a presentation

In this article

Embedded vs. linked sounds

Determine if a sound is linked or embedded

Increase or decrease the size of the embedded sound

Change an embedded sound file to a linked file

Embedded vs. linked sounds

The main differences between embedded sounds (objects) and linked sounds are where they are stored and how you update them after you put them in your presentation. Embedded files are stored within the presentation, and linked files are stored outside the presentation. Also, linked files are updated when changes are made to their source file, but embedded files don't change if you change their source file. Note that PowerPoint reflects updates to the linked files only if the presentation contains current links to the sound.

When your presentation contains linked files, you must copy both the linked files and the presentation if you plan to give the presentation on another computer or send it to someone in an e-mail message. Copying the files into the same folder as the presentation makes the files available to Microsoft Office PowerPoint 2007, so that PowerPoint can find the files when you want to play them. If you use the Package for CD feature to move your files, your links will be updated automatically. If you don't use this feature, you need to manually update any links by deleting the sound files and then adding them back.

linked and embedded objects in document

1 An embedded object

2 A linked object

callout 3 The source file that contains the linked object

By default, only .wav (waveform audio data) sound files under 100 kilobytes (KB) each in size are embedded in your presentation. All other media file types and .wav files greater than 100 KB are linked. If you want the .wav sound file to be contained inside the presentation, you can increase the size of the embedded file to a maximum of 50,000 KB (50 megabytes). However, raising this limit also increases the overall size of your presentation and may slow down its performance.

To help you decide whether to embed or link your sound files, consider the following table.

Type of file

When to use it

Embedded file

  • Your files are under 100 KB each (the recommended maximum size) and are .wav files only. You can embed .wav files that are up to 50 megabytes (MB), but it may slow down the performance of the presentation.

  • You want all sound files contained within, rather than linked to, your presentation.

  • You don't plan to change the source files.

Linked file

  • Your sound files are 100 KB or more each.

  • You plan to change the source files.

  • You plan to use the Package for CD feature to package your presentation to a CD or to a different folder or computer.

Top of Page

Determine if a sound is linked or embedded

  1. In Normal view, click the sound icon Icon image on the slide that you want to determine the linked or embedded status for.

  2. Under Sound Tools, on the Options tab, in the Sound Options group, click the Dialog Box Launcher Icon image .

    Sound Tools Options tab image

  3. Under Information, next to File, you see either [Contained in presentation] (meaning that the sound is embedded) or the path to the sound (meaning that the sound is linked).

Top of Page

Increase or decrease the size of the embedded sound

  1. Click the embedded sound icon Icon image .

  2. Under Sound Tools, on the Options tab, in the Sound Options group, increase the maximum sound file size by entering a number in the Max Sound File Size (KB) box. You can increase it to as much as 50 MB or decrease it to as little as 1 KB.

    Sound Tools Options tab image

Note: Changes made to this setting are not retroactive. Any sound files that were linked before you increased the maximum sound file size must be deleted and then reinserted into your presentation if you want them to be embedded. Correspondingly, any sound files that were embedded before you reduced the maximum sound file size must be deleted and then reinserted into your presentation if you want them to be linked.

Top of Page

Change an embedded sound file to a linked file

To decrease the size of your presentation file, you can delete the embedded sounds and add them back as linked files. To do this, save a copy of your presentation as a Web page to get the sounds into a separate folder, delete the embedded sounds, copy or move the sounds to the same folder as your presentation, and then add the linked sounds to your original presentation.

Save the embedded sounds to a folder

  1. Click the Microsoft Office Button Office button image , point to Save As, and then click PowerPoint 97-2003 Presentation.

  2. In the File name box, type a name for the Web page.

  3. In the Save as type box, click Web Page.

  4. Click Save.

    PowerPoint will save the embedded sounds to a separate folder with the same name as the one used for the Web page above. After these sounds are in a separate folder, you can copy or move them to the same folder as your presentation.

Delete the embedded sounds

  1. In your original presentation, in Normal view, click the slide that contains the sound that you want to delete.

  2. Click the sound icon Icon image , and then press DELETE.

To delete multiple sounds, repeat this process for each slide that contains sound files that you want to remove.

Replace embedded sounds with linked sounds

Before you add the sounds to your presentation again, copy or move the sounds to the same folder as your presentation, and then verify and set the Max Sound File Size (KB) to be lower than the size of the sounds that you want to include in your presentation.

  1. Click the slide that you want to add a sound to.

  2. On the Insert tab, in the Media Clips group, click the drop-down arrow under Sound, and then click Sound from File.

    Insert tab image

  3. Locate the folder that contains the sound files that you just deleted, and then double-click the file that you want to add.

To add multiple sounds, repeat this process for each slide that contains sound files that you want to add.

Tip: To run a presentation that contains linked files on a different computer, to distribute a presentation on a CD, or to save a presentation to a folder or network, you must copy both the presentation and the linked files. To copy your presentation and any supporting files either onto a CD or to a single folder or network share, click the Microsoft Office Button Office button image , point to Publish, and then click Package for CD. The Package for CD feature will automatically update any links to files that you package with the presentation. When you package your presentation, you can also make it play automatically.

Top of Page

Communicate with Lync in Office 365

Communicate with Lync in Office 365

Your browser does not support video. Install Microsoft Silverlight, Adobe Flash Player, or Internet Explorer 9.

Note: SkyDrive is now OneDrive, and SkyDrive Pro is now OneDrive for Business. Read more about this change at From SkyDrive to OneDrive.

Use Lync to IM, have online meetings, and more.

Office Communicator 2007 Error ID: 486

Office Communicator 2007 Error ID: 486

Details

Product:

Office Communicator 2007, Office Communicator 2007 R2

Version:

2.0, 3.0

Source:

Office Communicator Client

ID:

486

Message:

Busy Here

Explanation

The user was contacted successfully, but is currently not willing or able to take additional calls on his or her system.

Cause

This error condition can occur when you call a user that has a traditional PSTN phone line, the user's phone is busy, and the user does not have voice mail.

Resolution

Try calling the user again later.

Regular Work fields

Regular Work fields

The Regular Work fields show the total amount of nonovertime work scheduled to be performed by resources.

There are several categories of Regular Work fields.

Data Type    Duration

Regular Work (task field)

Entry Type    Calculated

How Calculated    Microsoft Office Project calculates regular work as follows:

Regular Work = Work - Overtime Work

If you enter regular work, it is distributed proportionally to all assigned resources.

This field shows the amount of time scheduled for a task that is charged at the resource's standard rate.

Best Uses    Add the Regular Work field to any task sheet to display or filter for nonovertime work for tasks. Add the Overtime Work field as well to see standard time next to overtime.

Example    The "Write proposal" task has 40 hours of work, all assigned to Chris. Of these total work hours, 8 hours are overtime work and 32 hours are regular work.

Regular Work (resource field)

Entry Type    Calculated

How Calculated    Microsoft Office Project calculates regular work for a resource as the sum of all regular work for all assigned tasks. This field shows the total amount of time scheduled for a resource that is charged at the resource's standard rate.

Best Uses    Add the Regular Work field to any resource sheet to display or filter for nonovertime work scheduled for resources. Add the Overtime Work field as well to see standard time next to overtime.

Example    You want to compare the amount of regular work to overtime work that your team will work in the next three months. You add the Regular Work and Overtime Work fields to the Resource Sheet view.

Regular Work (assignment field)

Entry Type    Calculated or entered

How Calculated    Microsoft Office Project calculates regular work as follows:

Regular Work = Work - Overtime Work

This field shows the amount of time scheduled for an assignment that is charged at the resource's standard rate.

Best Uses    Add the Regular Work field to the Task Usage or Resource Usage view to edit, display, or filter for nonovertime work for assignments. Add the Overtime Work field as well to see standard time next to overtime.

Example    The "Write proposal" task has 40 hours of work assigned to Chris. Of these total work hours, 8 hours are overtime work and 32 hours are regular work.

Regular Work (task-timephased field)

Entry Type    Calculated

How Calculated    Microsoft Office Project calculates regular work as follows:

Regular Work = Work - Overtime Work

If you enter regular work, it is distributed proportionally to all assigned resources.

This timephased field shows the amount of time scheduled for a task that will be charged at the resource's standard rate.

Best Uses    Add the Regular Work field to the timephased portion of the Task Usage view to display nonovertime work for tasks for each period of time. Add the Overtime Work field as well to see standard time next to overtime.

Example    The "Write proposal" task has 40 hours of work, all assigned to Chris. You want to see how much of this is regular work and how much is overtime. In the timephased portion of the Task Usage view, you see that there are 8 hours of regular work scheduled across each of 4 days for a total of 32 hours of scheduled regular time.

Regular Work (resource-timephased field)

Entry Type    Calculated

How Calculated    Microsoft Office Project calculates regular work for a resource as the sum of all regular work for all assigned tasks, distributed over time.

Best Uses    Add the Regular Work field to the timephased portion of the Resource Usage view to display nonovertime work for assignments, distributed over a period of time. Add the Overtime Work field as well, to see standard time next to overtime.

This timephased field shows the amount of time scheduled for a resource that is charged at the resource's standard rate.

Example    You want to compare the amount of regular work to overtime work that your team will be working in the next three months. You add the Regular Work and Overtime Work fields to the timephased portion of the Resource Usage view.

Regular Work (assignment-timephased field)

Entry Type    Calculated or entered

How Calculated    Microsoft Office Project calculates regular work as follows:

Regular Work = Work - Overtime Work

This timephased field shows the amount of time scheduled for a task that is charged at the resource's standard rate.

Best Uses    Add the Regular Work field to the timephased portion of the Task Usage or Resource Usage view to edit or display nonovertime work for assignments for a period of time. Add the Overtime Work field as well to see standard time next to overtime.

Example    The "Write proposal" task has 40 hours of work assigned to Chris. Of these total work hours, 8 hours are overtime work and 32 hours are regular work. In the timephased portion of the Task Usage view, you see the 32 hours of regular work distributed across 4 days with 8 hours in each day.

Add transitions between your slides in PowerPoint Online

Add transitions between your slides in PowerPoint Online

For smooth, animated shifts between slides, add transitions.

  1. On the Transitions tab, pick a transition.

Pick a transition

  1. To apply the transition to all the slides in your presentation, click Apply To All.

Password protect a document

Password protect a document

Help protect a sensitive or confidential document from unwanted edits by assigning a password. You can also prevent a document from being opened.

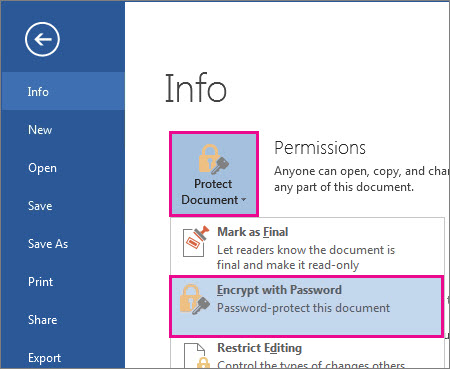
  1. Click File > Info > Protect Document > Encrypt with Password.

Password-protect your document

  1. In the Encrypt Document box, type a password, and then click OK.

  2. In the Confirm Password box, type the password again, and then click OK.

Notes: 

  • You can always change or remove your password.

  • Passwords are case-sensitive. Make sure that the CAPS LOCK key is turned off when you enter a password for the first time.

  • If you lose or forget a password, Word can't recover your information, so keep a copy of your password in a safe place or create a strong password that you'll remember.

Project 2007 converter information

Project 2007 converter information

Important notice for users of Office 2003    To continue receiving security updates for Office, make sure you're running Office 2003 Service Pack 3 (SP3). The support for Office 2003 ends April 8, 2014. If you're running Office 2003 after support ends, to receive all important security updates for Office, you need to upgrade to a later version such as Office 365 or Office 2013. For more information, see Support is ending for Office 2003.

Microsoft Office Project 2003 has detected that the original file was created in Microsoft Office Project 2007 and might contain some information only available in Project 2007.

Converters for opening Office Project 2007 files are provided as part of Microsoft Office Project 2003 Service Pack 3 (SP3).

Download Microsoft Office Project 2003 Service Pack 3.

If you use Project 2003 to save this file in the Project 2000 - 2003 MPP format or an older file format, you can lose data in areas where Project 2007 contains enhanced functionality.

The following types of data or formatting can be lost:

  • Budget information      Information contained in the new budget fields will be lost.

  • Deliverables and Dependencies     Information contained in the new, cross-project deliverables and dependencies fields will be lost. Information contained in task links will not be lost.

  • Cost resources     Information contained in the new cost resource fields might be changed, converting cost resources into material resources. Information contained in other cost fields will not be lost.

  • Background cell formatting     Sheet cells that have background formatting applied to them will lose their background formatting. Information in these fields will not be lost.

  • Assignment owner information     Information contained in the new assignment owner fields will be lost.

  • Calendar exceptions     New exceptions that were added to project and resource calendar functionality (such as monthly exceptions, yearly exceptions, and those with arbitrary dates) will be lost.

  • New fields and custom fields    Information within new fields, or any formulas relying on new fields, will be lost. New options that are set on custom fields created in Project 2007 will be lost, such as the new roll-down setting for calculation of assignment rows. Task assignment custom field values will also be lost.

  • Enterprise custom fields    Any enterprise custom fields created within Project 2007 will be lost.

Create a matrix

Create a matrix

Keywords    animate matrix; add matrix border matrix border color; matrix border style; matrix layout; matrix background; tiled matrix; grid matrix

A matrix is a rectangular array of elements, arranged in rows and columns, and can be used to show the placement of concepts along two axes. For example, you can use a matrix to illustrate the four possible combinations of two concepts or ingredients. By using a SmartArt graphic in Microsoft Office Excel 2007, Microsoft Office Outlook 2007, Microsoft Office PowerPoint 2007, or Microsoft Office Word 2007, you can create a matrix and include it in your spreadsheet, e-mail message, presentation, or document.

Basic matrix

In this article

Create a matrix

Move a box in your matrix

Change to a different matrix layout

Change the colors of your matrix

Apply a SmartArt Style to your matrix

Animate your matrix

Create a matrix

  1. On the Insert tab, in the Illustrations group, click SmartArt.

    Illustrations group Ribbon Image

  2. In the Choose a SmartArt Graphic gallery, click Matrix, click a matrix layout (such as Basic Matrix), and then click OK.

  3. To enter text in your matrix, do one of the following:

    • Click [Text] in the Text pane, and then type your text.

    • Copy text from another location or program, click [Text] in the Text pane, and then paste your text.

      Note: If the Text pane is not visible, click the control.

      text pane control

    • Click a box in the SmartArt graphic, and then type your text.

Top of Page

Move a box in your matrix

  • To move a box, click the box and then drag it to its new location.

  • To move a box in very small increments, hold down CTRL while you press the arrow keys on your keyboard.

Top of Page

Change to a different matrix layout

  1. Right-click the matrix that you want to change, and then click Change Layout.

  2. Click Matrix, and then do one of the following:

    • To show the relationship of components to a whole in quadrants, click Basic Matrix.

      Basic matrix

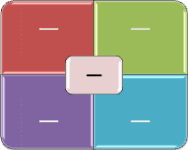
    • To show the relationship of four quadrants to a whole, click Titled Matrix. The first line of top-level text that you type appears in the center of the matrix, and the first four lines of second-level text appear in the four quadrants.

      Titled matrix

    • To show the relationship of components to a whole in quadrants, emphasizing the quadrants rather than the whole, click Grid Matrix.

      Grid matrix

Note: You can also change the layout of your SmartArt graphic by clicking a layout option in the Layouts group on the Design tab under SmartArt Tools. When you point to a layout option, your SmartArt graphic changes to show you a preview of how it would look with that layout.

Top of Page

Change the colors of your matrix

To quickly add a designer-quality look and polish to your SmartArt graphic, you can change the colors or apply a SmartArt Style to your matrix. You can also add effects, such as glows, soft edges, or 3-D effects. Using PowerPoint 2007 presentations, you can animate your matrix.

You can apply color combinations that are derived from the theme colors to the boxes in your SmartArt graphic.

  1. Click the SmartArt graphic whose color you want to change.

  2. Under SmartArt Tools, on the Design tab, in the SmartArt Styles group, click Change Colors.

    SmartArt toolbar - matrix

    If you don't see the SmartArt Tools or Design tabs, make sure that you've selected the SmartArt graphic.

Tip: When you place your pointer over a thumbnail, you can see how the colors affect your SmartArt graphic.

Change the line color or style of a box's border

  1. In the SmartArt graphic, right-click the border of the box you want to change, and then click Format Shape.

  2. To change the color of the box's border, click Line Color, click Color Color Picker , and then click the color that you want.

  3. To change the style of the box's border, click Line Style, and then choose the line styles you want.

Change the background color of a box in your matrix

  1. Click the SmartArt graphic you want to change.

  2. Right-click the border of a box, and then click Format Shape.

  3. Click Fill, and then click Solid fill.

  4. Click Color Color Picker , and then click the color that you want.

To change the background to a color that is not in the theme colors, click More Colors, and then either click the color that you want on the Standard tab, or mix your own color on the Custom tab. Custom colors and colors on the Standard tab are not updated if you later change the document theme.

To specify how much you can see through the background color, move the Transparency slider, or enter a number in the box next to the slider. You can vary the percentage of transparency from 0% (fully opaque, the default setting) to 100% (fully transparent).

Top of Page

Apply a SmartArt Style to your matrix

A SmartArt Style is a combination of various effects, such as line style, bevel, or 3-D, that you can apply to the boxes in your SmartArt graphic to create a unique and professionally designed look.

  1. Click the SmartArt graphic you want to change.

  2. Under SmartArt Tools, on the Design tab, in the SmartArt Styles group, click the SmartArt Style that you want.

    SmartArt toolbar - matrix

    To see more SmartArt Styles, click the More button Button image .

Note: 

Top of Page

Animate your matrix

If you're using PowerPoint 2007, you can animate your matrix to emphasize each box.

  1. Click the matrix that you want to animate.

  2. On the Animations tab, in the Animations group, click Animate, and then click One by one.

    Animations tab image

Note:  If you copy a matrix that has an animation applied to it to another slide, the animation is also copied.

Top of Page

GUIDFromString Function

GUIDFromString Function

The GUIDFromString function converts a string to a GUID, which is an array of type Byte.

Syntax

GUIDFromString ( stringexpression )

The required stringexpression argument is a string expression which evaluates to a GUID in string form.

Remarks

The Microsoft Access database engine stores GUIDs as arrays of type Byte. However, Microsoft Office Access 2007 can't return Byte data from a control on a form or report. In order to return the value of a GUID from a control, you must convert it to a string. To convert a GUID to a string, use the StringFromGUID function. To convert a string to a GUID, use the GUIDFromString function.

Example

Note: Examples that follow demonstrate the use of this function in a Visual Basic for Applications (VBA) module. For more information about working with VBA, select Developer Reference in the drop-down list next to Search and enter one or more terms in the search box.

The following example uses the GUIDFromString function to convert a string to a GUID. The string is a GUID stored in string form in a replicated Employees table. The field, s_GUID, is a hidden field added to every replicated table in a replicated database.

Sub CheckGUIDType()
Dim dbsConn As ADODB.Connection
Dim rstEmployees As ADODB.Recordset
' Make a connection to the current database.
Set dbsConn = Application.CurrentProject.Connection
Set rstEmployees = New ADODB.Recordset
rstEmployees.Open "Employees", _
dbsConn, , , adCmdTable
' Print the GUID to the immediate window.
Debug.Print rst!s_GUID
Debug.Print TypeName(rst!s_GUID)
Debug.Print TypeName(GuidFromString(rst!s_GUID))
Set rstEmployees = Nothing
Set dbsConn = Nothing
End Sub

Insert and format pictures in OneNote 2016 for Mac

Insert and format pictures in OneNote 2016 for Mac

You can insert pictures anywhere in your notes, such as photos you've taken with a cell phone or other type of camera, screenshots you've taken on your Mac or downloaded from the Internet, and any images you've scanned with a flatbed or portable scanner.

Pictures you've inserted can be resized, scaled, rotated, and flipped — either to make them look the way you want or to make them fit on the page.

What do you want to do?

Insert a picture

Resize a picture

Scale a picture

Rotate a picture

Flip a picture

Arrange the order of a picture

Use a picture as the page background

Restore a picture

Insert a picture

Do the following:

  1. On any page, click where you want to insert a picture.

  2. On the Insert tab, click Picture.

  3. In the Choose a picture dialog box that opens, click to select one or more pictures you want, and then click Insert.

Tip: To move or align a picture you've inserted, click and drag it anywhere on the page. For more precise positioning, hold the Option key on your keyboard while dragging a picture. Doing so turns off the invisible grid that moving selections snap to.


Resize a picture

You can resize an inserted picture to make it appear smaller or larger on the page. Making a picture smaller will reduce its detail but maintain image quality, while making a picture larger can enhance its detail but at the expense of image quality. Resizing a picture keeps its original height and width ratio intact so that the resized image does not appear distorted.

Do the following:

  1. Click to select the picture you want to resize.

    Eight small boxes — called selection handles — will appear around the outer border of the picture.

  2. Click any one of the four selection handles that appear in the corners of the picture (not on the sides) and then drag the handle up, down, or sideways until the picture is the size you want.


Scale a picture

You can scale an inserted picture to make it fit on the page by reducing or increasing either its width or its height. Scaling is different from resizing in that it purposely distorts the picture to force it to fit into a specific area.

Do the following:

  1. Click to select the picture you want to scale.

    Eight small boxes — called selection handles — will appear around the outer border of the picture.

  2. Click any one of the four selection handles that appear in the center of the picture sides (not in the corners) and then drag the handle up, down, or sideways until the picture is the size you want.

    Tip:  If the result of your scaling is not what you wanted, press Command-Z on your keyboard to undo the change.


Rotate a picture

If the picture you've inserted shows up sideways, you can easily rotate it so it appears the way you want. This most commonly happens with photos that were taken with cell phone cameras.

Do the following:

  1. Click to select the picture you want to rotate.

  2. On the menu bar, click Format, point to Images, and then do one of the following:

    • Click Rotate Right 90° to rotate the picture clockwise by 90 degrees. You can apply this command more than once to achieve the rotation you want.

    • Click Rotate Left 90° to rotate the picture counterclockwise by 90 degrees. You can apply this command more than once to achieve the rotation you want.

Tip: If you need to rotate a picture to a specific angle, apply the rotation to the source image in your favorite image editing app before inserting the rotated picture into your notes.


Flip a picture

Flipping a picture reverses the image horizontally or vertically, as if seen in a mirror. You can use this effect to customize or add variety to inserted illustrations or graphics (for example, you can flip a picture of an arrow to have it point in the opposite direction). If you flip a picture that contains text, it will no longer be easily readable.

Do the following:

  1. Click to select the picture you want to rotate.

  2. On the menu bar, click Format, point to Images, and then do one of the following:

    • Click Flip Horizontal to flip the selected picture horizontally.

    • Click Flip Vertical to flip the selected picture vertically.


Arrange the order of a picture

If you need to position multiple pictures next to each other so that they partially overlap in a specific way, you can arrange the order of each picture to make it appear above or below another. In OneNote, this works much like the commands in popular page layout and illustration apps that let you control the depth (also known as the z-axis) of a three-dimensional design.

Do the following:

  1. Control-click the picture you want to arrange.

  2. On the menu that appears, point to Order, and then do any of the following:

    • Click Bring Forward to move the selected image up by one level. You can apply this command more than once to arrange the picture the way you want. Any other pictures that are positioned near or below the selected image may be partially or fully covered up.

    • Click Bring to Front to move the depth of the selected image up to the top-most level. Any other pictures that are positioned near or below the selected image may be partially or fully covered up.

    • Click Send Backward to move the selected image down by one level. You can apply this command more than once to arrange the picture the way you want. Any other pictures that are positioned near or above the selected image may partially or fully cover up the selected image.

    • Click Send to Back to move the depth of the selected image down to the lowest level. Any other pictures that are positioned near or above the selected image may partially or fully cover up the selected image.


Use a picture as the page background

You can change the design of your notebook pages using a specific image as your page background.

Do the following:

  1. Insert any picture, format it (optional), and position it on the page where you want to use it as the page background.

  2. Control-click the picture, and then click Set Picture as Background on the menu that appears.

    The picture is now part of the page and can no longer be selected by clicking it. This lets you annotate the picture or write notes over it.

To remove a picture from the page background, do the following:

  1. Control-click where the picture appears free of anything placed or typed over it, and then click √ Set Picture as Background on the menu that appears to un-check the selection.

    Once removed from the page background, you can select, format, move, restore, or delete it again like any normal picture.

Note: If you prefer, you can also change the background color of a page without the use of any images.


Restore a picture

If you want to revert an inserted picture to its original size and appearance, do the following:

  1. Click to select the picture you want to restore.

  2. On the menu bar, click Format, point to Images, and then click Restore to Original Size.

Why does Access want me to enter a parameter value?

Why does Access want me to enter a parameter value?

Sometimes when you open an Access object (such as a table, query, form, or report), Access displays the Enter Parameter Value dialog box. Access displays this dialog box when you open an object that contains an identifier or expression that Access can't interpret.

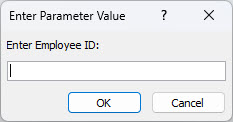
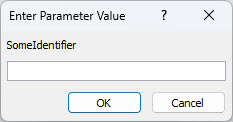
In some cases, this is the behavior that you want. For example, the creator of the database might have created a query that lets you enter information every time that the query runs, such as a start date or an employee ID number. Such a prompt might resemble this:

Enter Parameter Value dialog box

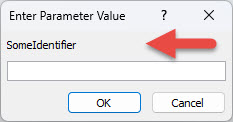
However, in other cases you don't want this dialog box to appear. For example, you might have made some changes to the design of your database. Now, when you open an object, Access displays the dialog box unexpectedly with a message you don't understand.

Enter Parameter Value dialog box

This article provides you with procedures to investigate why Access may be requesting a parameter value and how you can stop the requests.

Note:  This article doesn't apply to Access web apps – the type of database you design with Access and publish online to Office 365 or SharePoint. See Create an Access app for more information.

Stop the request for a parameter value

To stop the Enter Parameter Value dialog box from appearing, you must inspect any expressions that are associated with the object that you're working with, and find the identifier that is causing the dialog box to appear. Then, you must correct the identifier or the syntax of the expression that contains the identifier.

Find links to more information about expression syntax in the See Also section.

When the unwanted Enter Parameter Value dialog box appears, note the identifier or expression that's listed in the dialog box. For example, "SomeIdentifier" as shown in the following screenshot.

Enter Parameter Value dialog box

Then, select Cancel and continue with one of the following procedures, depending on the type of object that you're opening when the dialog box appears. The procedures provide general guidelines for inspecting the expressions in different types of objects. However, the specific changes that you must make depend on the structure of your database.

Typographical errors in queries are a frequent cause of unwanted parameter prompts. As mentioned earlier, when a query is designed to ask for a parameter value when it is run, the Enter Parameter Value dialog box appears by design. However, if you're sure that the query shouldn't be asking for a parameter value, use this procedure to inspect the query for incorrect expressions.

  1. Right-click the query in the Navigation Pane, and then click Design View.

  2. Inspect the identifiers and expressions in the Field row and in the Criteria rows, and determine whether any of the text matches the text that was displayed in the Enter Parameter Value dialog box. In particular, if one of the cells in the Field row contains a value such as Expr1: [identifier], this might be the source of the parameter prompt.

    Query that contains an expression that causes the Enter Parameter Value dialog box to appear

Find links to more information about how to create parameter queries in the See Also section.

Top of Page

If the Enter Parameter Value dialog box appears when you open a report, follow these steps to inspect the report's properties:

  1. Right-click the report in the Navigation Pane, and then click Design View.

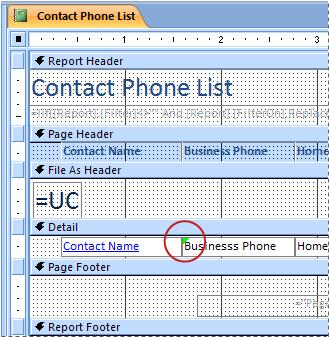
    Note: Before continuing, determine if any of the controls on the report display a green triangle in their upper-left corner. The triangle means that Access can't evaluate an identifier or expression in the Control Source property of that control. If any controls display the green triangle, pay particular attention to those controls as you continue through these steps.

    Report containing a text box with a misspelled identifier

  2. If the Property Sheet task pane isn't displayed, press F4 to display it.

  3. In the Property Sheet task pane, select the All tab.

  4. Select a control that displays data on the report (such as a text box, check box, or combo box). If any controls display the green triangle mentioned in step 1, click one of those controls first.

  5. In the Property Sheet task pane, inspect the Control Source property for the identifier that was displayed in the Enter Parameter Value dialog box, and then modify the expression if necessary.

  6. Repeat steps 4 and 5 for other controls on the report, until you find the expression that is causing the problem.

  7. If you still can't find the problem, check for any incorrect expressions in the Group, Sort, and Total pane:

    • If the Group, Sort, and Total pane isn't displayed, on the Design tab, in the Grouping & Totals group, select Group & Sort.

    • If "Group by expression" or "Sort by expression" is displayed on a line in the Group, Sort, and Total pane, select the word "expression" to open the Expression Builder, where you can examine the expression and modify it if necessary.

Top of Page

If the Enter Parameter Value dialog box appears every time that you open a form, the incorrect expression might be in the underlying query. Examine the underlying query to find the incorrect expression.

  1. Right-click the form in the Navigation Pane, and then select Design View.

  2. If the Property Sheet task pane isn't displayed, press F4 to display it.

  3. Make sure that Form is selected in the list at the top of the Property Sheet task pane, and then select the All tab.

  4. Examine the Record Source property. If it contains the name of a query, or an SQL statement, then one of the identifiers in the statement may be incorrect, and causing the Enter Parameter Value dialog box to appear. Select the Record Source property box, and then click the Build button Builder button .

  5. Use the procedure in the section Inspect expressions in a query to find the incorrect expression.

    Important: To save your changes to the query when you're finished, close the query, and then save the form before switching back to form view. Otherwise, any changes that you made to the query will be lost.

Top of Page

An incorrect expression in the Row Source property of a combo box or list box control can cause the Enter Parameter Value dialog box to appear. In some cases, the dialog box doesn't appear until you try to use the control. Use this procedure to inspect the Row Source property of the control:

  1. Right-click the form in the Navigation Pane, and then select Design View.

  2. Click the combo box or list box that you want to inspect.

  3. If the Property Sheet task pane isn't displayed, press F4 to display it.

  4. Select the Data tab, and then examine the Row Source property and determine whether any of the text matches the text in the Enter Parameter Value dialog box.

Top of Page

If Access displays the Enter Parameter Value dialog box every time that you open a table, the incorrect expression is most likely in the Row Source property of a Lookup field in that table.

  1. Right-click the table in the Navigation Pane, and then select Design View.

  2. To determine if a field is a Lookup field, select the field name, and then under Field Properties, select the Lookup tab. If the tab contains a Row Source property box, then the field is a Lookup field. Examine the Row Source property. If it contains an SQL statement, then one of the identifiers in the statement may be incorrect, and causing the Enter Parameter Value dialog box to appear.

Note: A table can have multiple Lookup fields, so be sure to check the Lookup tab for each field.

Top of Page

See Also

Guide to expression syntax

Add functions to Access expressions

Use parameters to ask for input when running a query

Delete an email account from Outlook on the web

Delete an email account from Outlook on the web

You can delete an email account from Outlook at any time, so it will no longer be connected to Outlook. You are only deleting the connection, not the email account or the email.

What happens to my existing email when I remove the connection? Any email that was imported into Outlook will still be there after you disconnect the email account.

Before you disconnect your email account from Outlook, we recommend signing in to your original email provider and making sure copies of your emails are there. If they are there, after you remove your account you can delete all of your email from Outlook and you'll still have a copy of them at your email provider. If they aren't there, after you remove the account, you might want to store your email in a folder in Outlook instead of deleting them.

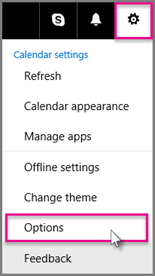
  1. On the Outlook navigation bar, select Settings Settings: update your profile, install software and connect it to the cloud > Options.

    Click Settings > Options

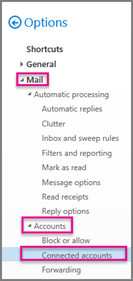
  2. In the left pane, click Mail, and under Accounts, click Connected accounts.

    Connected Accounts

  3. Select the account you want to remove, and then click Remove discard .

  4. Click Yes to confirm that you want to stop connecting to the account.

  5. After you remove your account from Outlook on the web, you can delete any emails that still appear in Outlook.

See Also

Delete all email in Outlook on the web

Connect email accounts in Outlook on the web