Set up Skype for Business Online
You must have Office 365 global admin permissions to set up Skype for Business. If you have a firewall or proxy server that restricts access to parts of the web, consider hiring a Microsoft partner to set up Skype for Business for you.
1. Plan for Skype for Business
If you have Office 365 Business Premium or Business Essentials, you can use Skype for Business to make online calls to other people in your business who are on your subscription. For example, if your business has 10 people, you'll be able to call and IM each other, and host online meetings using Skype for Business after performing the steps 2-6 below.
If you want to use Skype for Business to make and receive calls from people external to your business:
-
Option 1. Use the free Skype app. If you have a very small business (for example, 1-2 people) using the Skype app is the better way to go. It's less expensive to use for domestic and international calls. You can still hold conference calls, make video calls, and share your desktop for presentations. Check out the rates and payment options.
-
Option 2. Upgrade your plan, and buy Cloud PBX and the PSTN Calling plan. The easiest way to find out how much this costs, and then make the switch, is to call Support and have them do everything for you.
To learn more, see Plan for Skype for Business
2. Sign in to Office 365
Skype for Business Online is part of the Office 365 suite of services. To set up Skype for Business Online you need to sign in to Office 365. Here's how you do that:
-
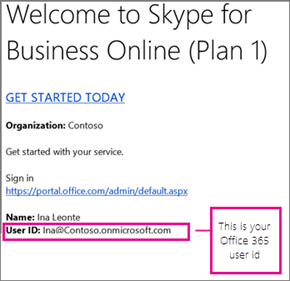
Locate your Office 365 user ID (for example, rob@fourthcoffee.com). You received an email from the Microsoft Online Services Team that contains the Office 365 user ID that you created when you purchased Skype for Business Online. The mail looks something like this:

-
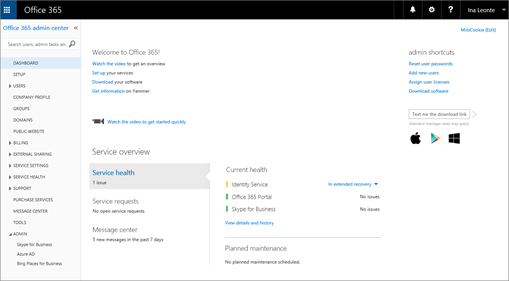
Go to https://portal.office.com/ and enter your Office 365 user ID and password. After you sign in, you'll see the Office 365 admin center:

3. Set up your domain and users
Now that you're signed in to Office 365, you can set up your domain and people in your organization to use Skype for Business Online.
-
Add your users and domain to Office 365: Use the Office 365 setup wizard to set up your custom domain (such as fourthcoffee.com) with Office 365. By default the Office 365 setup wizard includes setting up Skype for Business Online and creating your Skype for Business user IDs. If you already used the wizard to set up your domain for Office 365, then you've completed this step.
-
Check your domain and DNS connections: Use our tool - the domains troubleshooter - to check that your domain and DNS settings are correct. Doing this now will go a long way to helping figure out any setup issues later since you'll be able to eliminate DNS settings as the source of future issues.
-
Set up your outgoing connections: Most small businesses don't need to do this step. But if you have a firewall or proxy server that restricts access to parts of the web, you must create rules to allow access to the Skype for Business Online endpoints. This is an advanced step best performed by someone experienced with configuring firewalls and proxy servers. If you haven't done this before, consider hiring a Microsoft partner to set up Skype for Business for you.
4. Set up IM and presence in your organization
Instant Messaging (IM) and presence (what is this?) are basic features included with Skype for Business. By default the people in your business can Skype and IM with each other.
-
Choose who else your Skype for Business users can communicate:
-
IM with Skype for Business users in another business. Both you and the other business will need to configure your systems.
IMPORTANT: If you have two domains in your business, such as rob@contosowest.com and ina@contosoeast.com, you need to do this step so all of your users can communicate with each other.
-
IM with Skype users outside your business
-
-
Choose who sees whether co-workers are online: The presence feature shows who's online and what their availability is, such as available, busy, away, or presenting.

You can choose the default settings for everyone in your business:
-
Automatically display a person's online presence to everyone in the organization
-
Display a person's online presence only to their contacts
-
For instructions, see Configure presence in Skype for Business Online.
5. Download and install Skype for Business
To use Skype for Business on your PC, Mac, or mobile device, you and other people in your business have to first install the Skype for Business download on your devices.
-
Install Skype for Business: Instructions how to download the app from the Office 365 portal, and install it on your PC or Mac.
-
Deploy the Skype for Business client in Office 365: Instructions for deploying the app in a large enterprise.
-
Mobile installation: Download, install, and sign in to Skype for Business on:
-
Choose whether to receive alerts on phones and tablets: When you have Skype for Business installed on a mobile device, you and others in your business can receive alerts about incoming and missed instant messages.
6. Test to make sure everything is working
First, test whether you and others in your business can sign in to Skype for Business. Check that you can IM each other, see each other's presence, and try a quick meeting.
Problems? Do the following:
-
Check this list of common sign-in problems.
-
Call us. We're here to help!
Do you want to set up other available features?
Before setting up more features, make sure you have licenses for them. Skype for Business add-on licensing
Set up dial-in conferencing
Sometimes people in your organization will need to use a phone to call into a meeting. Skype for Business includes the dial-in conferencing feature for just this situation! People can call into Skype for Business meetings using a phone, instead of using the Skype for Business app on a mobile device or PC.
For step-by-step setup instructions, see Set up dial-in or PSTN conferencing for Skype for Business.
Set up Cloud PBX and PSTN Calling
The Cloud PBX feature gives you a phone system for your business. Calls to other Skype for Business people in your organization are free, and your employees can receive voicemail from each other and outside callers. Here's what you get with Cloud PBX.
When you add the PSTN Calling service, your employees get a primary phone number in Skype for Business. They can make and receive phone calls outside of your business. They can make voice calls across VoIP phones, PCs, and mobile devices. And, in case of emergencies, they can call 911 for help.
For step-by-step setup instructions, see Set up PSTN Calling for Skype for Business.
Set up Skype Meeting Broadcast
Skype Meeting Broadcast is a feature that lets you produce, host, and broadcast meetings with up to 10,000 attendees. To learn more about how it works, see What is Skype Meeting Broadcast?
Here's an overview of the steps to setup Skype Meeting Broadcast:
-
Assign licenses to your users: Assign Skype for Business Online or Enterprise Plan licenses to everyone who is going to host a Broadcast meeting.
-
Enable Skype Meeting Broadcast: By default this feature isn't enabled. After you turn it on, your users will be able to host broadcast meetings with other people in your organization.
-
Set up your network for Skype Meeting Broadcast: If you want to host webinars and other broadcasts with attendees outside of your organization, you need to configure your network.
-
Schedule a practice meeting and have a user join it: Make sure broadcast meetings work by scheduling a Skype Meeting Broadcast at https://portal.broadcast.skype.com and then having someone try to join the meeting.
Learn about network connectivity requirements
The quality of audio, video, and application sharing in Skype for Business is greatly impacted by the quality of end-to-end network connectivity. For an optimal experience, it is important to make sure there is a high-quality connection between your company network and Skype for Business Online. For network and tuning information, see Tune Skype for Business Online Performance.
All done setting up? Getting started using Skype for Business
Discover Skype for Business: Check out this list of training topic to help you get started quickly!
Start a Skype for Business conference call

No comments:
Post a Comment