Save a file in Word 2016 for Mac
You can save a file to a location on your computer, like a hard disk drive or a flash drive, or on an online service, like OneDrive. You can also export files to different file formats and save them to different file names.
Important: Even if you have AutoRecover enabled, you should save a file frequently while you are working on it to avoid losing data due to an unexpected power failure or some other problem. AutoRecover is described later in this topic in Save AutoRecover information automatically.
When you save a file, you can usually change its name, storage location, and file format all at the same time, if you want to do so. However, you might not want to do all of those things, and the instructions in this topic describe each option individually.
What do you want to do?
Save a file
By default, Word saves a file in a default working folder.
-
On the File menu, click Save, or press
 + S.
+ S.Tip: Alternatively, you can click the Save icon
 in the upper left corner of the Word window.
 -
If you are saving the document for the first time, you must enter a file name.
Save as a different file name
To save the document that you currently have open in Word to a new or different file name than it currently has, use Save as.
-
On the File menu, click Save as, or press
 + Shift + S.
 -
If you want to save the file in a folder other than the current folder, navigate to that folder.
-
In the Save As box, enter a different file name.

-
Click Save.
Save to a different location on your computer
If you want to save a file to a location on your computer other than the default folder, use Save as.
-
On the File menu, click Save as, or press
 + Shift + S.
 -
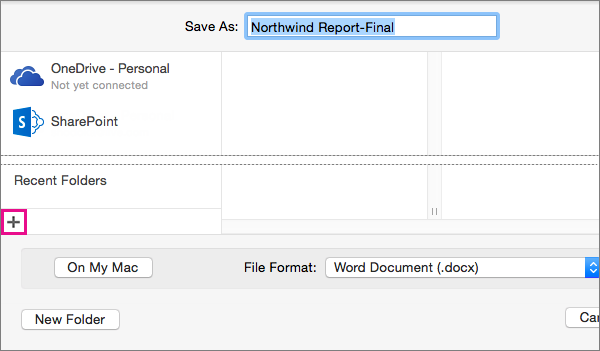
If the dialog box does not show a folder or folders on your computer, click On My Mac.

If Word displays the Online Locations button, the dialog box is currently displaying a folder on your computer.
-
Navigate to the folder on your computer where you want to save the file.
Tip: To show the favorites and display options for folders that are available in Finder, click the downward pointing arrow next to the Save As box.

-
If you want to create a new folder in the folder that you are currently viewing, click New Folder, and then enter a name for the folder.
-
In the Save As box, enter a different file name if you want.
-
Click Save.
Save to a different location on an online service
Word allows you to save files in online folders provided by OneDrive and SharePoint. If you have accounts that give you access to these services, you can save and access files stored on these services much like files stored on your computer.
SharePoint services and OneDrive for Business are typically offered by an employer or organization, but you can use OneDrive on you own. For more information about these services, see the related topics in See Also.
To save a file to an online location other than the default folder, use Save as. You can save files from Word directly to folders on OneDrive and SharePoint services.
-
On the File menu, click Save as, or press
 + Shift + S.
 -
If the dialog box shows a folder on your computer rather than on an online service, click Online Locations.

If Word displays the On My Mac button, the dialog box is currently displaying an online location.
-
Navigate to the folder where you want to save your file.
You might need to click the name of a service on the left before you can access the folder you want. If you do not see the service that you need to access, click the plus sign to add a service.

-
If you want to create a new folder in the folder that you are currently viewing, click New Folder, and then enter a name for the folder.
-
In the Save As box, enter a different file name if you want.
-
Click Save.
Save as a different format
If you need to share a file with someone who does not have Word or who has an older version of Word, you can save your document in a file format that a different or older application can read. You can also export a document as a PDF file or an HTML file, among other choices.
Save As also allows you to save your file as a template that you can use to create other documents. For more information about templates, see Create a template in Word 2016 for Mac.
-
On the File menu, click Save As.
-
If you want to change the file name, change the name in the Save As box.
-
In the File Format list, click the file format that you want to use.
For example, click Word 97-2004 document (.doc) to create a file that is compatible with Word 97 and later versions of Word that do not use the XML-based file format (.docx).
-
Click Save.
Save AutoRecover information automatically
AutoRecover can help Word recover a file that you were editing after a power failure or other problem that interrupts Word while you are editing the file. The more frequently that AutoRecover saves files information, the more complete recovery can be after a failure.
However, using AutoRecover does not replace saving your files at regular intervals or when you are done editing the file. You may also find it helpful to save multiple versions of a file to different file names (for example, after each significant change) so that you can review or return to an earlier version, if necessary.
If after a failure, you choose not to save the recovered version of a file after you open it, the file is deleted, and your unsaved changes are lost. If you save the recovery file, it replaces the original file, unless you specify a new file name.
-
On the Word menu, click Preferences.
-
Under Output and Sharing, click Save.
-
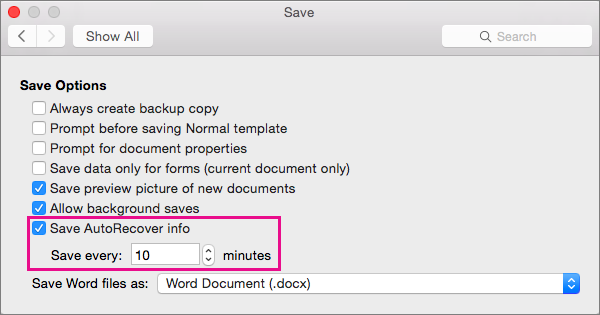
Select Save AutoRecover info.

-
In the Save every box, enter the number of minutes you want as the interval between saving AutoRecover information.
Each time that Word saves AutoRecover information, it waits for the number of minutes that you specify here to pass before saving AutoRecover information again.
No comments:
Post a Comment