Move shapes
Microsoft Office Visio 2007 offers a number of ways to place shapes exactly where you want them.
What do you want to do?
Move shapes by using your mouse
-
Click the Pointer tool
 , and then do one of the following:
-
Drag a selection net around all of the shapes that you want to move.
-
Hold down SHIFT and click all of the shapes that you want to move.
-
-
Rest the pointer on one of the shapes. A four-headed arrow appears
 .
.If one of the objects that you are moving is a group, the four-headed arrow appears only if the pointer is on one of the shapes in the group.
-
Drag the shapes to their new positions. All of the selected shapes move the same distance and direction from their original positions.
If snapping is turned on, the shapes may jump into place.
Note: Be careful not to point to a selection handle when you move a shape. Moving a selection handle can change the shape's size. If you accidentally resize a shape, immediately click Undo on the Edit menu.
Tip: To constrain the movement of the shapes to vertical or horizontal, hold down SHIFT while you drag the shapes. To move shapes to another page in the drawing, drag the shapes to a page tab  . Pause until the other page is displayed, and then drag the shape to where you want it.
Move shapes a specific distance (requires Microsoft Office Visio Professional 2007)
If you have Office Visio Professional, you can use the Move Shapes add-on to move shapes and copies of shapes a specific distance.
-
Click the Pointer tool
 , and then do one of the following:
-
Drag a selection net around all of the shapes that you want to move.
-
Hold down SHIFT and click all of the shapes that you want to move.
-
-
On the Tools menu, point to Add-Ons, point to Visio Extras, and then click Move Shapes.
-
Under Direction, specify the coordinate system that you want to use to move the shape or shapes.
-
Horizontal/Vertical This uses X-Y (Cartesian) coordinates to move the selection.
-
Distance/Angle This uses polar coordinates to move the selection.
-
-
Specify the distances to move the selection.
-
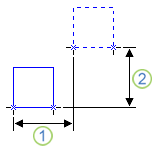
If you select Horizontal/Vertical, in the Horizontal and Vertical boxes, type the distances that you want the shape or shapes to move. Enter distances as positive or negative values, depending on the direction that you want the selection to move.

1. Horizontal distance
2. Vertical distance
-
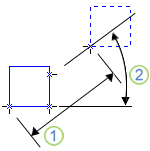
If you select Distance/Angle, in the Distance and Angle boxes, type the radial distance and angle along which you want the shape or shapes to move. Enter distances as positive or negative values, depending on the direction that you want the selection to move.

1. Radial distance
2. Angle
-
-
To move a copy of the selected shape or shapes and keep the original shape or shapes in the original position, select Duplicate.
Nudge shapes by using the arrow keys
-
Click the Pointer tool
 , and then do one of the following:
-
Drag a selection net around all of the shapes that you want to move.
-
Hold down SHIFT and click all of the shapes that you want to move.
-
-
Do one of the following:
-
To move a shape to the next position to which it can snap, press an arrow key.
If there is no position to which the shape can snap, pressing an arrow key moves the shape a single tick on the ruler.
-
To move the shape one pixel, hold down SHIFT while pressing an arrow key.
-
Note: If pressing an arrow key scrolls your drawing instead of moving a shape, make sure the SCROLL LOCK key is not on.
No comments:
Post a Comment