Create a relationship
A relationship helps you combine data from two different tables. In an Access desktop database, you can create a relationship in the Relationships window. Creating a relationship in an Access web app is a different process, as explained later under Create a relationship in an Access web app.
In this topic
Create a relationship in an Access desktop database
-
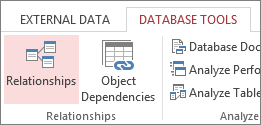
On the Database Tools tab, in the Relationships group, click Relationships.

-
If you haven't yet defined any relationships, the Show Table dialog box automatically appears. If it doesn't appear, on the Design tab, in the Relationships group, click Show Table.
The Show Table dialog box displays all of the tables and queries in the database. To see only tables, click Tables.
-
Select one or more tables, and then click Add. After you have finished adding tables, click Close.
-
Drag a field (typically the primary key) from one table to the common field (the foreign key) in the other table. To drag multiple fields, press the Ctrl key, click each field, and then drag them.
The Edit Relationships dialog box appears.

-
Verify that the field names shown are the common fields for the relationship. If a field name is incorrect, click on the field name and select the appropriate field from the list.
-
To enforce referential integrity for this relationship, select the Enforce Referential Integrity box.
-
Click Create.
-
When you are finished in the Relationships window, click Save to save your relationship layout changes.
Access draws a relationship line between the two tables. If you selected the Enforce Referential Integrity check box, the line appears thicker at each end. In addition, again only if you selected the Enforce Referential Integrity check box, the number 1 appears over the thick portion on one side of the relationship line, and the infinity symbol (∞) appears over the thick portion on the on the other side of the line.
Notes:
-
To create a one-to-one relationship Both of the common fields (typically the primary key and foreign key fields) must have a unique index. This means that the Indexed property for these fields should be set to Yes (No Duplicates). If both fields have a unique index, Access creates a one-to-one relationship.
-
To create a one-to-many relationship The field on the one side (typically the primary key) of the relationship must have a unique index. This means that the Indexed property for this field should be set to Yes (No Duplicates). The field on the many side should not have a unique index. It can have an index, but it must allow duplicates. This means that the Indexed property for this field should be set to either No or Yes (Duplicates OK). When one field has a unique index, and the other does not, Access creates a one-to-many relationship.
Create a relationship in an Access web app
The Relationships window isn't available in an Access web app. Instead of creating a relationship in an Access web app, you create a lookup field that gets values from a related field in another table. For example, let's say you have an Employees table and you want to add a lookup to a Regions table so you can show which region each employee works in.
Note: The field that your lookup will use as the source for values must already exist before you create your lookup field.
Here's how you create a lookup field in an Access web app:
-
Open the table where you want to create a new lookup field by double-clicking it in the navigation. (Hint: you may need to click Home > Navigation Pane to see the available tables.)
In the above example, click the Employees table.
-
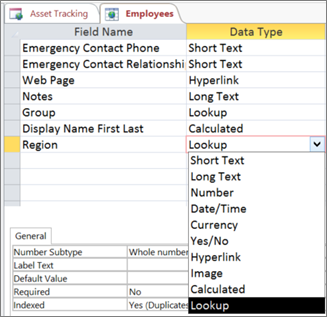
Click in the Field Name column just below the last field in the table and type a name for your new lookup field.
In the example, type Region as the field name.
-
In the Data Type column, click the arrow and select Lookup.

The Lookup Wizard starts.
-
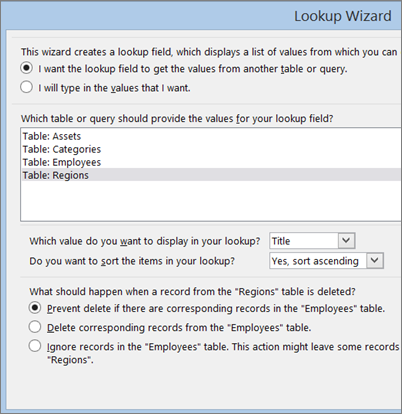
On the first page of the Lookup Wizard, select I want the lookup field to get values from another table or query. More options appear in the dialog box.
-
Select the name of the table or query that should provide the values for your lookup.
In the example, select Table: Regions.

(Names of the tables in the image correspond to the example we're using.)
-
After you select the table, use the Which value do you want to display in your lookup list to select the field that you want to use as a display value for your lookup field. By default, Access selects the first text field it can find in the selected table.
In the example, you would leave the selected field, Title, as the display value.
-
Use the Do you want to sort the items in your lookup list to set the sorting, if you want.
-
Under What should happen when a record from the "Regions" table is deleted, set the type of relationship you want between the two tables and whether you want to enforce referential integrity. (The name of the table in this question varies depending on which table you selected in step 5.)
The Lookup Wizard defaults to Prevent delete if there are corresponding records in the "Employees" table, because that's the safest option in most cases. In the example, this option means you can't delete a value from the Regions table if that region is being used in records in the Employees table. So, if employee records are using a region, such as "West" and you try to delete "West" from the Regions table, Access will prevent you from deleting it. In this case, you need to reset all employee records using that value to something else, before you can delete "West" from the Regions table. The last option could work in this example, because that would allow you to delete "West" from the Regions table. The region value would be automatically removed from Employee records that were set to "West," leaving the value blank. Choosing the second option would delete all employee records from the Employees table that have the region set to "West." That's called a cascading delete and would delete much more data than you want in the example. Be careful when choosing that option.
To learn more about the ins and outs of relationships, see the article Create, edit or delete a relationship.
Want just the basics for editing or deleting relationships? See the following articles:
No comments:
Post a Comment