Change the appearance of your calendar
What do you want to do?
Change the time scale
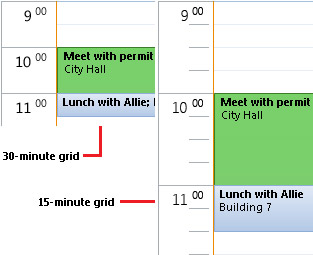
By default, the calendar grid shows a time interval of 30 minutes. You can increase or decrease this interval.

-
In Calendar, on the View tab, in the Arrangement group, click Time Scale, and then click the grid interval that you want to show in the calendar.
Change the displayed time range
-
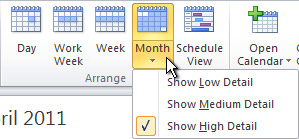
In Calendar, on the Home tab, in the Arrange group, click Day, Work Week, Month, or Schedule View.
To change the amount of information that appears in the month view, click the bottom half of the Month button, and then click a detail level.

-
Show Low Detail Only holidays appear on a blank calendar.
-
Show Medium Detail Holidays and color bars appear that indicate days on which you have calendar items.
-
Show High Detail Time and header information, including category colors for calendar items appear.
-
Change the background color
-
On the View tab, in the Color group, click Color.
-
Click the color that you want.
To change the default background color for all calendars:
-
Click the File tab.
-
Click Options.
-
Click Calendar.
-
Under Display Options, click Default calendar color, click the color that you want, and then select the Use this color on all calendars check box.
Change the font
-
On the View tab, in the Current View group, click View Settings, and then click Other Settings.
-
Use the buttons to choose the fonts and sizes that you want to use.
To change the font in the Date Navigator in the Navigation Pane, do the following:
-
Click the File tab.
-
Click Options.
-
Click Calendar.
-
Under Display Options, under Date Navigator font, click Font, and then click the size and font that you want to use.
Turn bold on or off for dates
-
In Calendar, on the View tab, in the Current View group, click View Settings, and then click Other Settings.
-
Under General settings, clear or select the check box for Bolded dates in Date Navigator represent days containing items.
Set work week options
-
Click the File tab.
-
Click Options.
-
Click Calendar.
-
Under Work Time, do any of the following:
-
To set your work days, select the check boxes next to the days of the week that you want.
-
To set the first day of the week, in the First day of week box, click the day that you want.
-
To set the first week of the year, in the First week of year box, click the option that you want.
-
To set the beginning and end of your work day, enter times in the Start time box and the End time box.
-
Add or remove a second time zone

-
Click the File tab.
-
Click Options.
-
Click Calendar.
-
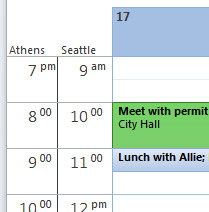
Under Time zones, select the Show a second time zone check box.
-
In the Time zone box, click the time zone that you want to add. If you want, type a name for the second time zone in the Label box.
If you want your computer clock to automatically adjust for daylight saving time changes, select the Adjust for daylight saving time check box. This option is available only in time zones that use daylight saving time (DST).
Note: The second time zone is used only to show a second time bar in Calendar view, and does not affect the way in which calendar items are stored or displayed.
No comments:
Post a Comment