Add an attachment in Outlook Web App
You can use attachments to include one or more files with any email message you send. Attachments can also be added to items in your Calendar, and to Tasks. When you add an attachment, you can choose a file from your hard drive, or a file you have in OneDrive for Business. You can send the file as an attachment, or as a link. When you send a link, not only will you save space in everyone's mailbox, but recipients are automatically given permission to edit the file, making it easier for everyone to collaborate. A file from your hard drive can be sent as a link by uploading it to OneDrive for Business.
New to OneDrive for Business? See What is OneDrive for Business? for more information.
See View an attachment in Outlook Web App to learn about viewing or editing attachments in messages that you receive.
In this article
Attach a file
Attach a file or a link to a message-
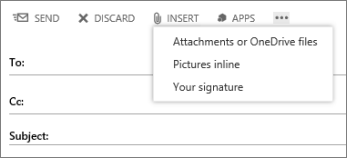
To attach a file to a message, open a new message or respond to an existing message and select Insert
 > Attachments or OneDrive files.
-
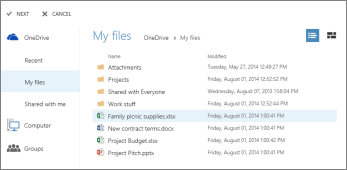
Choose the source you want to use from the navigation pane: OneDrive, Computer, or Groups.
-
Browse to find the file you want to attach.
-
Select the file, and then select Next to add it to your message.
-
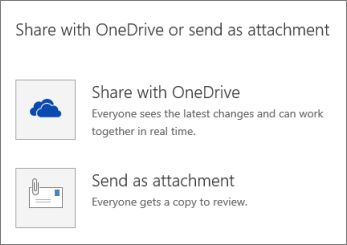
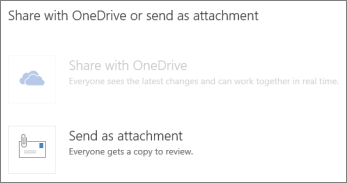
Next, you're prompted to share your file with OneDrive for Business, or attach a copy. If you share with OneDrive for Business, recipients will receive a link to the file and be given permission to edit the file.
If you choose to share a file from your computer, a copy of the file is added to a folder named Email Attachments in your OneDrive for Business, and a link to that file is sent to message recipients.
Sending a link saves space in everyone's mailbox, and makes document collaboration it easier.
-
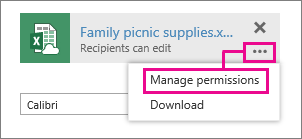
When you attach a file as a link, message recipients are automatically given permission to edit the file.
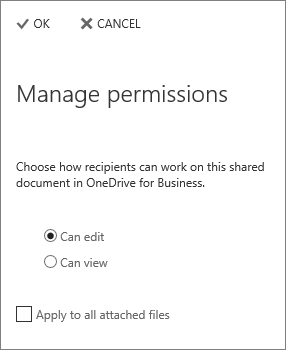
You can change permissions by clicking the more options menu next to the file name at the top of the message, and then clicking Manage permissions.
-
Click Can edit to allow message recipients to edit the file. Click Can view to limit message recipients to viewing the file.
You can also click Apply to all attached files to apply your choice to all linked files attached to the message.
-
Click OK to save your choices.
-
To attach a file to an event, open a new event or edit an existing event and select More
 > Insert > Attachments or OneDrive files.
-
Choose the source you want to use from the navigation pane: OneDrive, Computer, or Groups.

-
Browse to find the file you want to attach.
-
Select the file, and then select Next to add it to your event.
-
Select Send as attachment to include a copy of the file with the event.
-
To attach a file to tasks, open a new task or edit an existing task and select Insert
 .
. -
Choose the source you want to use from the navigation pane: OneDrive, Computer, or Groups.

-
Browse to find the file you want to attach.
-
Select the file, and then select Next to add it to your task.
-
Select Send as attachment to include a copy of the file with the task.

Note: Linked files aren't currently supported in Calendar or Task items.
Insert a picture
You can attach or link to a picture using the steps above, or insert a picture in the body of your email message or calendar item.
-
To add a picture to an email message, select Insert
 > Pictures inline.
 -
Browse to find the picture you want to attach.
-
Select the picture, and then select Open to insert it in your message.
-
After you've added pictures, you can resize them by selecting the handles and dragging to make them larger or smaller.
Attach a message to a message
Drag to attach a message-
Open a new message, or reply to or forward an existing one.
-
Open the message in a new window by selecting
 .
. -
Arrange the windows so you can see both the message list and your new message.
-
Select and drag the message you want to attach from the message list to your new message.
-
In the list view, select the message you want to attach and press Ctrl+C to copy it.
-
Open a new message, or reply or forward an existing one.
-
With the new message open in the reading pane, press Ctrl+V to attach the message you copied.
Remove an attachment
If you've already added an attachment and decide you don't want it, select  next to the attachment name to remove it.
To remove an embedded picture, select the picture, and then press Delete.
What else do I need to know?
-
An attachment can be a file that's created in any program, such as a Word document, an Excel spreadsheet, a .wav file, or a bitmap file.
-
Some attachments may be removed or blocked by antivirus software used by your organization or by the organization of the recipients of your email message. If you have a question about support for attachments, contact your helpdesk.
-
Long file names of attachments might be shortened in Outlook Web App. A shorter name doesn't affect the contents of the file.
-
Depending on the service that's hosting your mailbox, the default size limit in Outlook Web App for an entire message, including all attachments, is 25 MB or 35 MB. Attachment and message size limits for your mailbox are set by your organization and may be different from the default limits.
No comments:
Post a Comment