Create and customize record types and lists
With Business Contact Manager for Outlook, you can customize your forms by adding fields that are relevant to your business, removing fields that you don't need, and moving fields to emphasize the information that is most important to you. You can create new forms, add lists, customize reports, modify sales stages and lead scoring criteria, choose fields for your Contact Cards, and customize the Ribbon.
This article covers creating and customizing forms, and creating and editing lists.
Note: Only the database owner can customize forms.
See the following articles for information about customizing reports; modifying sales stages, sales activities, and reminders; changing lead scoring criteria; choosing fields for Contact Cards; and customizing the Ribbon:
What do you want to do?
Create a new record type
Business Contact Manager for Outlook includes a number of different types of customizable forms or record types, including Account, Business Contact, Lead, Opportunity, and Business Project.
You can use the default forms without changing them, or you can create new record types to suit the needs of your business.
You can also modify forms by adding and removing fields. For information, see Add or remove fields later in this article.
New record types must be based on either the Account or Business Contact record type. How records can be linked and the information that is shared among them is preserved in any new record types that you create.
Example: Bicycle wholesaler creates custom record types
A bicycle wholesaler needs to create Store and Store Employee records.
Each store that buys from the wholesaler has several employees who are responsible for purchasing. The bicycle wholesaler sells to lots of stores, each with their own set of employees who make purchasing decisions. The wholesaler needs to associate each store employee with their particular store to see the list of employees and any communication with the store employees when reviewing information about a store.
To do this, the wholesaler creates a Store record that is based on the Account record type and creates a Store Employee record that is based on the Business Contact record type. The wholesaler chooses to base the Store record on an Account record, because Account records display a list of related Business Contacts and all the communication history items from each of the Business Contacts.
Create a custom record type
-
Click the File tab.
-
Click the Business Contact Manager tab.
-
Click the Customize button, and then click Customize Record Types.
-
In the Customize Record Types dialog box, do one of the following:
-
Click New Business Contact Type to create a new form that is based on the Business Contact record type.
-
Click New Account Type to create a new form that is based on the Account record type.

-
If you need a new record type for individuals, choose New Business Contact Type.
-
If you need a new record type for organizations or for groups within a larger organization, choose New Account Type. All the communication items from any record that is linked to an Account are listed in the communication history of the Account record. For more information about Account records, see Store information about your Accounts in Business Contact Manager.
-
-
-
In the New Business Contact Type or New Account Type dialog box, type a singular and plural name for your new record type.
-
Optionally, click Browse to change the icon that will appear on each record of that type.
-
Click OK.
Your new record type is included in the list of record types in the Customize Record Types dialog box.
Your new record type includes all of the default pages and fields of the Account or Business Contact that you based the new record type on. It does not include any customized pages or fields you added to other forms. To customize the form by changing pages and fields, see the next section, Customize a form.
Customize a form
You can customize forms in multiple ways. You can add or remove pages, sections, and fields. You can rearrange the fields in a way that makes sense for your business.
Note: Only the database owner can customize forms.
You can export your custom forms so that you can share them with others. For more information about exporting, see Export your business records from Business Contact Manager.
Important: Any changes you make to a form will change all records of that type. For example, if you remove a field from the Business Contact form, it will remove that field from all Business Contact records.
In this section
Open a form for customization
-
Click the File tab.
-
Click the Business Contact Manager tab.
-
Click the Customize button, and then click Customize Record Types.
-
From the list, click the record type that you want to customize, and then click the Customize Form button.
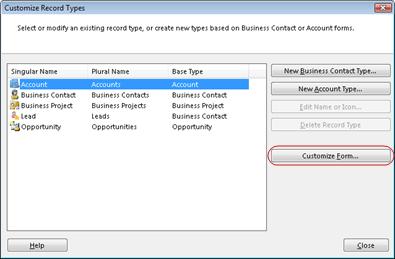
You can also customize any form you have open. On the Ribbon, in the Customize group, click the Form Layout button.
A customizable version of the form opens. You can now add or remove pages, sections, and fields, or rearrange sections and fields on the form.
The General page is displayed by default. To display a different page, on the Customize tab, in the Pages group, click Show, and then click the page name.
Create a new page
You can create up to four additional pages for any form. By default, most forms include the General, Details, and History pages.
-
On the Customize tab, in the Pages group, click Show
 , and then click User page 1, or one of the other user pages.
 A blank page is displayed.
Note: If the page name ends with (Hidden), the page is hidden by default. You will need to turn off the Hide feature to be able to enter data on this page of the form.
-
If the page is hidden, turn off the Hide feature to show the page. In the Pages group, click Hide

Note: To verify that the page is no longer hidden, in the Pages group, click Show. If the page you selected no longer includes (Hidden) after the name of the page, then it is visible.
You can now rename your page or add sections and fields to it. See Add or remove sections and Add or remove fields later in this article for more information.
Name or rename a page
-
On the Customize tab, in the Pages group, click Show, and then click the page you want to rename.
-
In the Pages group, click Rename Page
 .
. -
In the Page name box, type the new name, and then click OK.
Add or remove sections
Information on a form is organized into sections. For example, on the Business Contact form, there is a Phone numbers section that includes different phone number fields, such as Business and Home.
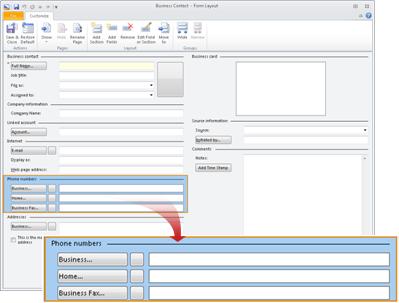
Add a section
-
On the Customize tab, in the Layout group, click Add Section
 .
. -
In the Section Name box, type a name for the section, and then click OK.
If you want to change the width of a section, select the section. On the Customize tab, click either Wide
 or Narrow
  .
.
Remove a section
-
Click the section that you want to remove.
Tip: A section has a section name with a horizontal line next to the name. To select a section, click on or near the section name.

-
On the Customize tab, in the Layout group, click Remove
 .
.Notes:
-
Any fields that are in this section are removed, but they are not deleted from your Business Contact Manager database. If you want to add the fields back to the form, see Add a field later in this article. Removing fields does not delete the fields or the data they contain. Any data that was entered in the fields is still saved in your database, unless you permanently delete the field.
-
When you remove a section, it is deleted from your Business Contact Manager database. The fields that were included in the section are not deleted along with the section. If you want to add the section again, you can add a section with the same name and then add the fields back to the form in that section.
-
Add or remove fields
You can add different types of fields in Business Contact Manager for Outlook that you need for your business. The type of field you add dictates the kind of information that can be entered or selected in the field.
For example, if you want to type information in a text box, you can add a text field; if you want to click an item from a list, you can add a pre-populated list (also known as a drop-down list); if you want to link or associate one record to another record, you can add a relationship field.
A florist might create a text field named "Favorite Flower" where people have to type the kind of flower in the field, and a heating specialist might create a field named "Furnace Model" with a list to choose from. For more information about lists, see Create or edit lists later in this article.
Add a field
-
Open a form for customization.
Tip: Before the next step, click the section where you want to add the field. If the field is not where you want it to be, you can drag it to another section after you have added it.
-
On the Customize tab, in the Layout group, click Add Fields
 .
. -
In the Add Fields dialog box, do one of the following:
-
In the list, click one of the listed fields, and then click Add to Form.
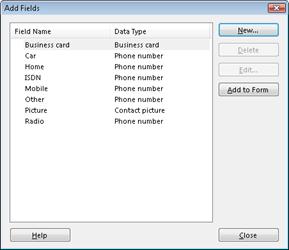
-
To create a new field or add a field you already created for another form, click New.
In the Create a New Field dialog box, do one of the following:
Create a new field
-
In the Field name box, type a name for the field.
-
From the Data type list, click the type of data that the field will contain, for example, Number.
For this type of data
Select this data type
Words or sentences up to 96 characters
Text
Numbers with or without a decimal point
Number
Percentages
Percent
Prices, income, or any other currency-related data
Currency
Answers to simple questions such as yes or no, on or off, or true or false
Yes/No
Date or time information in any of the formats available in Outlook
Date/Time
Whole numbers
Integer
A pre-populated list of items (values) to save time or maintain consistency among forms
Web address
URL
A link to another record in the database
Note: You cannot change the data type of a field after you create the field. If you want to change the data type, delete the field, and then add a new one with the data type that you want.
-
If necessary, in the Format list, click a format for the data in the field.
Note: Some of the data types have only one format.
-
Click OK.
The field you created appears in the list in the Add Fields dialog box.
-
To add the field to your form, in the Add Fields dialog box, click the field, and then click Add to Form.
Add a field from a different form
-
Click the Add a field from a different form option.
-
Click a field from the list, and then click OK.
Note: You must have created a field for it to appear in this list.
The field you selected appears in the list in the Add Fields dialog box.
-
To add the field to your form, in the Add Fields dialog box, click the field, and then click Add to Form.
-
-
Add a relationship field
Use a relationship field to link related records. All records that have been linked to a particular record are listed on the selected record, which is known as the destination record, similar to the way that an Account record lists all the Business Contacts that are linked to it.
You can link records of the same type, as well as link records that are different.
For example, in the Sample Business database, to link retail bicycle stores with the vendors whose bikes the retail stores carry, you would:
-
Open the Vendor record type for customization. The relationship field will be added to this record type.
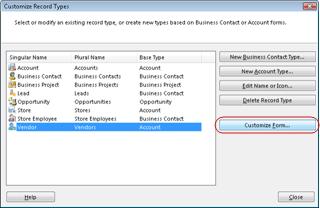
-
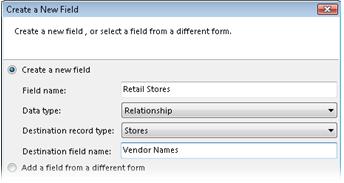
Add a relationship field called Retail Stores to the Vendor record type, with Stores as the destination record type, and Vendor Names as the destination field name.
Notes:
-
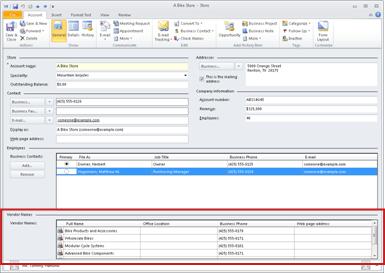
Adding a relationship field to the origination record type also creates a table that lists the related records on the destination record. In this example, the vendor records (origination records) have a relationship field you use to link to store records. The store records (destination records) have a table that lists the vendor records that are linked to them.
-
The table, or destination field, is not editable. To change the related records, use the relationship field. In this example, go to the vendor record to remove a store or to add another store. This changes the list of vendors in the table on the related store records.
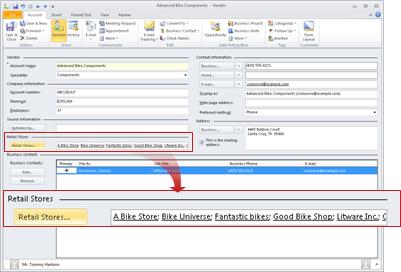
-
-
Use the relationship field on the vendor records to link the retail bicycle store records to the vendor records.
-
Check the destination field on the retail bicycle store records to see the list of vendors that supply bicycles to those stores.
For information about the sample business database, see About Adventure Works and the sample business database.
How to add a relationship field
-
On the Customize tab, in the Layout group, click Add Fields
 .
. -
In the Add Fields dialog box, click New.

-
In the Create a New Field dialog box, in the Field name box, type the name of the relationship field.
-
In the Data type list, click Relationship.
-
In the Destination record type list, click the record type that you want to link the selected record to.
Note: If the destination record type is the same as the record type you are customizing, the Field name and the Destination field name must be different.
-
In the Destination field name box, type the name of the destination field.
Note: The Destination field name is the name of the table that lists all of the related records that are linked to the destination record type.
-
Click OK.
The field you selected appears in the list in the Add Fields dialog box.
-
To add the field to your form, in the Add Fields dialog box, click the field that lists Relationship in the Data Type column, and then click Add to Form.
Note: The field that lists Relationship in the Data Type column is the data entry field. The field that lists Relationship destination list in the Data Type column is automatically added to the Destination record type, and it is the table that lists all of the related records that you entered into the relationship field.
Remove a field
-
Click the field that you want to remove from the form.
Note: Required fields, such as Account name, cannot be removed.
-
On the Customize tab, in the Layout group, click Remove
 , or press the DELETE key.
Note: The field and any data that it contains can be added back to the form, because the field is still stored in your Business Contact Manager database. The field can also be added to other forms from the Add Fields dialog box.
Permanently delete a field
Warning: If you delete a field from the Add Fields dialog box, you are permanently deleting the field, and you will lose any data that was entered into that field. If you remove or delete a field from a form, you are only deleting the field from the form. If you add the field back to the form, you can then access the data.
-
On the Customize tab, in the Layout group, click Add Fields
 .
. -
In the Add Fields dialog box, click the field that you want to delete, and then click Delete.
Note: You can only permanently delete a field if it is not used on any other forms.
Rename sections and edit fields
You can rename any section on a form, but you can only rename fields that you have created.
You can edit fields by renaming them, and by changing the format of the data that can be selected in the field.
Note: You cannot change the data type of a field. You can delete the field and then add a new one with the data type that you want.
-
Click the section or field that you want to rename or edit.
Note: You can only rename fields that you have created.
-
On the Customize tab, in the Layout group, click Edit Field or Section
 .
. -
Do any of the following:
-
Rename a section In the Edit a Section dialog box, type a different name for the section.
-
Edit a field name that you created In the Edit a Field dialog box, type a different name for the field.
If you want to change the format of the data that is allowed in the field, in the Format box, click a different format. Some field types have only one formatting option.
-
Arrange items on a form
On a customizable form, you can move the sections on a page or move them to a different page, and rearrange the fields.
Move a section or rearrange fields on a page
-
Click the section or field you want to move.
A section has a section name with a horizontal line next to the name. To select a section, click on or near the section name.

-
Drag the section or field to a new location on the page, or use the arrow keys on your keyboard to move the section or field.
Move a section to another page
-
Click the section you want to move.

-
On the Customize tab, in the Layout group, click Move to
 .
. -
In the Move to Page dialog box, click the page to which you want to move the section, and then click OK.
Note: If a page is hidden, you will need to turn off the Hide feature to be able to enter data on the page. On the Customize tab, in the Show group, click the page. In the Pages group, click Hide
 .
.
Delete a form
Warning: If you delete a record type, you will lose any data that was entered into that record type.
-
Click the File tab.
-
Click the Business Contact Manager tab, and then click the Customize button.
-
Click Customize Record Types.
-
In the Customize Record Types dialog box, click a record type that you have created.
Note: You can only delete record types that you have created. You cannot delete the default record types.
-
Click Delete Record Type.
Create or edit lists
When you frequently enter the same data into a form, it is convenient and more consistent to create a list that you can pick from.
Create a list
-
On the Customize tab, in the Layout group, click Add Fields
 .
. -
In the Add Fields dialog box, click New.
-
In the Data type list, select Drop-down list.
Note: For a list, the only format choice is also Drop-down list.
-
Click OK.
-
Add items to your list.
How?
-
In the Edit Lists dialog box, click Add to add an item (a value) to the list.
-
In the Add Item dialog box, in the Item name box, type the name of the value.
-
Click OK.
In the Edit Lists dialog box, in the Value column, the item you added appears.
-
To add another item to the list, repeat this process.
-
-
To move an item up or down in the list, click the value you want to move, and then click the up or down arrow button.
-
To choose one item to be the default value in the field, click the value, and then click the Make Default button.
If there is one item that will be used most often, you can make it the default value to save time when you are completing a form.
-
Click OK.
Edit a list
-
Click the File tab.
-
Click the Business Contact Manager tab, and then click the Customize button.
-
Click Edit Lists.
-
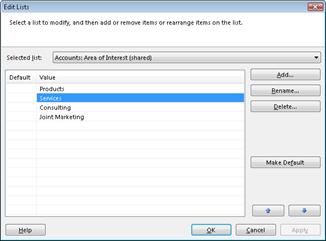
In the Edit Lists dialog box, click the list that you want to edit.
When you select a list, the items in the list appear in the Value column.
-
Do any of the following to edit the list:
Add a value to the list Click the Add button, type the item name, and then click OK.
Rename a value Click an item, and then click the Rename button. Type the new name, and then click OK.
Remove a value or replace it with another value Click an item, and then click the Delete button. If you want to replace the value, select another value in the list and then click OK. If you want to remove it, click OK.
Move a value up or down in the list Click an item, and then click the up or down arrow button.
Make an item the default value Click the item, and then click the Make Default button.
-
When you have completed all of your changes, in the Edit Lists dialog box, click OK.
No comments:
Post a Comment