Add a button, menu, or command to a toolbar or menu
You can rearrange and change toolbar buttons, menus, and menu commands by using the mouse or you can use the Rearrange Commands dialog box, which you can access by using the keyboard. Tasks that you can accomplish by using the keyboard are identified as (keyboard accessible).
What do you want to do?
Add a button, menu, or command to a toolbar
-
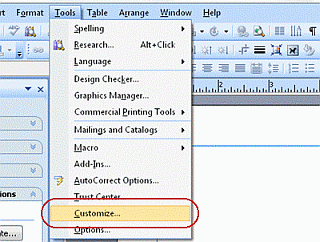
On the Tools menu, click Customize.
-
Make sure the toolbar you want to change is visible.
-
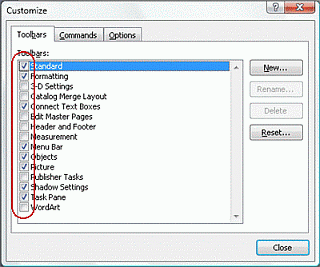
In the Customize dialog box, click the Toolbars tab.
-
Select the check box for the toolbar you want to display.
-
-
Do one of the following:
-
Add a button
-
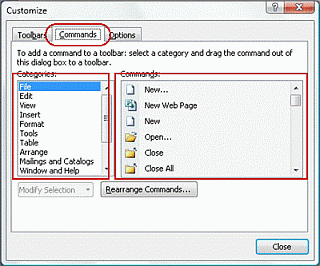
Click the Commands tab.
-
In the Categories box, click a category for the command you want the button to perform.
-
Drag the command or macro you want from the Commands box to the displayed toolbar.
-
-
Add a built-in menu to a toolbar
-
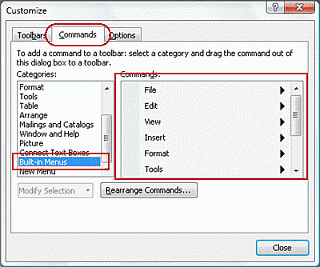
Click the Commands tab.
-
In the Categories box, click Built-in Menus.
Note: This category is not available in Microsoft Office InfoPath, Microsoft Office OneNote, or Microsoft Office Outlook.
-
Drag the menu you want from the Commands box to the displayed toolbar.
-
-
Add a custom menu to a toolbar
-
Click the Commands tab.
-
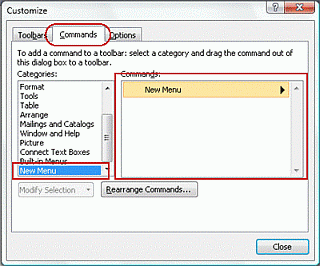
In the Categories box, click New Menu.
-
Drag New Menu from the Commands box to the displayed toolbar.
-
Right-click the new menu on the toolbar, type a name in the Name box on the shortcut menu, and then press ENTER.
-
-
-
In the Customize dialog box, click Close.
Add a button, menu, or command to a toolbar (keyboard accessible)
-
On the Tools menu, click Customize.
-
Make sure the toolbar you want to change is visible.
-
In the Customize dialog box, click the Toolbars tab.
-
Select the check box for the toolbar you want to display.
-
-
In the Customize dialog box, click the Commands tab.
-
Click Rearrange Commands.
-
Click Toolbar, and then click the toolbar you want to add the button, menu, or command to in the Toolbar list.
-
Do one of the following:
-
Add a button
-
In the Controls list, click the toolbar item that you want the new button to appear next to.
-
Click Add.
-
In the Add Command dialog box, in the Categories list, click a category for the command you want the button to perform.
-
In the Commands list, click the command or macro you want.
-
-
Add a built-in menu to a toolbar
-
In the Controls list, click the toolbar item that you want the new built-in menu to appear next to.
-
Click Add.
-
In the Add Command dialog box, in the Categories list, click Built-in Menus.
Note: This category is not available in Microsoft Office InfoPath, Microsoft Office OneNote, or Microsoft Office Outlook.
-
In the Commands list, click the menu you want.
-
-
Add a custom menu to a toolbar
-
In the Controls list, click the toolbar item that you want the new menu to appear next to.
-
Click Add.
-
In the Add Command dialog box, in the Categories list, click New Menu.
-
In the Commands list, click New Menu.
-
In the Add Command box, click OK.
-
With New Menu selected in the Controls list, click Modify.
-
In the Name box on the shortcut menu, type a name for the new menu, and then press ENTER.
-
-
Add a button, menu, or command to a toolbar in Project
-
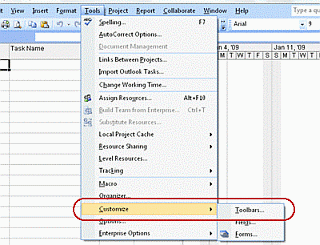
On the Tools menu, point to Customize, and then click Toolbars.
-
Make sure the toolbar you want to change is visible.
-
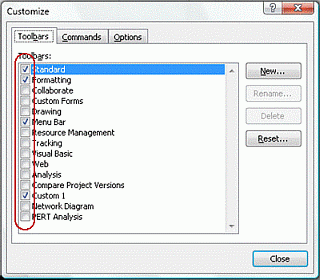
In the Customize dialog box, click the Toolbars tab.
-
Select the check box for the toolbar you want to display.
-
-
Do one of the following:
-
Add a button
-
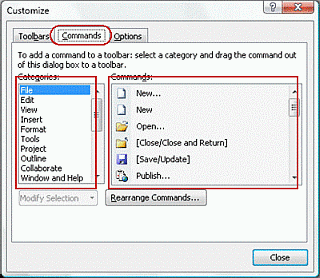
Click the Commands tab.
-
In the Categories box, click a category for the command you want the button to perform.
-
Drag the command or macro you want from the Commands box to the displayed toolbar.
-
-
Add a built-in menu to a toolbar
-
Click the Commands tab.
-
In the Categories box, click Built-in Menus.
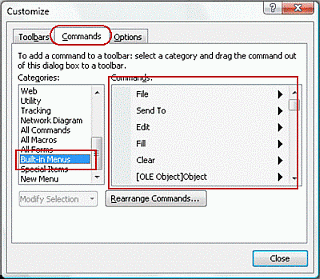
Note: This category is not available in Microsoft Office InfoPath, Microsoft Office OneNote, or Microsoft Office Outlook.
-
Drag the menu you want from the Commands box to the displayed toolbar.
-
-
Add a custom menu to a toolbar
-
Click the Commands tab.
-
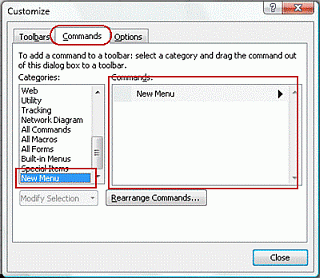
In the Categories box, click New Menu.
-
Drag New Menu from the Commands box to the displayed toolbar.
-
Right-click the new menu on the toolbar, type a name in the Name box on the shortcut menu, and then press ENTER.
-
-
-
In the Customize dialog box, click Close.
Add a button, menu, or command to a toolbar in Project (keyboard accessible)
-
On the Tools menu, point to Customize, and then click Toolbars.
-
Make sure the toolbar you want to change is visible.
-
In the Customize dialog box, click the Toolbars tab.
-
Select the check box for the toolbar you want to display.
-
-
In the Customize dialog box, click the Commands tab.
-
Click Rearrange Commands.
-
Click Toolbar, and then click the toolbar you want to add the button, menu, or command to in the Toolbar list.
-
Do one of the following:
-
Add a button
-
In the Controls list, click the toolbar item that you want the new button to appear next to.
-
Click Add.
-
In the Add Command dialog box, in the Categories list, click a category for the command you want the button to perform.
-
In the Commands list, click the command or macro you want.
-
-
Add a built-in menu to a toolbar
-
In the Controls list, click the toolbar item that you want the new built-in menu to appear next to.
-
Click Add.
-
In the Add Command dialog box, in the Categories list, click Built-in Menus.
Note: This category is not available in Microsoft Office InfoPath, Microsoft Office OneNote, or Microsoft Office Outlook.
-
In the Commands list, click the menu you want.
-
-
Add a custom menu to a toolbar
-
In the Controls list, click the toolbar item that you want the new menu to appear next to.
-
Click Add.
-
In the Add Command dialog box, in the Categories list, click New Menu.
-
In the Commands list, click New Menu.
-
In the Add Command box, click OK.
-
With New Menu selected in the Controls list, click Modify.
-
In the Name box on the shortcut menu, type a name for the new menu, and then press ENTER.
-
-
Add a command to a menu
-
On the Tools menu, click Customize.
-
If the menu you want to change is on a toolbar, make sure the toolbar is visible.
-
In the Customize dialog box, click the Toolbars tab.
-
Select the check box for the toolbar you want to display.
-
-
In the Customize dialog box, click the Commands tab.
-
In the Categories box, click a category for the command.
-
Drag the command you want from the Commands box and, without releasing the mouse, rest it over the menu you want to change. When the menu displays a list of commands, point to where you want the command to appear, and then release the mouse.
Add a command to a menu (keyboard accessible)
-
On the Tools menu, click Customize.
-
If the menu you want to change is on a toolbar, make sure the toolbar is visible.
-
In the Customize dialog box, click the Toolbars tab.
-
Select the check box for the toolbar you want to display.
-
-
In the Customize dialog box, click the Commands tab.
-
Click Rearrange Commands.
-
If the menu you want to change is on the menu bar, click Menu Bar and then click the menu you want in the Menu Bar list.
If the menu you want to change is on a toolbar, click Toolbar, and then click the menu that you want in the Toolbar list. For example, click Drawing|AutoShapes to add a command to the AutoShapes menu on the Drawing toolbar. -
In the Controls list, click the existing menu item above which you want the command to appear.
-
Click Add.
-
In the Categories list, click a category for the command.
-
In the Commands list, click the command you want.
Add a command to a menu in Project
-
On the Tools menu, point to Customize, and then click Toolbars.
-
If the menu you want to change is on a toolbar, make sure the toolbar is visible.
-
In the Customize dialog box, click the Toolbars tab.
-
Select the check box for the toolbar you want to display.
-
-
In the Customize dialog box, click the Commands tab.
-
In the Categories box, click a category for the command.
-
Drag the command you want from the Commands box and, without releasing the mouse, rest it over the menu you want to change. When the menu displays a list of commands, point to where you want the command to appear, and then release the mouse.
Add a command to a menu in Project (keyboard accessible)
-
On the Tools menu, point to Customize, and then click Toolbars.
-
If the menu you want to change is on a toolbar, make sure the toolbar is visible.
-
In the Customize dialog box, click the Toolbars tab.
-
Select the check box for the toolbar you want to display.
-
-
In the Customize dialog box, click the Commands tab.
-
Click Rearrange Commands.
-
If the menu you want to change is on the menu bar, click Menu Bar and then click the menu you want in the Menu Bar list.
If the menu you want to change is on a toolbar, click Toolbar, and then click the menu that you want in the Toolbar list. For example, click Drawing|AutoShapes to add a command to the AutoShapes menu on the Drawing toolbar. -
In the Controls list, click the existing menu item above which you want the command to appear.
-
Click Add.
-
In the Categories list, click a category for the command.
-
In the Commands list, click the command you want.
No comments:
Post a Comment