In PowerPoint for Windows, you can add closed captions or subtitles to videos and audio files in your presentations. Adding closed captions makes your presentation accessible to a larger audience, including people with hearing disabilities and those who speak languages other than the one in your video.
To read about best practices for accessibility, see Make your PowerPoint presentations accessible.
Beginning with version 2016, PowerPoint has a new, simpler format for caption files, called WebVTT. The video player in the following versions of PowerPoint can show those captions when you play the video:
-
PowerPoint 2016
-
PowerPoint 2019
-
PowerPoint for Microsoft 365
The closed captions are stored in a text-based file with a .vtt filename extension. You can create a closed caption file on your own or use a caption-creation tool. To search online for available tools and detailed instructions, type "create vtt file" in your search engine.
For instructions on showing captions when watching a video in these versions of PowerPoint, see Turn on closed captions or subtitles.
Requirements for this feature
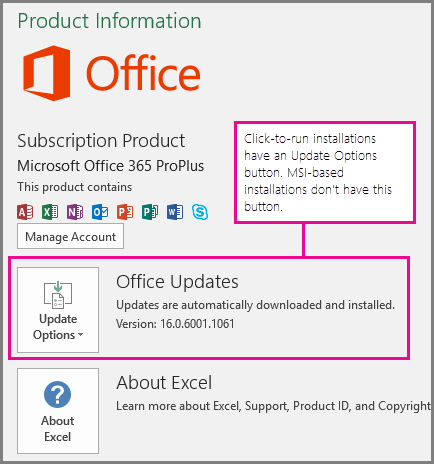
In Office 2016, the availability of the closed-captioning feature depends on the way Office was installed. Closed-captioning is only available for Office 2016 Click-to-Run installations; MSI-based installations don't have closed-captioning features. Read the next section to see whether the feature is available to your installation of PowerPoint 2016.
-
Open an Office 2016 application.
-
On the File menu, select Account.
-
For Office 2016 Click-to-Run installations, you'll have an Update Options button.
MSI-based installations don't have an Update Options button. You'll only see the About <application name> button.
If you have an MSI-based installation of Office 2016, read the instructions in the 2013 section of this article to see what captioning features are available to you.
Create closed captions
Prepare a text-based caption file with a .vtt filename extension before adding captions. For instructions on how to create the caption file, see Create closed captions for a video.
Add closed captions to a video
You can add captions to presentations that you've recorded with video narration, screen recordings, and any other video (except online videos) that you insert into PowerPoint. Currently, adding captions to an audio-only recording isn't supported.
-
In PowerPoint, in the Normal view, open the slide that has the video that you want to add captions to.
-
Select the video on the slide.
-
On the Playback tab, click the Insert Captions button, and then select Insert Captions.

-
In the Insert Captions dialog, browse to your caption file. Select the file and then click Insert .
-
If you need to add another caption file, just repeat the process.
-
Play the video and check that the captions appear correctly.
Remove closed captions from a video
If you need to edit a closed caption file that is inserted in a video in PowerPoint, you can first remove the file, modify it, and then add it back to the video. Before removing the file from the PowerPoint video, make sure you have the original copy of the closed caption file stored on your PC.
If you have added more than one caption file to a video, the following process removes all caption files assigned to the video.
-
In PowerPoint, in the Normal view, open the slide that has the video containing the captions.
-
Select the video on the slide.
-
On the Playback tab, click the Insert Captions button, and then select Remove All Captions.
Tip: If you're using Microsoft 365 you can also show live subtitles, including live translation to another language if you like, of your speech as you present. For more information see Present with real-time, automatic captions or subtitles in PowerPoint.
Add captions to an audio file
To add captions to an audio file you should use the STAMP add-in.
In PowerPoint 2013 and PowerPoint 2010, and the MSI-based version of PowerPoint 2016, STAMP (the Subtitling text add-in for Microsoft PowerPoint) lets you add closed captions to your video and audio files. If you work with captioned video and audio files that already have Timed Text Markup (TTML) files associated with them, this add-in lets you import them directly into your presentation. If you don't have a TTML file, you can add captions directly in your presentation by using the STAMP Caption Editor.
The STAMP add-in allows you to:
-
Import captions from a Timed Text Markup (TTML) file to create captions against an audio or video in the presentation.
-
Create and edit closed captions in PowerPoint 2010, 2013, or 2016.
-
Delete your closed captions.
-
Export captions to a TTML file.
-
Turn captions on and off when in presentation mode. Viewers who have this add-in installed can do this also.
-
Use a video/audio playback while editing Timed Text captions.
-
Align captions when they have moved, or if you re-size the video.
-
Import communicative text formatting information from the TTML file, for example: styling, color and alignment.
What do you want to do?
Download and install STAMP
The add-in is designed for PowerPoint 2010, 2013, or 2016, and you must install the correct add-in for your version of Office (32-bit or 64-bit).
Step 1: Confirm your version of Microsoft Office
To check which version of Office you are using, and which installer you should download, do the following:
-
In PowerPoint, click the File tab.
-
Click Help.
-
Under About Microsoft PowerPoint is information about the version of Office that you have installed, including whether it is 32-bit or 64-bit.
Step 2: Download STAMP
After you are sure of the version you need, download the add-in by doing the following:
-
Go to Subtitling Text Add-in for Microsoft PowerPoint (STAMP).
-
Choose the correct version for your computer and save the .zip file to your computer.
-
Extract the files to a folder on your computer.
Step 3: Install STAMP
After you have downloaded the appropriate STAMP file, install it by doing the following:
-
Go to the folder where you extracted the installation files, and run STAMP Setup (32-bit or 64-bit).msi.
-
Follow the steps in the installation wizard.
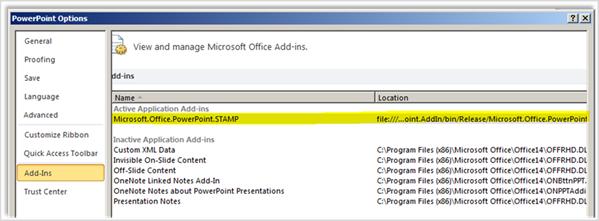
To verify that the add-in installed correctly, do the following:
-
Open PowerPoint.
-
Click the File tab, and then click Options.
-
Click Add-ins, and verify that Sub-titling Text Add-in for Microsoft PowerPoint is listed under Active Application Add-ins.
After you have installed the STAMP add-in, you will see new options on the Playback tab in the Audio Tools or Video Tools group when you have an audio or video item selected in your presentation. The ribbon commands are enabled or disabled based on the media item selected and the captions already attached to it.
Keyboard shortcuts
The buttons on the caption editor can be accessed using standard Microsoft Windows Alt + key accelerators.
The following keys have also been assigned to functions in the Caption Editor:
| Key | Function |
|---|---|
| F2 | Move back 2 seconds of playback |
| F3 | Set start time of the current caption |
| F4 | Set end time of the current caption |
| F5 | Set focus to caption text for editing |
| F6 or Insert | Insert new caption at the bottom of grid, and set start time |
| Delete | Delete current caption |
| CTRL+P | Start or pause the playback |
| CTRL+SHIFT+S | Slows the playback speed |
| CTRL+SHIFT+N | Resumes normal playback speed |
| CTRL+SHIFT+G | Increases the playback speed |
Create new captions using the Caption Editor
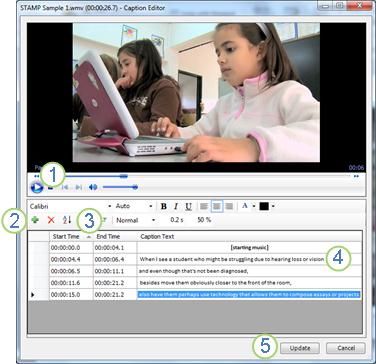
1 Play
2 Add caption
3 Set start and end time
4 Add or change caption text
5 Update captions
6 To add new captions to an audio or video in your presentation, do the following:
-
On the Insert tab, click the Video or Audio menu, and then select the media type and location that you want to insert into your presentation.
Note: See Add and play sounds in a presentation for more information.
-
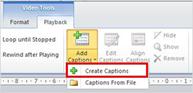
In Audio Tools or Video Tools, click the Playback tab, and then click the Add Captions menu.
-
Click Create Captions.
-
In the Caption Editor, Click the Play button to start playback of the audio or video.
-
With the media playing, listen for the dialog that you want to caption, and click New Caption
 to add a caption. The caption will be created with the current media playback time as the Start Time of the caption.
Clicking Start Time will reset the starting point of the active caption.
-
You can then do one of the following:
-
Click in the Caption Text field and type the text to appear in the caption; or
-
Click Set End Time
 to set the caption end time to match the current media playback position. You can also manually enter the end of each caption. If you leave the end time blank, it adjusts to the start time of the following caption.
-
-
Repeat steps 4 and 5 to create additional captions.
You don't have to create captions in order. To add a new caption between two existing captions, click Sort to put them into time sequence order.
Import captions as a TTML file
If captions for your media have already been created and saved as a TTML file, you can import them into PowerPoint by doing the following:
-
On the Insert tab, click the Video or Audio menu and then select the media type and location that you want to insert into your presentation.
See Add and play sounds in a presentation or Insert and play a video file from your PC or OneDrive for more information.
-
In Audio Tools or Video Tools, click the Playback tab, and then click the Add Captions menu.
-
Click Captions From File.

-
Browse to the TTML file location, select the file you want to import, and then click Open.
-
If you want to edit the captions after they have been imported into your presentation, select the Edit Captions check box.
-
Click OK.
Edit or delete captions in the Caption Editor
When you select media that already has captions added you can edit the captions by doing the following:
-
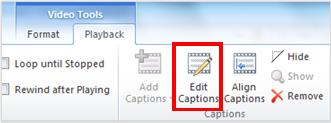
On the Playback tab, click Edit Captions.
-
Click in the text area of the caption you want to edit, and then make the necessary changes.
-
Click Update Captions.
You can delete a caption by doing the following:
-
On the Playback tab, click Edit Options.
-
Select the row of the caption you want to remove, and then click Delete Caption.
To see the captions you have entered or modified, switch to Slide Show view of your presentation and then click the audio or video to start it.
Align, show, hide, or remove captions
Align captions if you move or resize your video
If you move or change the size of the video in your presentation, you can realign the closed captions by selecting the video, and then clicking Align Captions on the Playback tab.
Hide or show captions in the presentation
You can hide captions from view in your presentation by selecting the media, and then clicking Hide on the Playback tab.
Hiding captions does not remove them from the presentation.
To display captions that you have previously hidden, select the media, and then click Show on the Playback tab.
Remove captions from the presentation
To completely remove captions from the media in your presentation select the media, and then click Remove on the Playback tab.
ReplyDeleteI never thought it was possible to recover stolen cryptocurrency due to my past experience trying to recover $228k that was stolen from my usdt w.a.l.l.e.t; until I read an article on this webpage www.thedailychargeback.com , I summited all documents needed to carryout the recovery operation, they successfully recover $205k from what I lost, I advice anyone having problems with lost or stolen cryptocurrency issues to reach to them.