A rule is an action that is performed automatically on incoming or outgoing messages, based on conditions that you specify. You can create rules to help you stay organized. For example, you can create rules to automatically file messages into folders or assign messages to categories.
This article describes how to create some commonly used rules. It also describes how you can find out which type of email account you have.
Quickly create a rule based on a message's sender or recipient
A common type of rule directs Outlook to move messages to a folder based on the sender or recipient. For example, you can create a rule that moves all messages from "Toni Poe" to a folder called "Mail from Toni." Outlook has a shortcut to create these types of rules from an existing message.
Tip: If you receive messages from a contact group (also known as a distribution list), you can create a rule that automatically moves messages that are sent to the group into a folder.
-
In the message list, click a message with the sender or recipient that you want to create a rule for.
-
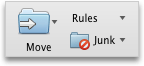
On the Home tab, click Rules, and then click Move Messages from (sender's name) or Move Messages to (recipient's name).
-
In the folder search box, start typing the name of the folder that you want to move messages to.
-
When the folder you want appears, click the folder name, click Choose, and then click OK.
Notes:
-
If you have a Microsoft Exchange account managed by Microsoft Exchange Server 2010 or later, the rule is automatically saved on the Exchange server. For more information, go to Outlook for Mac 2011 Help.
-
If you create multiple rules, Outlook runs the rules in the order in which they are listed in the Rules window. .
-
Before it runs rules on messages, Outlook first applies the Mailing List Manager rules and then the junk e-mail protection rules. Regular rules are applied last. However, they are applied to messages even if they are in the Junk category. For more information about Mailing List Manager rules, see Organize mailing list messages.
-
Create a rule based on an existing message
When you create a rule from an existing message, the sender, recipient, and subject are automatically pre-populated in the rules instructions.
-
In the message list, click the message from which you want to create a rule.
-
On the Home tab, click Rules, and then click Create Rule.
-
Under When a new message arrives, edit the criteria to suit your needs.
To remove one of the criteria, click
 . To add additional criteria, click
  .
. -
Under Do the following, specify the actions that you want to be performed.
-
Click OK.
Notes:
-
If you have a Microsoft Exchange account managed by Microsoft Exchange Server 2010 or later, the rule is automatically saved on the Exchange server. For more information, go to Outlook for Mac 2011 Help.
-
If you create multiple rules, Outlook runs the rules in the order in which they are listed in the Rules window.
-
Before it runs rules on messages, Outlook first applies the Mailing List Manager rules and then the junk e-mail protection rules. Regular rules are applied last. However, they are applied to messages even if they are in the Junk category. For more information about Mailing List Manager rules, see Organize mailing list messages.
-
Create a custom rule
Instead of creating a rule from an existing message, you can create a custom rule based on any criteria you want. Creating a custom rule is necessary if you have an account managed by Microsoft Exchange Server 2010 or later and you want to save the rule on your computer. (If you create the rule based on an existing message, rules for an account managed by Microsoft Exchange Server 2010 or later are saved on the Exchange server, not on your computer.)
If you don't know whether your account is managed by Exchange, go to Find out which type of account you have.
-
On the Tools menu, click Rules.
-
In the left pane of the Rules dialog box, do one of the following:
-
To create a rule that runs on your computer while Outlook is open, under ON MY COMPUTER, click the account type.
-
To create a rule that runs on the Exchange server, under EXCHANGE SERVERS, click the account name. (This option is only available for accounts management by Microsoft Exchange Server 2010 or later.)
-
-
Click Add
 .
. -
In the Rule name box, type a name for the rule.
-
Under When a new message arrives, on the leftmost pop-up menu, click the type of information that you want to identify.
For most criteria, you move from left to right to use more pop-up menus or text boxes. For example, to identify all messages sent from coworkers, the criterion could be "From" "Contains" "@alpineskihouse.com."
If you want to have multiple criteria separated by "or," for rules saved on the Exchange Server, do this:
-
In the left-most pop-up menu of the criteria, select a field that contains text, such as From, Recipients, or Subject.
-
Moving to the right, in the second pop-up menu, select Contains.
-
Click Add search terms, and then in the search list, click Add
for each term that you want to add.
For rules saved on your computer, you can use the pop-up menu above the criteria to select If Any Criteria Are Met or other options.
-
-
To remove one of the criteria, click
. To add additional criteria, click . -
Under Do the following, specify the actions that you want to be performed.
-
Click OK.
Notes:
-
With a Microsoft Exchange account managed by Microsoft Exchange Server 2007, you cannot use Outlook for Mac to edit or create rules that are saved on the Exchange server (such as rules you created in Outlook for Windows). Rules that you create in Outlook for Mac are saved on your computer and run on messages only as they are synchronized with Outlook for Mac. For more information, go to Outlook for Mac 2011 Help.
-
If you create multiple rules, Outlook runs the rules in the order in which they are listed in the Rules window.
-
Before it runs rules on messages, Outlook first applies the Mailing List Manager rules and then the junk e-mail protection rules. Regular rules are applied last. However, they are applied to messages even if they are in the Junk category. For more information about Mailing List Manager rules, see Organize mailing list messages.
-
Find out which type of account you have
-
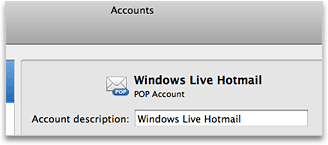
In the Rules dialog box, click Show All, and then under Personal Settings, click Accounts.
-
In the left pane of the Accounts dialog box, click the account. The account type appears under the account description. In this example, the account is a POP account.
-
To return to the Rules dialog box, click Show All, and then under Email, click Rules.
See also
Send automatic Out of Office replies from Outlook for Mac 2011
No comments:
Post a Comment