Forms and form templates: Understanding InfoPath file types
Note: This article has done its job, and will be retiring soon. To prevent "Page not found" woes, we're removing links we know about. If you've created links to this page, please remove them, and together we'll keep the web connected.
| Applies to |
| Microsoft Office InfoPath® 2003 Service Pack 1 or later |
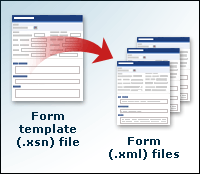
You can use InfoPath to design forms and fill them out. Depending on which task you're doing, you deal with different types of files. For instance, when you design a form, you create a form template (.xsn) file, which is a single file that contains multiple supporting files. Although it's possible to extract these supporting files, in typical scenarios this isn't necessary.
Conversely, when you fill out a form, you are actually filling out a form (.xml) file, which is based on a form template.
This article is intended for form designers. It offers a quick introduction to form templates and the forms that are based on them. It covers the following subjects:
What you design: the form template
What you design: the form template
You create form templates in design mode, the InfoPath design environment. A form template is a file with an .xsn file name extension. The .xsn file defines the data structure, appearance, and behavior of finished forms (.xml files).

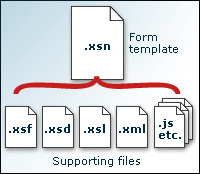
A form template actually consists of several files that have been compressed into one, including one or more XML Schema files, an XSL Transformation (XSLT) file for each view in the form, an XML file for the data that appears by default when a form is first opened, script files or managed code assemblies, and a form definition file, called Manifest.xsf. You'll learn more about these supporting files later in this article. For now, the important thing to know is that the form template is really a set of related files that define the way a form looks and acts.
A form template defines a lot of things, including:
-
The controls, labels, and instructional text that appear on the form.
-
The way that controls behave when users interact with them. For example, you might make a particular section appear when the user selects a check box and disappear when the user clears the check box.
-
Whether the form has additional views. For example, in an international organization, you might design different views of your form for different languages. Or you might design a print view that consolidates data from other views in the form.
-
How and where the data in a form is stored. For example, your form might let users submit data to a database, either directly or through the use of a Web service. Or you might have users save their form to a particular network server.
-
The fonts, colors, and other design elements that are used in the form.
-
Whether users can customize the form. For example, you might let users add extra rows to a repeating table, repeating section, or optional section.
-
Whether users are notified when they make mistakes in the form or forget to fill out a required field.
After you finalize the design of a form template, you make it available to others by publishing it as an .xsn file. For more information about publishing forms, refer to the links in the See Also section.
What users fill out: the form
In InfoPath, a form is a file that contains .xml data. Users either save a form as an individual .xml file or submit the .xml data in the form to a database or other location. To fill out a form, users must have InfoPath installed on their computers.
As previously mentioned, all InfoPath forms that users fill out are based on a form template, which determines how the form looks and acts.
To illustrate the relationship between a form template and a form, imagine that you've designed a status report form template and published it for the people in your department to use. Each status report that your coworkers fill out is a form. That form is just an .xml file that contains the data (and only the data) that's been entered into the form. All of the other things that make up the form are provided by the form template. This means that whenever you open a form in InfoPath, that form must locate and use the form template in order to function properly. Otherwise, when you opened a form you'd just be looking at Extensible Markup Language (XML) markup tags and data.
To link a form template and the forms that are based on it, InfoPath includes several lines of code, called processing instructions, at the top of each form file. This code links the form file to its associated form template.
Components of a form template
A form template is a single file that contains multiple supporting form files, such as files that define how controls in the form should appear, files for graphics that appear in the form, and programming files that enable custom behaviors in the form.

A form template might contain some or all of the following files.
| File type | File name extension | Description |
| Form definition file | .xsf | The file that contains information about how the form is put together, including the XML Schemas that it uses and the resource files it contains. InfoPath automatically generates this file when you design a new form template. As you design and modify the form template, the file is automatically updated to reflect your changes. |
| XML Schema | .xsd | The file or files that constrain and validate the data in a form. The contents of XML Schema files — that is, the elements, attributes, and so forth — are represented by groups and fields in the Data Source task pane. Each data source associated with a form template, including the main data source, has a corresponding .xsd file. |
| View | .xsl | The XSL Transformation (XSLT) files that are used to present, view, and transform into HTML the data contained in a form's underlying XML document files. When you work with the different views of a form, you are actually looking at different HTML representations (or transformations) of the form data. |
| XML template | .xml | The file that contains the data that you want to appear by default in specific controls. Users see this data when they first open a form and until they select different values in the controls. |
| Presentation | .htm, .gif, .bmp, and others | The files that are used to show custom task panes or pictures within the form template. |
| Business logic | .js, .vbs | The files that contain scripts for implementing specific form behavior. These script files are either Microsoft JScript or Microsoft Visual Basic Scripting Edition (VBScript) files. |
| Binary | .dll, .exe, .cab, and others | The external files that provide programming code and additional business logic. For example, if you create a custom ActiveX control for your form template, you might need a .cab file in order to automatically install and register that control on your users' computers. Binary files are not created in InfoPath, but in programs such as Microsoft Visual Studio .NET. |
In general, you should let InfoPath update the form files automatically, as you add or make changes to your form template. However, if you're experienced with XML, or if you're an advanced form designer, you can extract the individual form files and customize them by hand. For example, you might want to manually modify a set of form files in the following types of situations:
-
You want to reuse the form template's .xsd file in another Microsoft Office program. For example, you can add the InfoPath .xsd file to the Schema Library in Microsoft Office Word 2003. You can then map elements from the InfoPath .xsd file to the content of a document.
-
You want to create a toolbar in the form template that contains custom commands in addition to the built-in commands that come with InfoPath. In order to do this, you need to edit the form's .xsf file.
-
You want to make formatting-related enhancements to your form template that aren't available in InfoPath, such as adding a background image (.gif file) to a button. In order to do this, you need to edit the form's .xsl file.
Save a form template's form files to a folder
If you need to modify one of the form files that make up your form template (.xsn file), you can extract all of the form files to a folder and then customize one or more of the files.
-
In design mode, open the form template whose form files you want to save to a project folder.
-
On the File menu, click Extract Form Files.
-
In the Browse For Folder dialog box, select an existing folder in which to save the form files, or create a new folder.
InfoPath saves a copy of your .xsn file as a set of files inside the folder. You can tell that you're working on a copy of the form template and not the original by noting the name in the title bar, which reflects the name of the folder where you saved the files. From this point on, any changes that you make in InfoPath apply only to the files in the folder, and not to your original .xsn file. This helps prevent you from accidentally overwriting your original form template with unintended changes. To apply changes to the original .xsn file, you must combine the files back into a single .xsn file, and then overwrite the original file.
-
Edit the files in Microsoft Notepad or in another text-editing program.
Combine a set of form files into a single .xsn file
After you make changes to one or more form files, you typically combine them back into a single .xsn file.
-
In Microsoft Windows Explorer, right-click Manifest.xsf, and then click Design on the shortcut menu.
The form opens in InfoPath design mode.
Note: If you get an error message that prevents you from opening the file, review the changes that you made. If you modified an XML file, such as the .xsf file, make sure that there are no errors in the code. In the unlikely case that you can't fix the problem, you can always revert to your original .xsn file.
-
Test your form thoroughly to make sure that it still works as expected.
-
To overwrite your original .xsn file with the new changes, do one of the following:
-
To publish your form, click Publish on the File menu, and then follow the steps in the Publishing Wizard. When prompted, choose to overwrite the original form template.
-
To continue designing your original form, click Save As on the File menu. If prompted to save or publish, click Save. In the Save As dialog box, locate the original .xsn file, and then click Save. Note that from this point on, clicking Save updates the original .xsn file, not the files in the folder.
-
Note: In certain situations, you may decide not to combine the files that you extracted. For example, some form designers want to integrate the entire set of files into a source control system such as Microsoft Visual SourceSafe. They can then run a difference-reporting tool that detects and reconciles differences across versions of the same file, which helps when multiple developers are working on the same form. This type of difference-reporting isn't possible with the .xsn file type.
No comments:
Post a Comment