Select shapes
What do you want to do?
You usually need to select shapes before you can do other things, such as move, rotate, or resize shapes, in Microsoft Office Visio drawings. Visio provides several tools for selecting shapes. Knowing when to use each tool makes working with shapes easy.
Select one shape
To work with a shape, you first select it on the drawing page, and then perform your task: apply formatting, move the shape, align it, or add text, for example.
-
Click the Pointer tool on the Standard toolbar and then point to the shape on the drawing page you want to select.
-
When the pointer turns into a four-headed arrow, click the shape.
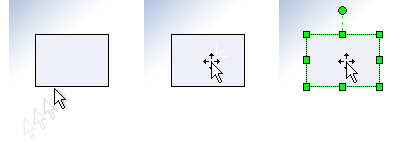
Green handles appear on the shape when you select it.
Note: You can resize shapes by dragging these handles, which are called selection handles on 2D shapes, and endpoints on 1D shapes. The green circle that appears above the shape is called the rotation handle — you can drag it to rotate the shape in any direction you want.
Select multiple shapes
When you want to move or format a number of shapes, you can select multiple shapes to work with them all at once. The method you use depends on several factors: the nature of the action you want to perform, which shape you want to be the primary shape, and how the shapes you want to select are arranged in your drawing—whether they are adjacent or scattered across the page.
You can select multiple shapes using any of the following methods:
Using the Area Select tool

Use the Area Select tool when you can easily draw a rectangular selection net around the shapes. (The selection net defines with a green line the area that encloses all the shapes to be selected.)
-
Click the down arrow next to the Pointer tool, and then click the Area Select tool.
-
Place the pointer above and to the left of the shapes you want to select, and then drag to create a selection net around the shapes.
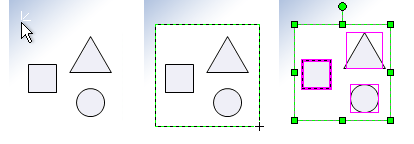
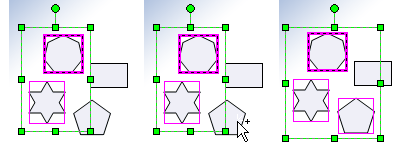
After you select the shapes, you'll see green selection handles around the shapes you selected and magenta lines around the individual shapes.
The primary shape has a thick magenta outline.
Using the Lasso Select tool

With the Lasso Select tool, you can select multiple shapes within a non-rectangular area.
-
Click the down arrow next to the Pointer tool, and then click the Lasso Select tool.
-
Drag a freeform selection net around the shapes you want to select.
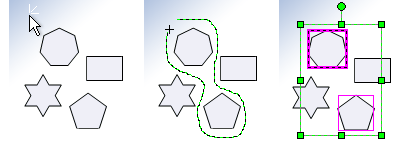
When you select multiple shapes, green selection handles appear around the selected shapes.
Tip: By default for both the Area Select and Lasso Select tools, the selection net must completely surround each shape for it to be selected. If you want more flexibility, you can widen the selection net so that shapes partially within it are also selected. To do this, on the Tools menu, click Options, and then on the General tab select the Select shapes partially within area check box.
Using the Multiple Select tool

With the Multiple Select tool you can add shapes to your selection. This tool gives you control over defining the primary shape.
For example, if you have shapes that are spaced close to one another, you can click a shape to make it the primary shape and then click additional shapes to add them to the selection.
-
Click the down arrow next to the Pointer tool, and then click the Multiple Select tool.
-
Click each shape you want to select.
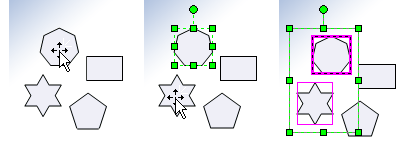
The first shape you selected is outlined with a thick magenta box and all the other shapes are outlined with thin magenta lines.
Note: When you use the Multiple Select tool and drag the mouse around shapes, the pointer acts like the Area Select tool.
Using keyboard shortcuts
You can hold down SHIFT or CTRL while clicking shapes to select multiple shapes one at a time.
You can also use these keys to add another shape to a current selection. For example, if you want to add a shape to a selection you created with the Area Select tool, you can hold down SHIFT or CTRL and then click the shape.
Select all the shapes on a page
If you are zoomed into a page and want to keep that close-up view, you can easily select all the shapes on a page without having to click the shapes one-by-one or drag a selection net around them.
Do one of the following:
-
On the Edit menu, click Select All.
-
Press CTRL+A.
When you select all the shapes on the page, the last shape you dropped on the page becomes the primary shape.
Select all of a particular kind of object
You can easily select all of a particular type of object, such as shapes, groups, or guides:
-
On the Edit menu, click Select by Type, and then check the type of object that you want to select, such as shapes, groups, or guides.
Deselect one or more shapes
If you inadvertently include more shapes in your selection than you want, you can easily deselect one or more shapes.
To deselect all shapes:
-
Click a blank area on your drawing or press ESC.
To deselect one shape when several are selected:
-
Press SHIFT and click a shape to cancel its selection.
Troubleshoot selection problems
If you are having trouble selecting shapes on your drawing page, the problem might be that the shapes are protected, or that they are grouped together.
Are the shapes protected?
If you can't select a shape, the shape might be protected against selection, which prevents you from deleting or applying any changes to it such as positioning, resizing, formatting, editing text, or rotating.
To remove protection against selection:
-
On the View menu, click Drawing Explorer Window.
-
Right-click the drawing file name, and then click Protect Document.
-
In the Protect Document dialog box, clear the Shapes check box, and then click OK.
If you can select a shape, but can't apply any changes to it, the shape might still be protected. If grey handle bars on the shape you select, the shape is locked against all changes.
To remove protection against all changes:
-
1. Select the shape, and then on the Format menu, click Protection.
-
2. Clear the check boxes that apply to the characteristics you want to change, and then click OK.
Are the shapes grouped together?
If you can select the shape, but you can't work with it as you expect, the shape might be a group. Shapes that are grouped together function as one unit. For example, if the shapes are grouped, you can change their color at the same time.
To find out if a shape is a group:
-
Select the shape and then click Special on the Format menu. If the shape Type is specified as Group, the shape is a group.
To select a shape within a group:
-
Select the group, and then on the Edit menu, click Open Group.
A window opens that displays the group of shapes. You can then select a shape and apply changes to it. When you are finished, close the window by clicking the Close button on the upper right corner of the window.
Tip: You can also select a shape within a group by clicking a group once, and then clicking a specific shape within the group.
No comments:
Post a Comment