Create a simple report by formatting a datasheet
When you open a table or view the results of a query, Microsoft Office Access 2007 displays the table or query result in Datasheet view. Table data or query results that are shown in Datasheet view are commonly referred to as a datasheet. You can customize the appearance of a datasheet to display specific data for use as a simple report.
What do you want to do?
Learn about datasheets
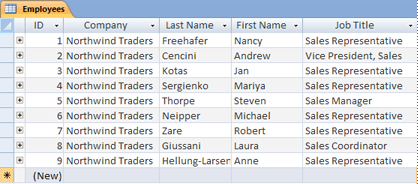
A datasheet is the visual representation of the data contained in a table, or of the results returned by a query. It displays the fields for each record from a table, form, or query result in a tabular (row and column) format, as shown here.
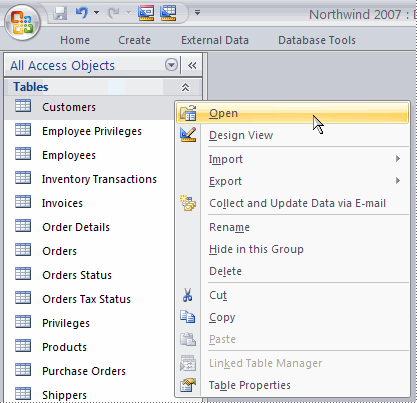
By default, tables and queries open in Datasheet view. In the Navigation Pane, right-click a table or query, and then click Open on the shortcut menu to open the table or query as a datasheet.
When you apply specific formats to rows and columns or add a Total row, a datasheet can also serve as a simple report.
Organize data by modifying and moving columns or rows
You can organize data to make the datasheet easier to view or to display only the required data at a particular time. This section shows you several ways in which you can accomplish this.
Resize columns or rows
Sometimes, not all of the columns in a datasheet will fit on your screen or printout, or individual columns may occupy more space than they need for their contents. In addition, you may want to change the height of the rows so that text that does not fit into a column can continue on a new line.
After you open a table, query, or form in Datasheet view, you can either manually resize the individual columns or automatically resize a column to fit its contents.
Manually resize a column
-
Position the pointer on the edge of the column that you want to resize.
-
When the pointer becomes a double-headed arrow, drag the edge of the column until it is the size that you want.

Automatically resize a column
-
To resize a column to best fit its contents, position the pointer on the edge of the column that you want to resize.
-
When the pointer becomes a double-headed arrow, double-click the edge of the column.

Resize multiple columns
-
To resize multiple columns at the same time, hold down the SHIFT key, select multiple adjacent columns, and then resize the selected columns. You can also select the entire datasheet and resize all the columns.
Resize rows
-
To resize rows, position the pointer between any two record selectors in the datasheet, and drag until the rows are the size that you want.
You cannot resize each row individually — when you resize a row, all of the rows are resized.

Resize rows to the default height
-
To resize rows to the default height, right-click a record selector, and then click Row Height on the shortcut menu.
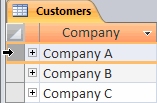
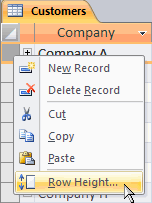
-
In the Row Height dialog box, select the Standard Height check box, and then click OK.
Note: You cannot undo changes to the width of a column or the height of rows by clicking the Undo button on the Quick Access Toolbar. To undo changes, close the datasheet, and then click No when you are prompted to save your changes to the layout of the datasheet. Clicking No will also undo any other layout changes that you made.
Move a column
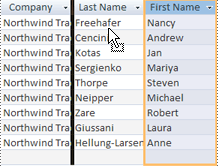
You can quickly change the order of the columns in a datasheet by dragging the columns to different locations within the datasheet. For example, you might do this to ensure that a specific column always remains in view.
-
Click the column header to select a column, or hold down the SHIFT key to select multiple adjacent columns, and then drag the column or columns to a new location.
Rename a column
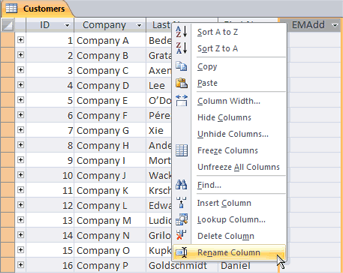
There might be occasions when you want to rename a column so that it better describes the data it contains. For example, if a column containing e-mail addresses is named EMAdd, you may want to make the column heading easier to understand by changing it to E-Mail Address. To do this, right-click the heading for the column, click Rename Column on the shortcut menu, and then type the new name. For example, type E-Mail Address.
Show or hide columns
If you want to display or print only certain columns for your simple report, you can hide the columns that you don't want displayed in a datasheet. For example, if you are working with a database of contact information, you may want to see only the full name and e-mail address for each contact. You can create this view by hiding all other columns.
Hide columns
-
Click the heading for the column that you want to hide.
To select adjacent columns, hold down SHIFT and click additional column headers.
Note: You cannot select nonadjacent columns. Select any additional columns and hide those separately.
-
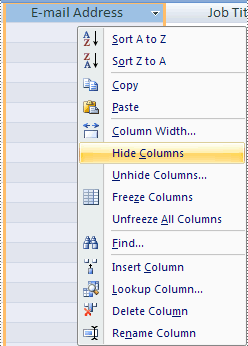
Right-click the column header, and then click Hide Columns on the shortcut menu.
Show columns
-
Right-click any column header, and then click Unhide Columns on the shortcut menu.
-
In the Unhide Columns dialog box, select the check box next to each column that you want to show, and then click Close.
Change the gridlines style and background color
When using a datasheet as a simple report, you can enhance the appearance of the data by changing the formats, such as the gridlines style or the background color, or by creating different colors for alternating rows.
Set the gridlines style
-
On the Home tab, in the Font group, click the arrow next to the Gridlines button.
-
Click the gridlines style that you want.

Set the background color
-
On the Home tab, in the Font group, click the arrow next to the Fill/Back Color button.
-
Click the background color that you want.

Change the background color of alternating rows
You can set the background color of alternating rows in a datasheet independent of the default background color. By setting an alternating background color, you can make it easier to distinguish between adjacent rows.
-
On the Home tab, in the Font group, click the arrow next to the Alternate Fill/Back Color button.

-
Click the background color that you want to apply.
Change the text format
After you open a table, query, or form in Datasheet view, you can change the appearance of the text, including the formatting. Note that your changes apply to the entire datasheet. If you want your changes to appear automatically the next time that you open the datasheet, remember to click Yes when you close the datasheet and are prompted to save the changes to the layout.
The following illustration shows the Font group on the Home tab. You use the commands in this group to make changes to font characteristics in the datasheet.

-
Click any cell in the datasheet.
-
On the Home tab, in the Font group, do one or more of the following:
-
To change the font, type or click a font in the Font box.
-
To change the font size, type or click a font size in the Font Size box.
-
To change the font style, click the Bold, Italic, or Underline button (or any combination of the three).
-
To change the font color, click the arrow next to the Font Color button, and then select a color from the palette.
-
Summarize data by adding a Total row
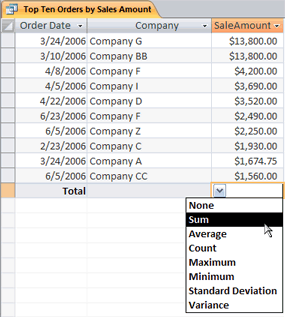
By adding a Total row to a datasheet, you can quickly see the calculated total for a column. In addition to summing a column of data, you can use the Total row to perform other calculations, such as finding averages, counting the number of items in a column, and finding the minimum or maximum value in a column of data.
To display the Total row, do the following:
-
On the Home tab, in the Records group, click Totals.
A new row appears at the bottom of the datasheet, with the word Total in the first column.
-
Click any cell that is on the same row as the cell that contains the word Total.
-
Click the arrow that appears, and then click the type of calculation that you want to display in that cell.
The list of functions or types of calculations that are available depends on the data type of the column. For example, if the column contains currency values, you see a list of functions that apply to currency calculations, such as Minimum and Maximum.
For more information about using the Total row feature, see the links in the See Also section.
Apply sorting and filtering
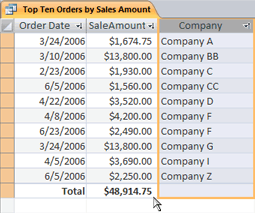
There are some additional quick changes that can make your datasheet easier to view or print. For example, in the following illustration, the company names are sorted alphabetically.
-
To apply sorting, right-click the column (or click the arrow in the column header), and then click the sorting option you want.
-
To apply a filter, click the arrow in the column header and select the check boxes for the values you want to display. Alternatively, you can click Text Filters or Number Filters to create more detailed filters.
Save your layout changes
After you change the layout and appearance of a datasheet, you need to save the changes if you want to keep the changes the next time that you open the datasheet. When you close a datasheet after you make changes to its layout, you are prompted to save those changes. If you click Yes, the changes are saved and applied the next time that you open the datasheet. If you click No, the changes are discarded, and the datasheet opens with the default layout settings (or the last saved settings) the next time that you open it.
No comments:
Post a Comment