Animate text and objects with motion paths in PowerPoint for Mac
You can add visual interest and emphasis to your presentation by animating a graphic or block of text so that it follows a set path on the slide.
Choose a predefined path and modify it to fit your needs, or draw your own custom path animation:
Using predefined paths
In most cases, using one of the basic path animations is a perfect choice for adding interest to your slide. In the following example, we'll apply a Turn path animation to a graphic, use Effect Options to change the direction of the path, and then we'll use Reverse Path Direction to get the final look we want.
Example: applying a predefined path animation to a graphic
-
On a blank slide, click Insert > Shapes > Rectangle (or another shape if you prefer), and then click in the upper-left corner of the slide to insert it.
-
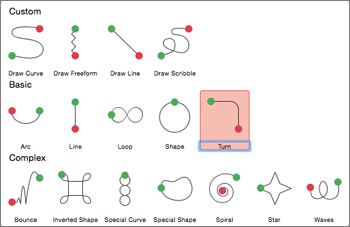
With the rectangle still selected, click Animations > Path Animation, and then under Basic, click Turn.

-
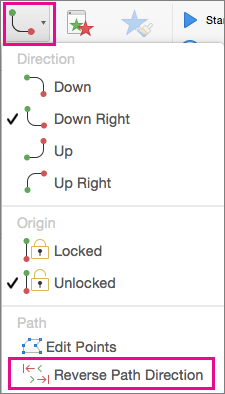
After the animation preview is finished and click Effect Options on the Animations tab, and then click Down Right.
-
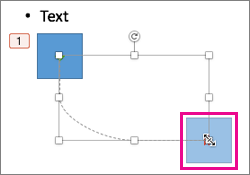
Move your cursor over the animation end-point until it changes to a double arrow with a line through it, and then click and drag to the lower-right corner of the slide.

-
Finally, click Effect Options > Reverse Path Direction.

The animation now moves the graphic from the least visible place on the slide (lower right) to the most visible (upper left).
Using custom paths
To draw a custom path animation, select the object you want to animate and click Animations > Path Animations, and then select an option under Custom. The drawing method is different depending on the type of path you choose.
If you selected a Curve or Freeform path: 
-
Click the start point, and then click each time you want to begin a change of direction.
-
Double-click to finish.
If you selected a Line or Scribble path: 
-
Click and hold the mouse button to trace the shape you want, and then release the button when you're done.
To change a custom path once you've drawn it:
-
Control+click or right-click the custom path and click Edit Points.

Tip: If you've never worked with editing paths in a graphics program before, you may find it easier to delete the effect and draw it again.
What do you want to do?
Apply a motion path to an object or text
Adjust the path of the animation
Reverse the direction of the motion path
Move the motion path on the slide
Apply a motion path to an object or text
-
Select the text or object that you want to apply an animation effect to.
-
On the Animations tab, under Motion, click Paths, and then under Basic or Complex, click the type of motion path that you want.

Tips:
-
The arrows that show the motion path when you are editing the animation are not visible to your audience during the slide show.
-
To preview all animation effects on the slide, on the Animations tab, under Preview, click Play.
-
Draw a custom motion path
-
Select the text or object that you want to apply an animation effect to.
-
On the Animations tab, under Motion, click Paths, and then click Draw Curve, Draw Freeform, Draw Line, or Draw Scribble.

-
To draw the motion path that you selected, do one the following:
| To | Do this |
| Draw a curve | Click the position on the slide where you want to start the path, and then move the pointer along a line. Click wherever you want a curve apex in the path. Double-click at any point to stop drawing the path. |
| Draw a freeform path that includes straight lines | Click the position on the slide where you want to start the path, move the pointer in a direction to draw a straight line, and then click at any point that you want to create a corner. Or, click and then hold down the mouse as your move the mouse in any direction to draw a path that appears hand-drawn. Click wherever you want to change between these drawing methods. Double-click at any point to stop drawing the path. |
| Draw a line | Click the position on the slide where you want to start the path, hold down the mouse button, and then drag the pointer in a direction to draw a straight line. Release the mouse button to stop drawing the path. |
| Draw a path that appears hand-drawn, or scribbled | Click the position on the slide where you want to start the path, hold down the mouse button, and then drag the pointer in any direction. Release the mouse button to stop drawing the path. |
Tips:
-
If you want the curve or freeform path to finish where it started (referred to as "closing" the path), click the starting point of the path to stop drawing the path, instead of double-clicking or releasing the mouse button.
-
To preview all animation effects on the slide, on the Animations tab, under Preview, click Play.
Adjust the path of the animation
-
In the navigation pane, select the slide that contains the animation effect that you want to change, and then click the Animation tab.
How to select slides in the navigation pane
-
On the View menu, click Normal.
-
In the top of the navigation pane, click the Slides
 tab, and then click a slide. Depending on the width of the navigation pane, you will either see the
  and
and  named tabs or the Slides
  and Outline
  icon tabs.
-
-
On the slide, select the animation effect that you want to change.
Tips:
-
Each animation effect is represented on the slide by a number
 next to the object, which indicates the order that it will play in. If two animation effects are set to play at the same time, they are represented by a numbered stack
  .
. -
To select an animation effect that is in a numbered stack
 , you must view the full list of animation effects on the slide. On the Animations tab, under Animation Options, click Reorder, and then click the animation that you want.
-
-
On the Animations tab, under Animation Options, click Effect Options, and then click Edit Points.

-
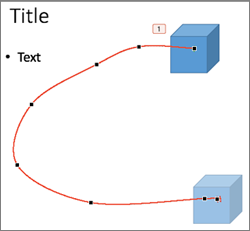
Drag an edit point on the path animation to adjust the shape.
Tip: To preview all animation effects on the slide, on the Animations tab, under Preview, click Play.
Reverse the direction of the motion path
-
In the navigation pane, select the slide that contains the animation effect that you want to change, and then click the Animation tab.
How to select slides in the navigation pane
-
On the View menu, click Normal.
-
In the top of the navigation pane, click the Slides
 tab, and then click a slide. Depending on the width of the navigation pane, you will either see the
  and
and  named tabs or the Slides
  and Outline
  icon tabs.
-
-
On the slide, select the animation effect that you want to change.
Tips:
-
Each animation effect is represented on the slide by a number
 next to the object, which indicates the order that it will play in. If two animation effects are set to play at the same time, they are represented by a numbered stack
  .
. -
To select an animation effect that is in a numbered stack
 , you must view the full list of animation effects on the slide. On the Animations tab, under Animation Options, click Reorder, and then click the animation that you want.
-
-
On the Animations tab, under Animation Options, click Effect Options, and then click Reverse Path Direction.

Tip: To preview all animation effects on the slide, on the Animations tab, under Preview, click Play.
Close or open the path
A motion path is "closed" if the path ends where it started. A motion path is "open" if it ends in a different location than where it started.
-
In the navigation pane, select the slide that contains the animation effect that you want to change, and then click the Animation tab.
How to select slides in the navigation pane
-
On the View menu, click Normal.
-
In the top of the navigation pane, click the Slides
 tab, and then click a slide. Depending on the width of the navigation pane, you will either see the
  and
and  named tabs or the Slides
  and Outline
  icon tabs.
-
-
On the slide, select the animation effect that you want to change.
Tips:
-
Each animation effect is represented on the slide by a number
 next to the object, which indicates the order that it will play in. If two animation effects are set to play at the same time, they are represented by a numbered stack
  .
. -
To select an animation effect that is in a numbered stack
 , you must view the full list of animation effects on the slide. On the Animations tab, under Animation Options, click Reorder, and then click the animation that you want.
-
-
Do any of the following:
| To | Do this |
| Open a closed path | Hold down CONTROL , click the motion path on the slide, and then on the shortcut menu, click Open Curve. |
| Close an open path | Hold down CONTROL , click the motion path on the slide, and then on the shortcut menu, click Close Curve. |
To preview all animation effects on the slide, on the Animations tab, under Preview, click Play.
Move the motion path on the slide
-
In the navigation pane, select the slide that contains the animation effect that you want to change, and then click the Animation tab.
How to select slides in the navigation pane
-
On the View menu, click Normal.
-
In the top of the navigation pane, click the Slides
 tab, and then click a slide. Depending on the width of the navigation pane, you will either see the
  and
and  named tabs or the Slides
  and Outline
  icon tabs.
-
-
On the slide, select the animation effect that you want to change.
Tips:
-
Each animation effect is represented on the slide by a number
 next to the object, which indicates the order that it will play in. If two animation effects are set to play at the same time, they are represented by a numbered stack
  .
. -
To select an animation effect that is in a numbered stack
 , you must view the full list of animation effects on the slide. On the Animations tab, under Animation Options, click Reorder, and then click the animation that you want.
-
-
Rest the pointer over the motion path until it becomes a
 , and then drag the motion path to the new location.
To preview all animation effects on the slide, on the Animations tab, under Preview, click Play.
Microsoft Office Tutorials: Animate Text And Objects With Motion Paths In Powerpoint For Mac >>>>> Download Now
ReplyDelete>>>>> Download Full
Microsoft Office Tutorials: Animate Text And Objects With Motion Paths In Powerpoint For Mac >>>>> Download LINK
>>>>> Download Now
Microsoft Office Tutorials: Animate Text And Objects With Motion Paths In Powerpoint For Mac >>>>> Download Full
>>>>> Download LINK ZA