Use a Whiteboard in a Lync Meeting
A Whiteboard is a blank page that you can use to work together with other meeting participants by being able to type notes, draw, or import images.
When your meeting is over, you can save the Whiteboard with the data from the participants' collaboration.
Important: For Lync 2013, after applying the March 10, 2015 update for Lync 2013, users will only be able to view who modified the Text Annotation on the Whiteboard. This is different from the behavior in Lync 2010. The user can click on the text annotation and a box will be displayed that identifies who created and modified that text annotation. Other types of annotations do not display who created or modified the object on the Whiteboard.
Notes: To learn about the other presentation options and Skype for Business (Lync) Meeting room features, including your options for audio, video, participants, and layouts, do one of the following:
Open a new Whiteboard
-
Pause on the present (monitor) icon, and then click Whiteboard under the Present tab.
-
A blank Whiteboard opens on the meeting stage on everyone's screen.
-
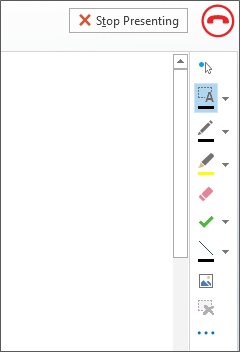
The annotation tool set opens automatically on the right side of the Whiteboard.
-
Click any of the tools to annotate on the Whiteboard, such as: Pointer tool, Pen, Highlighter, Eraser, and so on.
The Whiteboard closes automatically if you switch to another presenting option, but will be available in the Presentable Content window if you want to open it later in the meeting.
Just pause on the presentation (monitor) icon, and click Manage Presentable Content to access the Whiteboard again.

Use the annotation tools
Use the tools along the side of the Whiteboard to visually focus on the page or brainstorm with the participants. Many people can work on the Whiteboard at the same time, but each tool can be used only by one person at a time.
-
Laser Pointer: a virtual laser pointer. Click and drag the pointer across the page. A blue circle appears in the meeting indicating your name.
-
Select and Type: selects an area to type. You can change font, size, and color by clicking the arrow next to the Select and Type to open the menu.
-
Pen: draws freehand. Click and start writing or drawing in black, or click the down arrow next to the button, and then select another color.
-
Highlighter: highlights a specific area of the current slide.
-
Eraser: removes specific annotation you choose.
-
Stamp: inserts a stamp on the page: Arrow, Check, or X. Choose an option from the menu, then click on the Whiteboard to stamp.
-
Shape: draws shapes such as lines, arrows and squares. Click the down arrow next to the button to select another shape or color.
-
Insert Picture: inserts an image on the slide from your computer.
-
Delete Selected Annotation: removes the annotations that you've selected.
-
More options: provides options to select the annotation, undo, redo, copy, cut, paste, paste as image, Save as, and Send to One Note.
Move or delete drawings
You can select, then move or delete any of the drawings on the Whiteboard.
Move objects
-
Click the Select and Type button, and then click one or multiple drawings that you want to move.
A selection rectangle appears around the selected object(s). -
Drag the rectangle to a new position.
Note: For typed text, point to the bar at the top of the text box before you begin dragging it.
Delete an object
-
Click the Select and Type button, and then select the drawing that you want to delete.
-
Press Delete on your keyboard.
Who added or changed content?
To see who added or changed content on the Whiteboard, do one of the following:
-
For non-text items on the Whiteboard, hold the mouse pointer over the drawing to see "Created by" and "Last modified by" information.
-
For text, point at the text, and then hold the mouse over the solid rectangle that appears above the text when you point at it.
Manage your Whiteboard
-
Pause on the presentation (monitor) icon, and then click Manage Presentable Content.
-
Click the Permissions menu and choose who can download the Whiteboard to their computer:
-
Organizer Only the person who scheduled the meeting can download.
-
Presenters Any of the presenters in the meeting can download.
-
Everyone Anyone in the meeting can download.
-
Click the More menu and choose an option: Save As, Send to OneNote, or Rename.
No comments:
Post a Comment