Download and install custom fonts to use with Office
Most applications (such as Microsoft Word, Excel, and PowerPoint) include fonts that are automatically installed when you install the software. For example, applications that are created especially for document design projects, such as Microsoft Publisher, often come with quite a few extra fonts that you can use with any other program on your computer.
However, sometimes you may want to install custom fonts that you've created, purchased or downloaded from somewhere else. In this article we'll talk about how to install those fonts so you can use them in Microsoft Office.
Note: To embed fonts in a Microsoft Office Word document or PowerPoint presentation, see Embedding fonts on the PPTools site.
Locate custom fonts on the Web
In addition to acquiring and using fonts installed with other applications, you can download fonts from the Internet. Some fonts on the Internet are sold commercially, some are distributed as shareware, and some are free. The Microsoft Typography site site provides links to other font foundries (the companies or individuals outside of Microsoft who create and distribute fonts) where you can find additional fonts.
After you find a font that you would like to use with an Office application, you can download it and install it through the operating system that you are currently using on your computer. Because fonts work with the operating system, they are not downloaded to Office directly. You should go through the system's Fonts folder in Windows Control Panel and the font will work with Office automatically. On the Mac you use the Font Book to add the font and then copy it to the Windows Office Compatible folder.
Many third parties outside of Microsoft package their fonts in .zip files to reduce file size and to make downloading faster. If you have downloaded a font that is saved in .zip format double-click the zip file to open it.
Install a custom font you have downloaded
Once you've downloaded the font you want to install you need to install it in the operating system. Once the font is properly installed in the operating system Microsoft Office will be able to see and use it. For detailed instructions select the operating system you're using from the drop-down box below.
- Select your operating system
- Windows 7, 8 or 10
- Windows Vista
- Windows XP
- Mac
-
Find the font file that you downloaded, keeping in mind that it may be contained within a .zip file. It's probably located in your downloads folder.
-
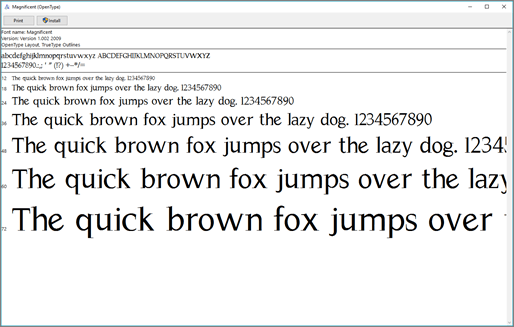
Double-click the font file to open it in the Font Previewer

-
If you're satisfied that this is the font you want, click Install at the top left.

-
Close the Font Previewer, and open your Office program. You should now see your new font included on the font list.
-
Go to Control Panel, and then click Fonts.
-
Right-click anywhere inside the folder, then click Install New Font.
-
Do one of the following:
-
To install a font from your computer disk drive, in the Add Fonts dialog box, in the list box containing Drives list box, select the folder that contains the new font files.
-
To install a font from a network drive, click Network, and then specify the drive and folder from which you want to install the font.
Note: The font files may be in different formats like Type 1, True Type, or Open Type. If the fonts you have selected has font files in these formats, it will be listed under the title List of Fonts.
-
-
Click Install, and then click Close.
-
On the Start menu, click Control Panel.
-
In Control Panel, double-click Fonts.
-
On the File menu, click Install New Font.
-
Locate the downloaded or unzipped font, and then in the List of Fonts box, click the font that you want to add.
-
Click OK.
-
Find the font file you downloaded - it likely has a .ttf or .otf extension and it's probably in your downloads folder. Double-click on it.
Note: If the font file has a .zip extension you need to open that .zip file and open the font file from there.
-
It will open in the font previewer. Click Install Font. It will open in the Font Book.
-
In Font Book, drag and drop the font to Windows Office Compatible to make it available to Microsoft Office.
Sharing files that contain non-standard fonts
When you install a custom font, each font will work only with the computer you've installed it on. Custom fonts that you've installed on your computer might not display the same way on a different computer. Text that is formatted in a font that is not installed on a computer will display in Times New Roman or the default font.
Therefore, if you plan to share Microsoft Office Word, PowerPoint, or Excel files with other people, you'll want to know which fonts are native to the version of Office that the recipient is using. If it isn't native, you may have to embed or distribute the font along with the Word file, PowerPoint presentation, or Excel spreadsheet. For more information about this see Fonts that ship with different versions of Office.
No comments:
Post a Comment